
In a previous post, I shared a comprehensive guide on implementing Incremental Data Refresh in Power BI Desktop. We covered essential concepts such as truncation and load versus incremental load, understanding historical and incremental ranges, and the significant benefits of adopting incremental refresh for large tables. If you missed that post, I highly recommend giving it a read to get a solid foundation on the topic.
Now, let’s dive into Part 2 of this series where we will explore tips and tricks for implementing Incremental Data Refresh in more complex scenarios. This blog follows up on the insights provided in the first part, offering a deeper understanding of how Incremental Data Refresh works in Power BI. Whether you’re a seasoned Power BI user or just getting started, this post will provide valuable information on optimising your data refresh strategies. So, let’s begin.
When we publish a Power BI solution from Power BI Desktop to Fabric Service, we upload the data model, queries, reports, and the loaded data into the data model to the cloud. In essence, the Power Query queries, the data model and the loaded data will turn to the Semantic Model and the report will be a new report connected to the semantic model with Connect Live storage mode to the semantic model. If you are not sure what Connect Live means, then check out this post where I explain the differences between Connect Live and Direct Query storage modes.
The Publish process in Power BI Desktop makes absolute sense in the majority of Power BI developments. While Power BI Desktop is the predominant development tool to implement Power BI solutions, the publishing process is still not quite up to the task, especially on more complex scenarios such as having Incremental Data Refresh configured on one or more tables. Here is why.
As explained in this post, publishing the solution into the service for the first time does not create the partitions required for the incremental refresh. The partitions will be created after the first time we refresh the semantic model from the Fabric Service. Imagine the case where we successfully refreshed the semantic model, but we need to modify the solution in Power BI Desktop and republish the changes to the service. That’s where things get more complex than expected. Whenever we republish the new version from Power BI Desktop to Fabric Service, we get a warning that the semantic model exists in the target workspace and that we want to Overwrite it with the new one. In other words, Power BI Desktop currently does not offer to apply the semantic model changes without overwriting the entire model. This means that if we move forward, as the warning message suggests, we replace the existing semantic model and the created partitions with the new one without any partitions. So the new semantic model is now in its very first stage and the partitions of the table(s) with incremental refresh are gone. Of course, the partitions will be created during the next refresh, but this is not efficient and realistically totally unacceptable in production environments. That’s why we MUST NOT use Power BI Desktop for republishing an already published semantic model to avoid overriding the already created tables’ partitions. Now that Power BI Desktop does not support more advanced publishing scenarios such as detecting the existing partitions created by the incremental refresh process, let’s discuss our other options.
Alternatives to Power BI Desktop to Publish Changes to Fabric Service
While we should not publish the changes from Power BI Desktop to the Service, we can still use it as our development tool and publish the changes using third-party tools, thanks to the External Tools support feature. The following subsections explain using two tools that I believe are the best.
Publishing (Deployment) Data Model Changes with ALM Toolkit #
The ALM Toolkit is a free community tool built by the amazing Christian Wade. After downloading and installing ALM Toolkit, the tool registers itself as an external tool accessible within the Power BI Desktop. The following steps explain how to publish the changes.
The “ALM” part of the tool’s name refers to Application Lifecycle Management. This tool primarily focuses on easing the challenges associated with managing Power BI projects across different stages of their lifecycle. ALM Toolkit simply compares a source data model with the selected destination. It is capable of detecting the created partitions on the Service and keeping them intact while applying the changes made in the Power BI Desktop to the destination Semantic Model in the Service.
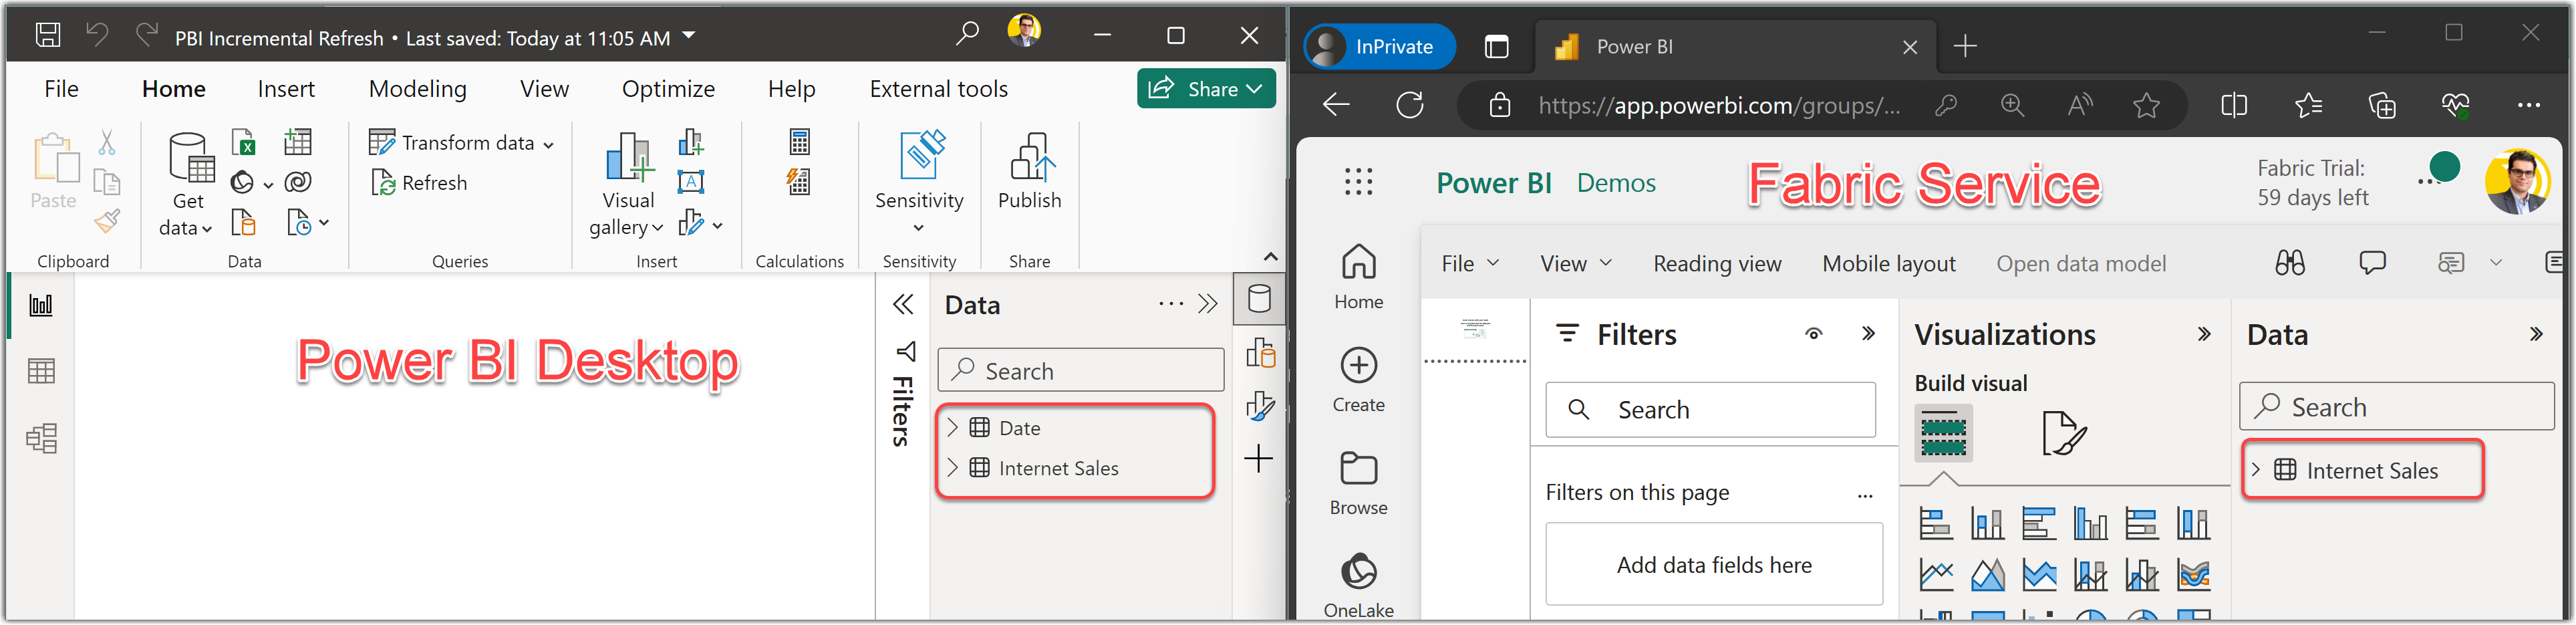
The left side of the following image shows a modified data model where we added the Date table and on the right, we see the already published semantic model in Fabric without the Date table.
We now want to compare the two in ALM Toolkit and apply the changes to the semantic model on Fabric. To do so, we need to copy the Workspace connection from the Workspace settings. The following steps explain how to get the Workspace connection:
- After you log in to Fabric, navigate to the desired Premium Workspace
- Click the Workspace settings
- Click the Premium tab
- Scroll down to find the Workspace connection at the bottom of the pane and copy the link
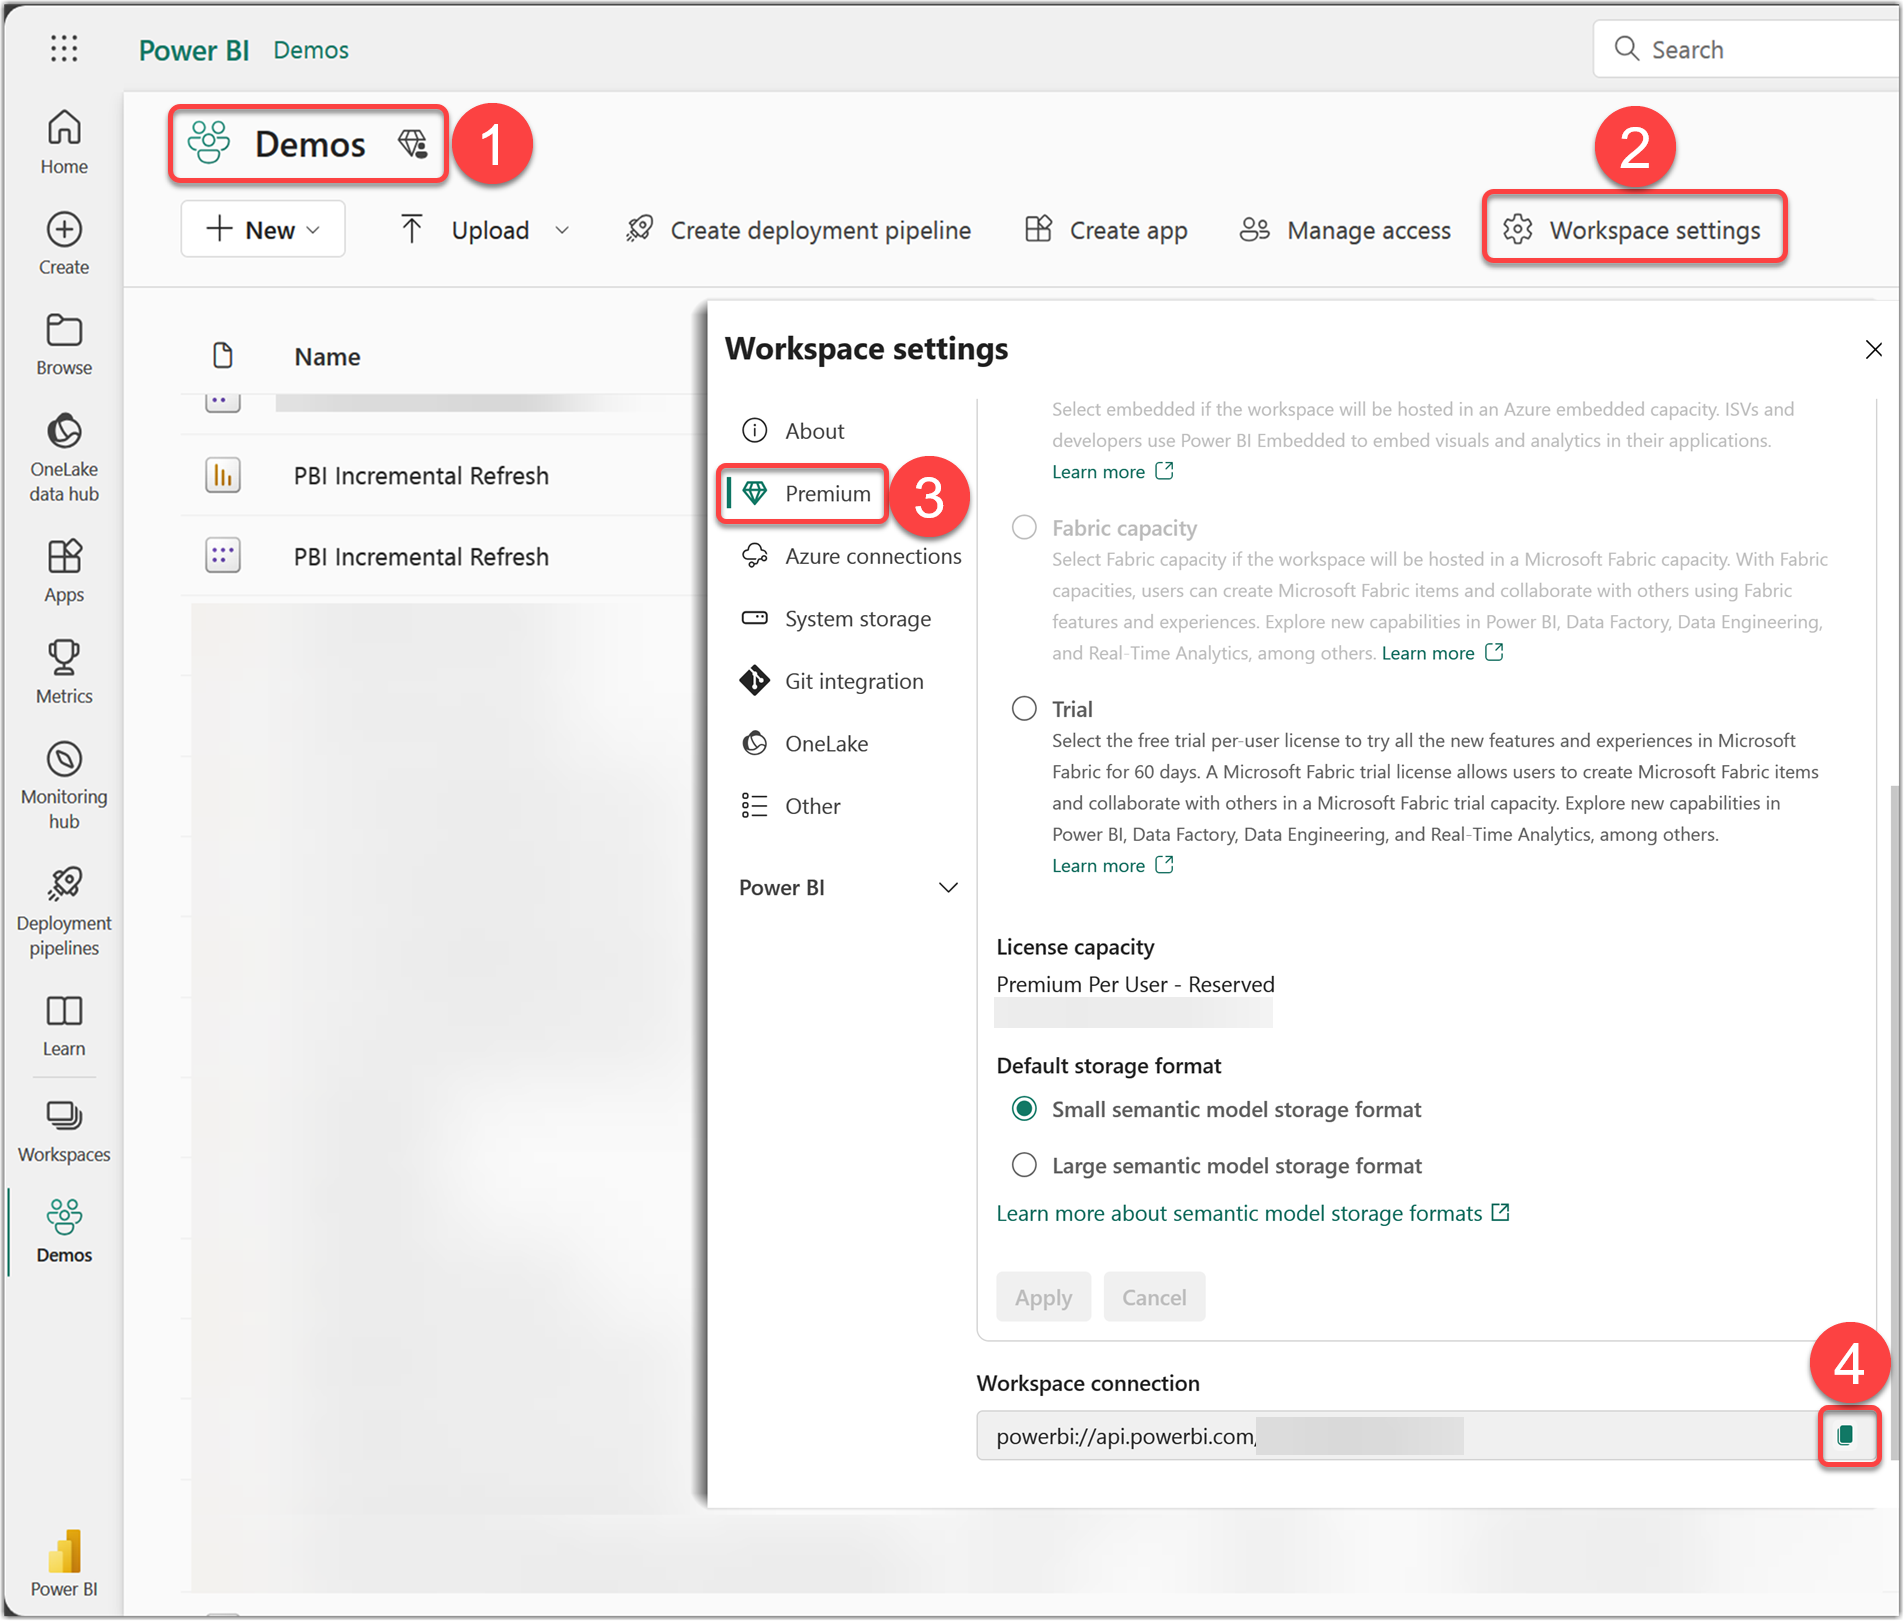
Keep this link as we will use it in the next section.
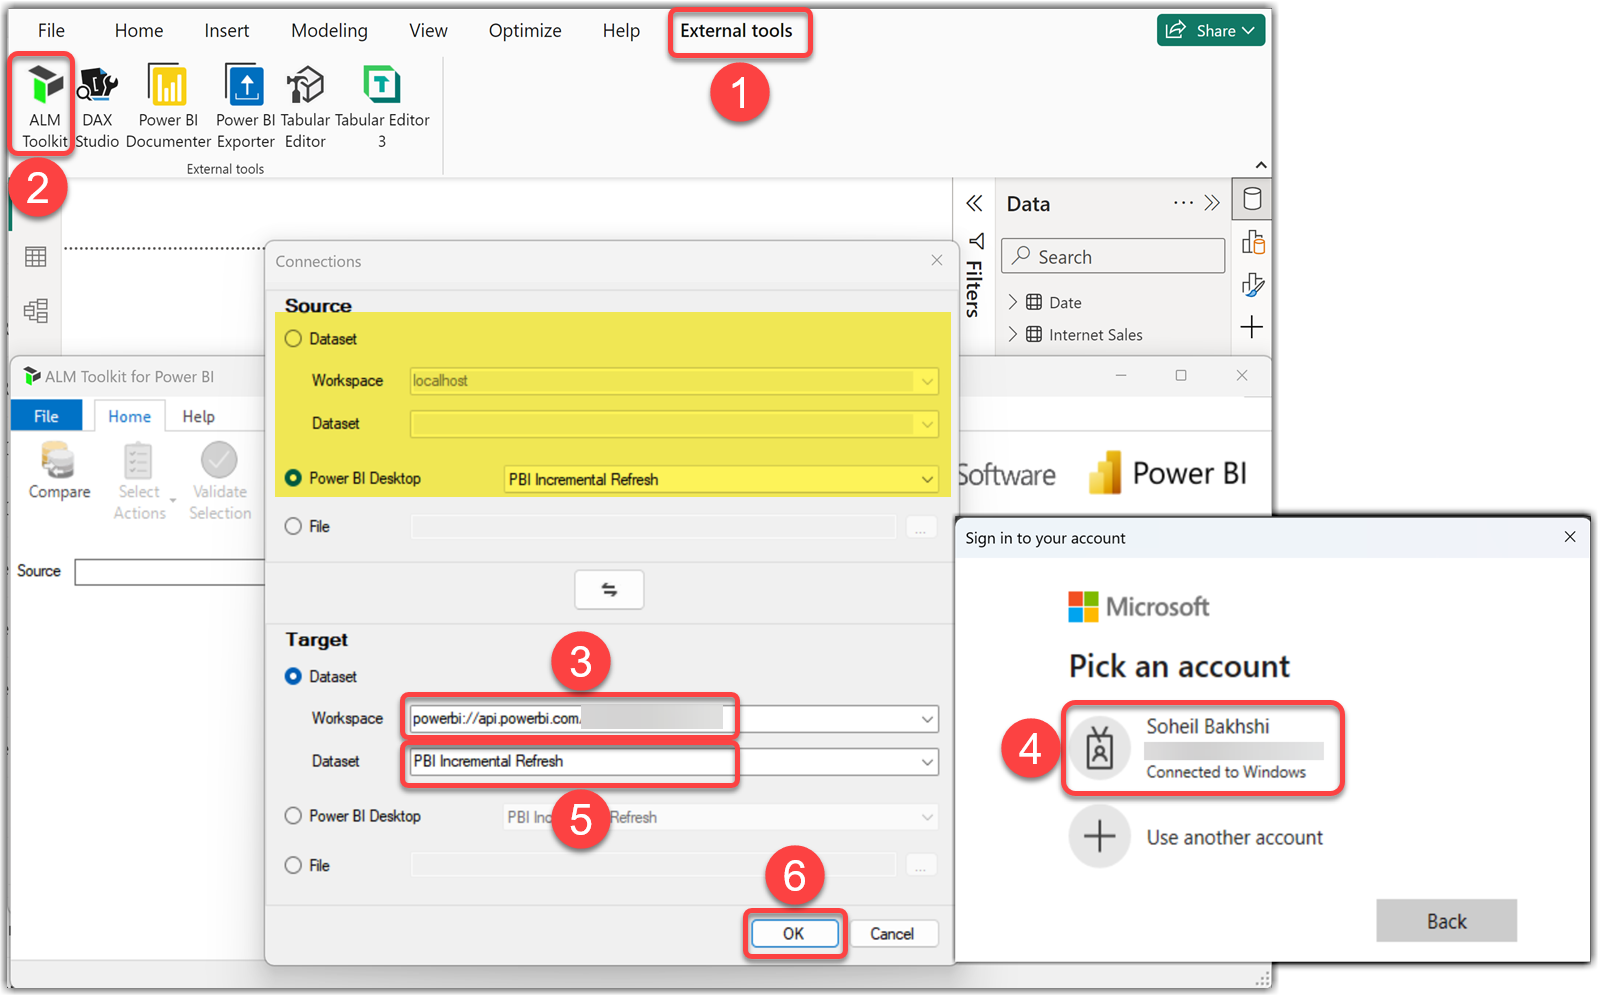
The following steps explain how to use the ALM Toolkit to compare the changes made in a local model from the Power BI Desktop with the existing Semantic Model in the Fabric Service:
- Select the External tools tab
- Click the ALM Toolkit to open the tool which automatically connects to the local Power BI Desktop instance as the Source
- On the Target section, paste the Workspace connection copied earlier on the Workspace textbox
- Pass your credentials
- Click the dropdown to select the desired Dataset
- Click OK
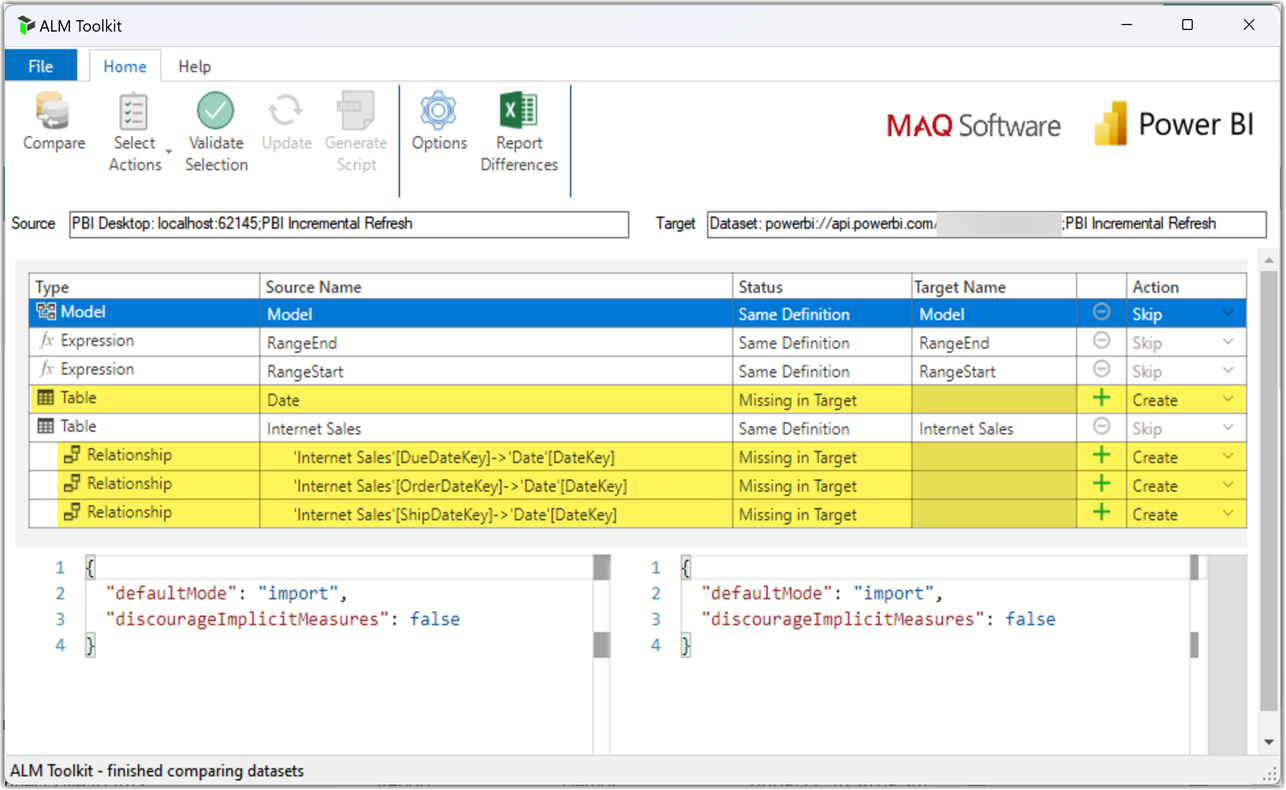
At this point, ALM Toolkit compares the two data models and reveals the changes. As the following image shows, it detected the new Date table and three new relationships added to the local model that do not exist on the target. We can decide which changes we want to apply to the target by changing the value of the Action. We leave the default action to Create.
Let’s continue following the required steps as follows:
- Click the Validate Selection button
- Review the changes and click the OK button
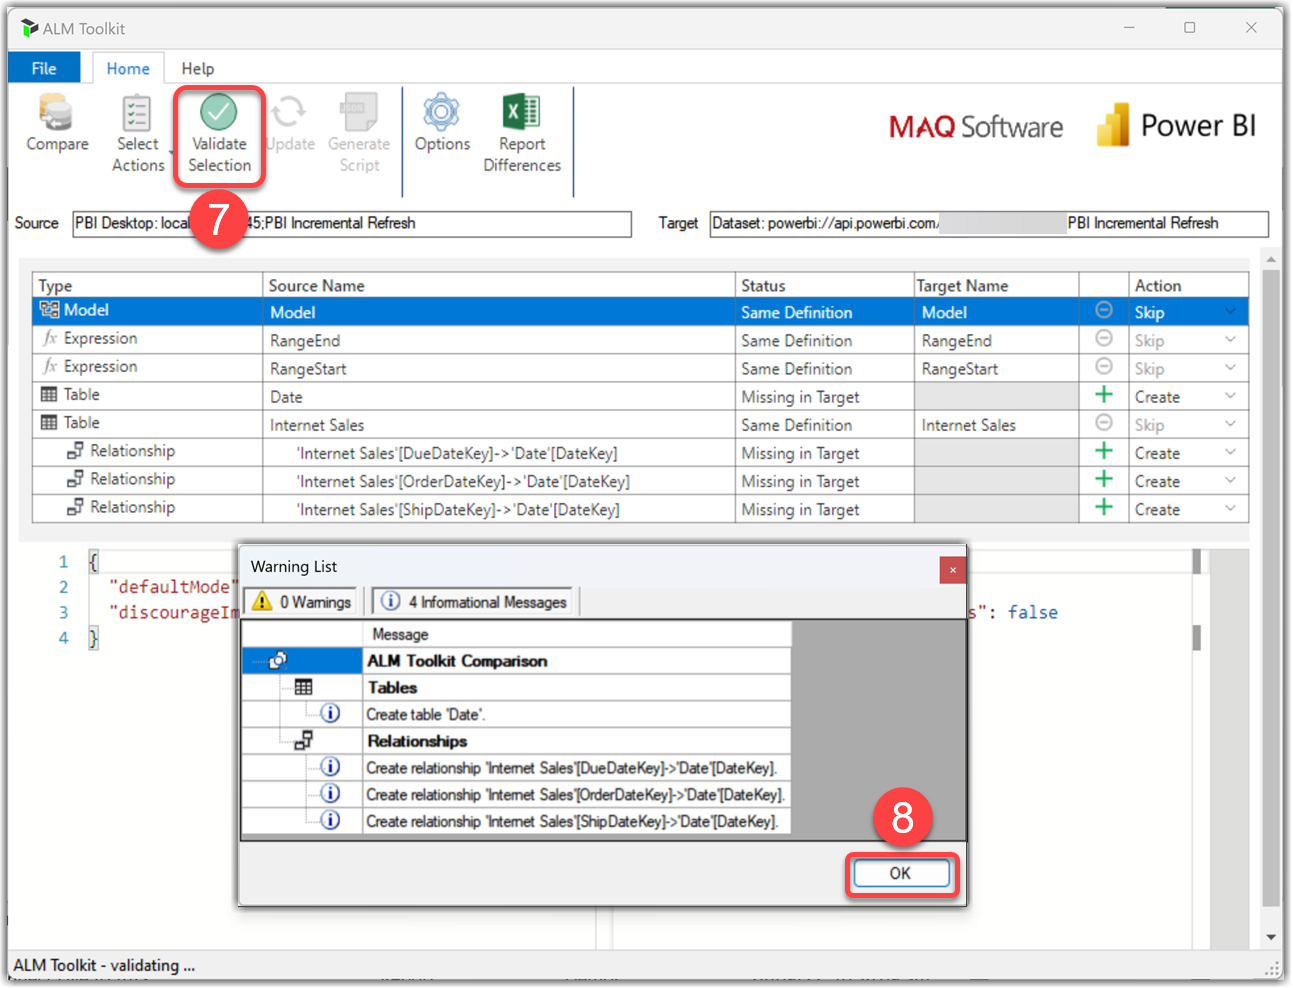
- Click the Update button
- Click Yes on the warning message
The ALM Toolkit now publishes the changes and shows the progress on the Deployment window.
- Click the Close button
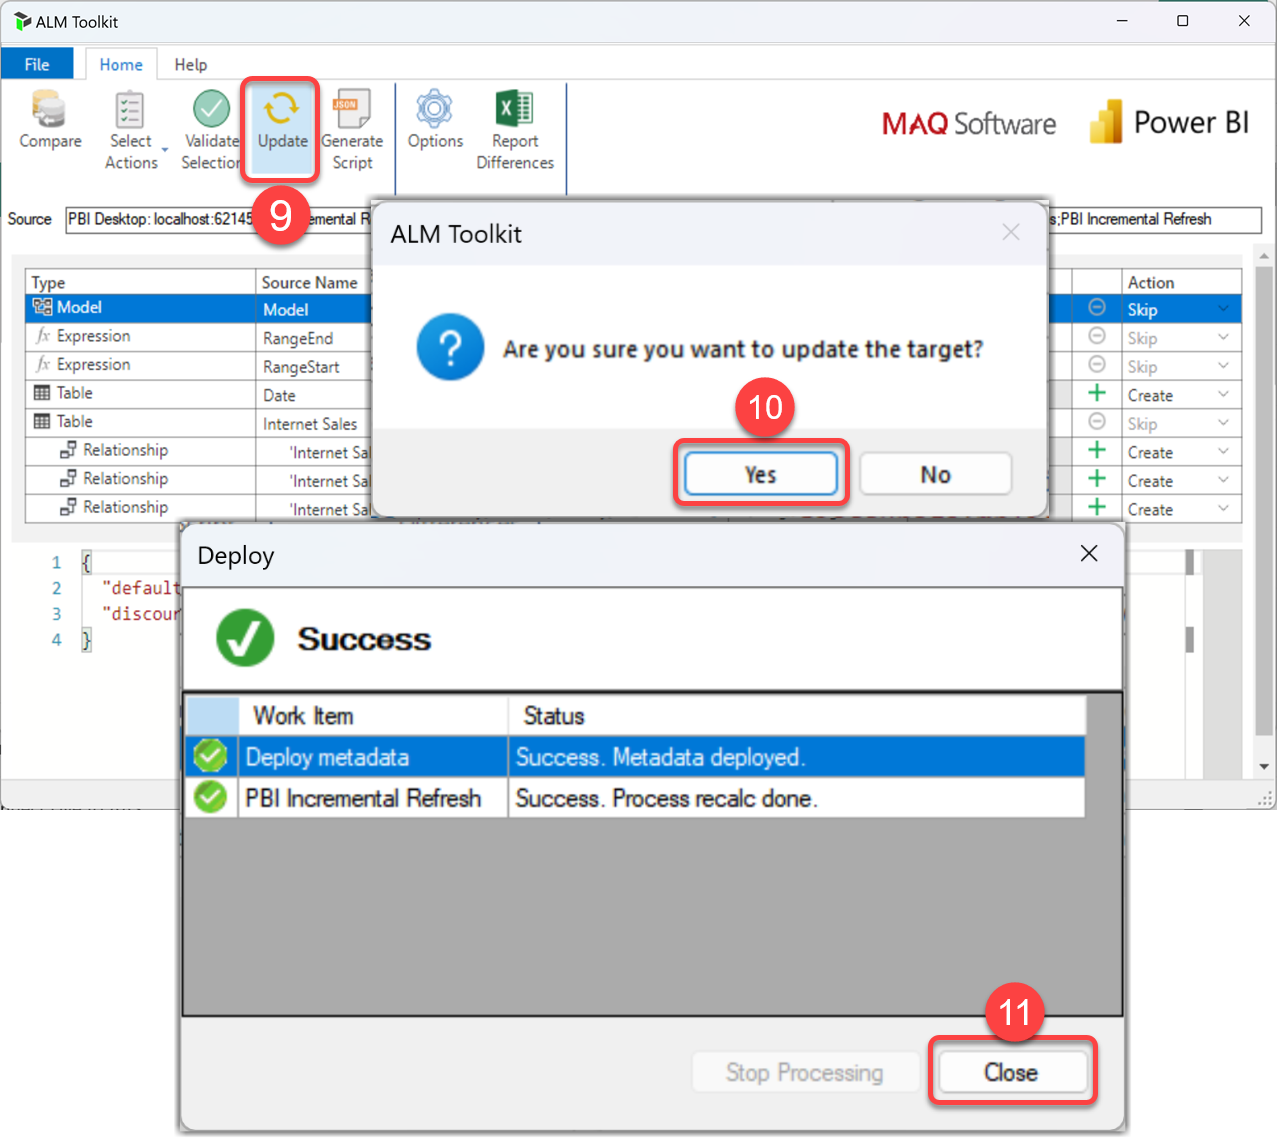
At this stage, all the selected changes have been published to the Semantic Model on Fabric. ALM Toolkit gives us the option to refresh the comparison afterward.
Note
This process only published the new changes to the Service. These changes include publishing the metadata, therefore, on the Semantic Model on the Service the new Date table and the three relationships must be added, but at this stage, the Date table is still empty. Hence we need to refresh the Semantic Model to capture the Date data from the source.
Publishing (Deployment) Data Model Changes with Tabular Editor #
Without a doubt, Tabular Editor is one of the most useful third-party tools available to Power BI developers created by the amazing Daniel Otykier. This tool comes in two different license categories, Tabular Editor v2.x and v3.x which have substantial differences. Tabular Editor v2.x is a free and open-source tool that lets you manipulate and manage measures, calculated columns, display folders, perspectives, and translations in either SQL Server Analysis Services (SSAS) Tabular and Power BI Sematic Models. Tabular Editor 3.x on the other hand, is a commercial tool that offers a premium experience with many convenient features to combine all your data modelling and development needs in one single tool. While Tabular Editor v2.x is free of charge, it does not have the advanced features of Tabular Editor v3.x. Therefore, the choice between the two versions depends on the needs and preferences of the user. For the purpose of this post, we only use Tabular Editor v2.x to publish the changes made to our local data model in Power BI Desktop to the Semantic Model published to Fabric. You need to download and install the desired version of Tabular Editor which will register it as an External Tool in the Power BI Desktop.
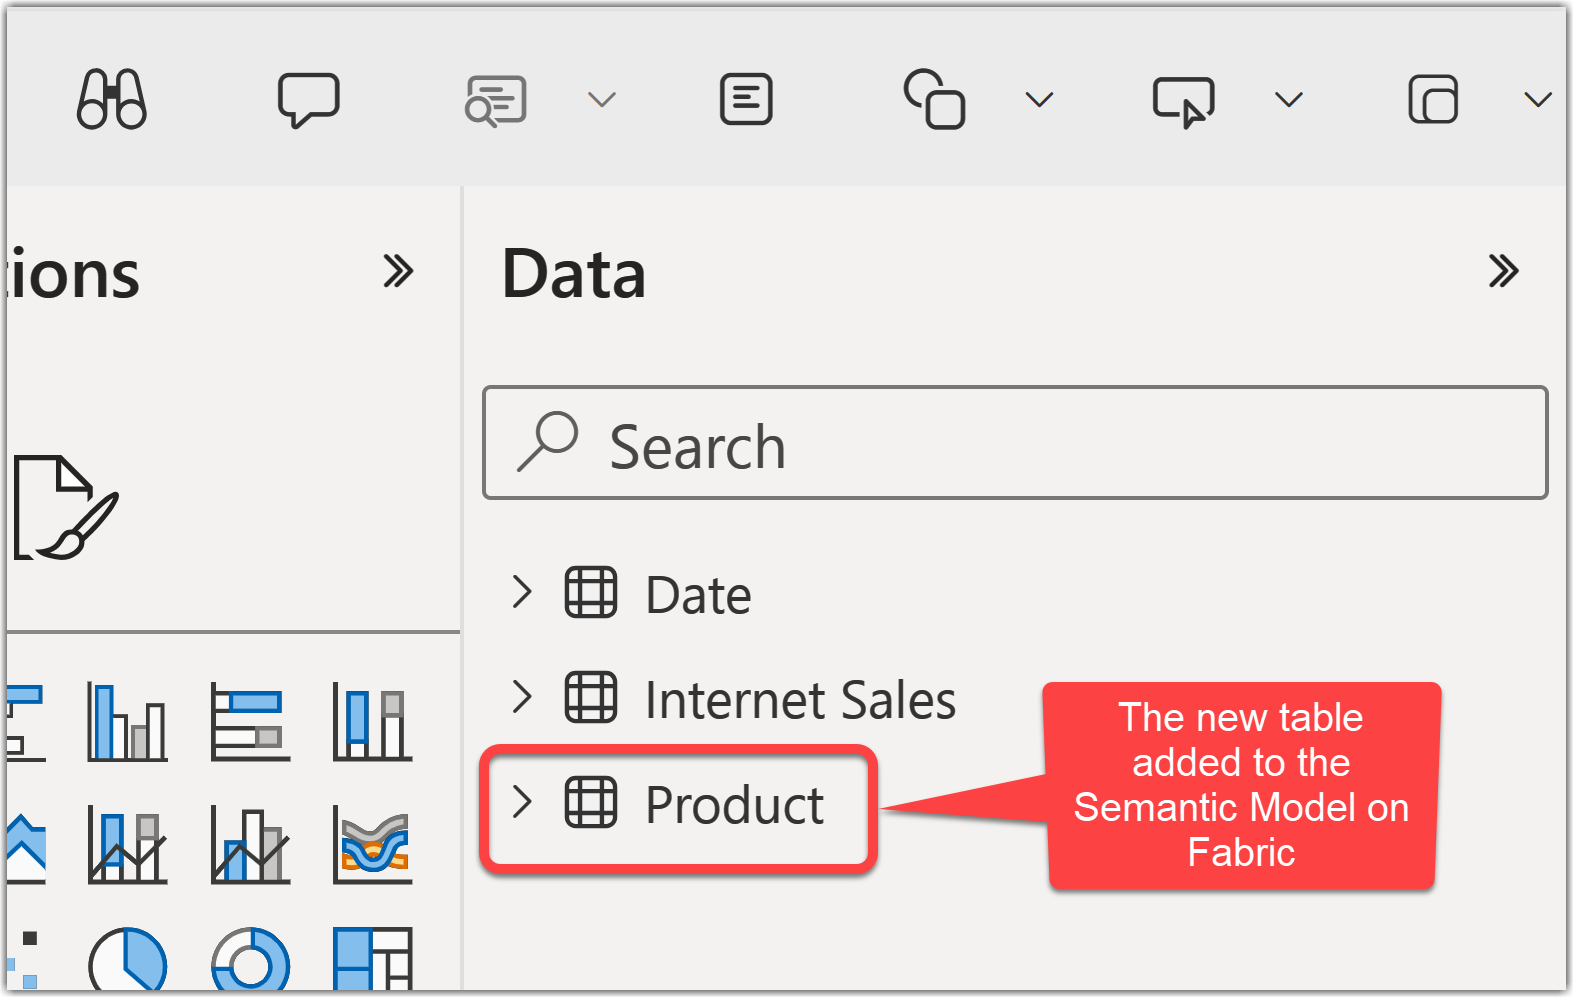
Imagine we add a new Product table to the data model in the Power BI Desktop.
The following steps explain how to deploy the changes to Fabric Service:
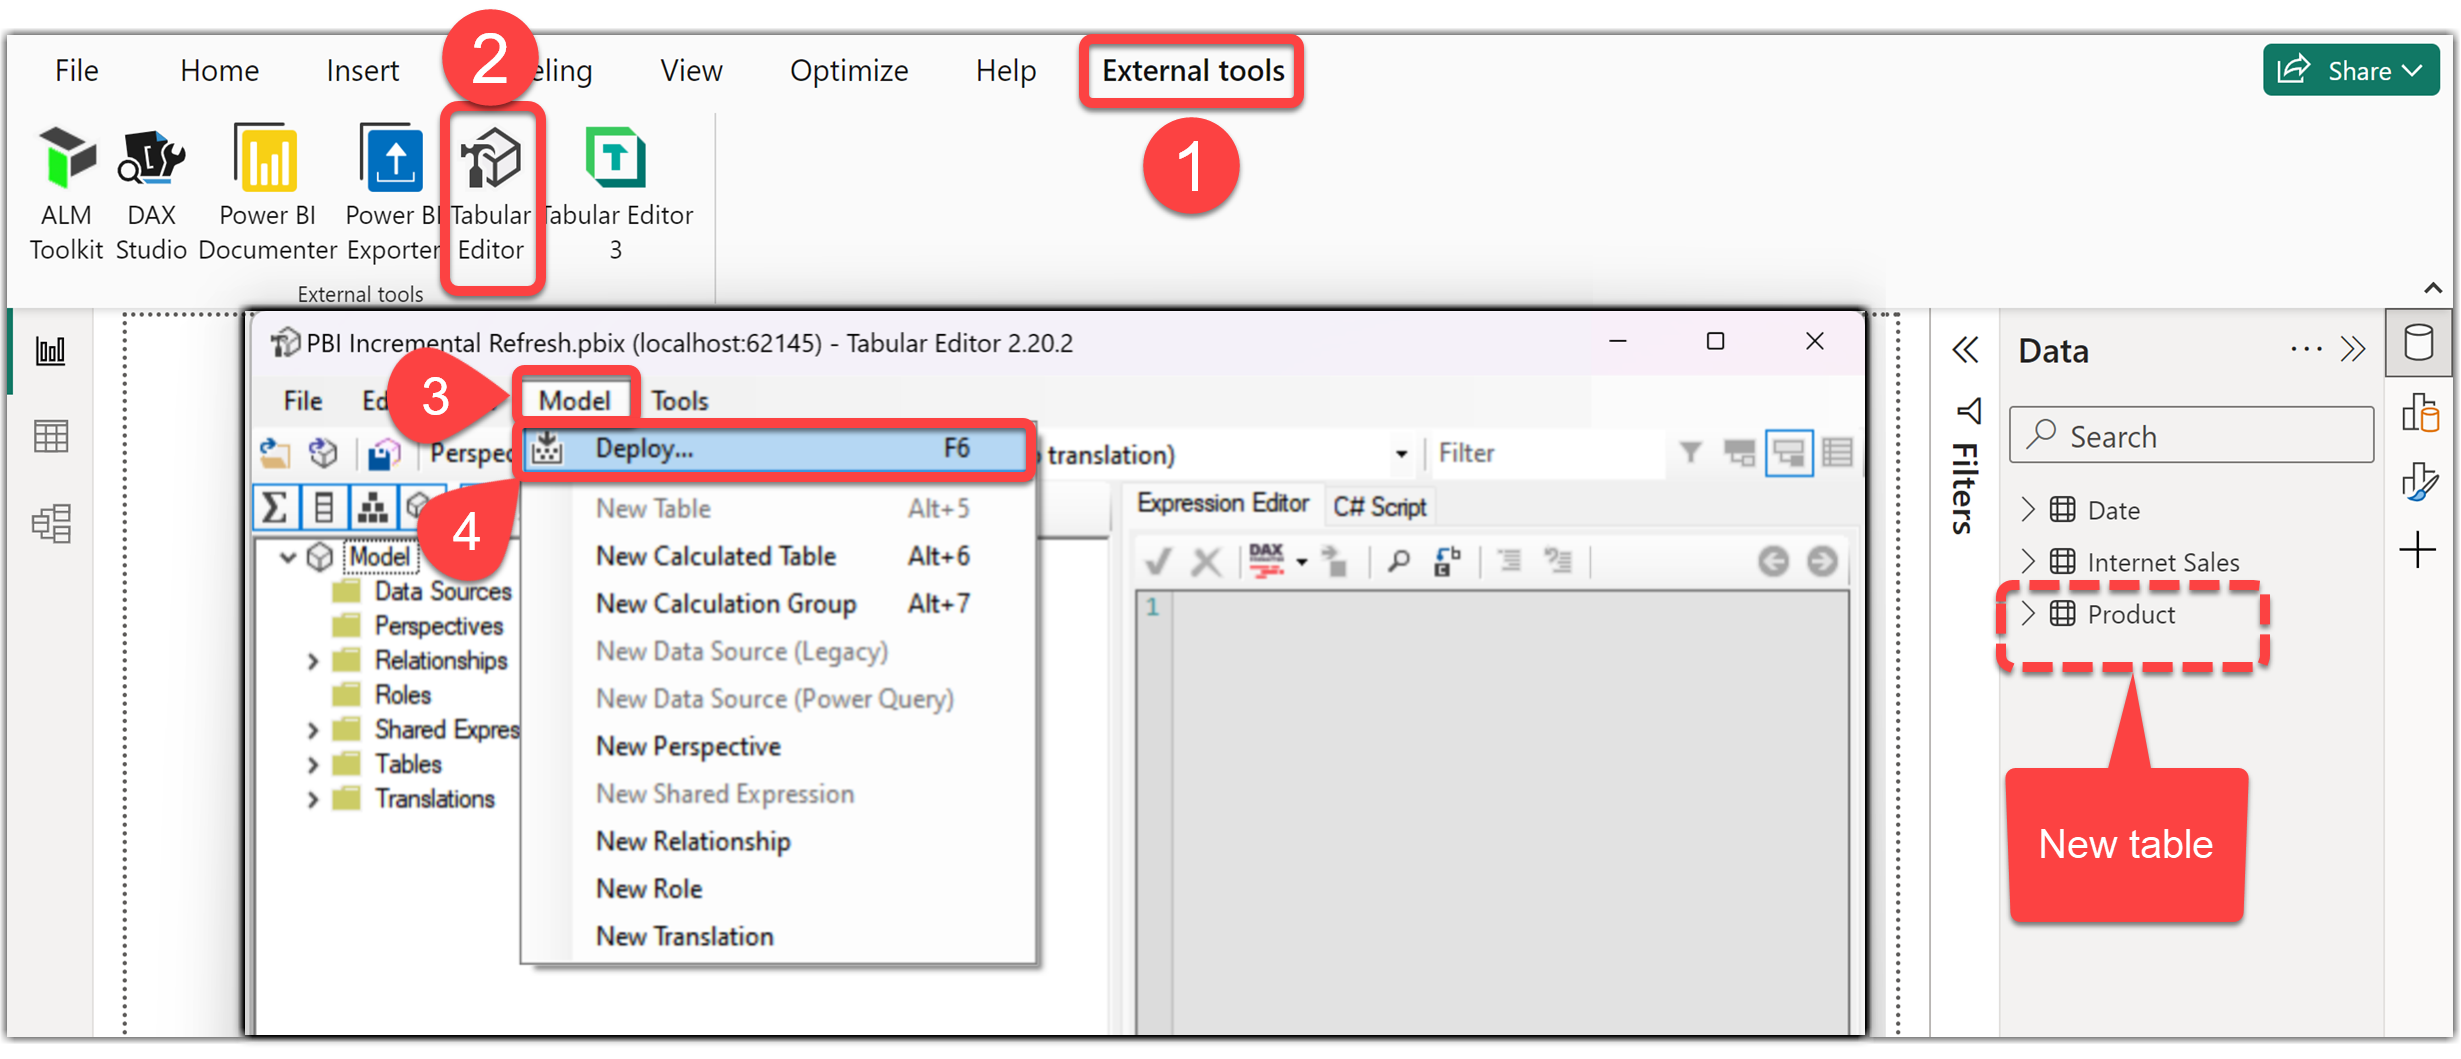
- On the Power BI Desktop, click the External Tools tab from the ribbon
- Click Tabular Editor to open it (the tool automatically connects to the local instance of the Power BI Desktop’s data model)
- Click the Model menu
- Select the Deploy option
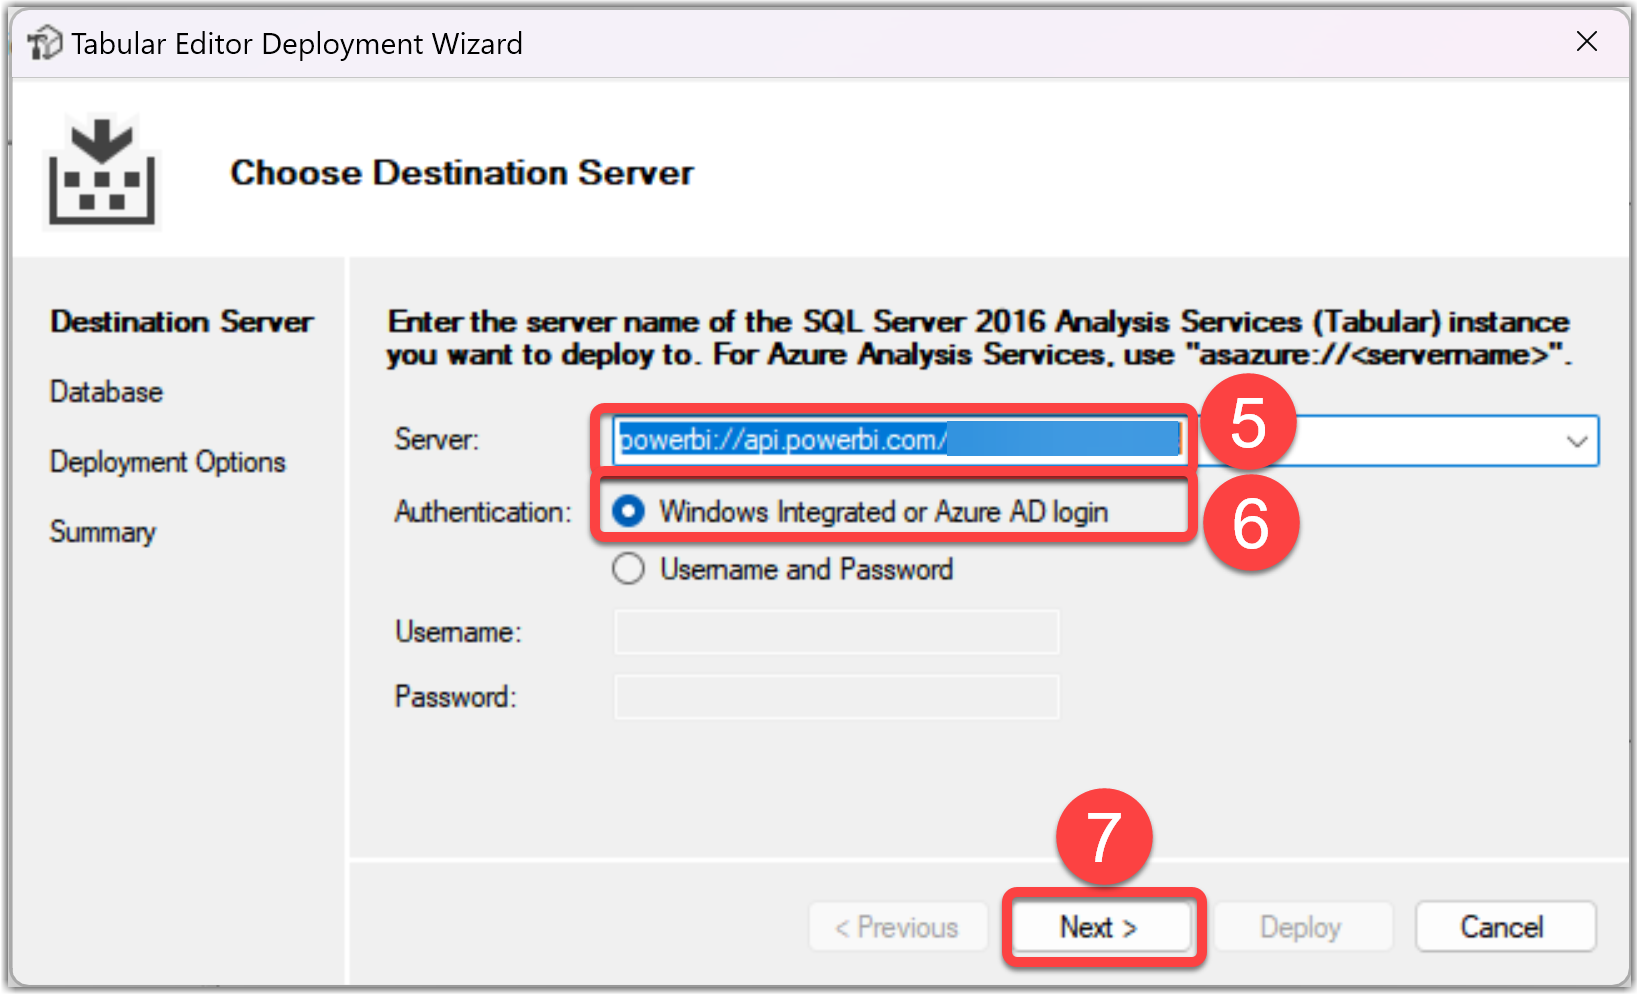
- Paste the Workspace connection copied earlier on the Server
- Select Windows Authentication or Azure AD login
- Click Next then pass your credentials
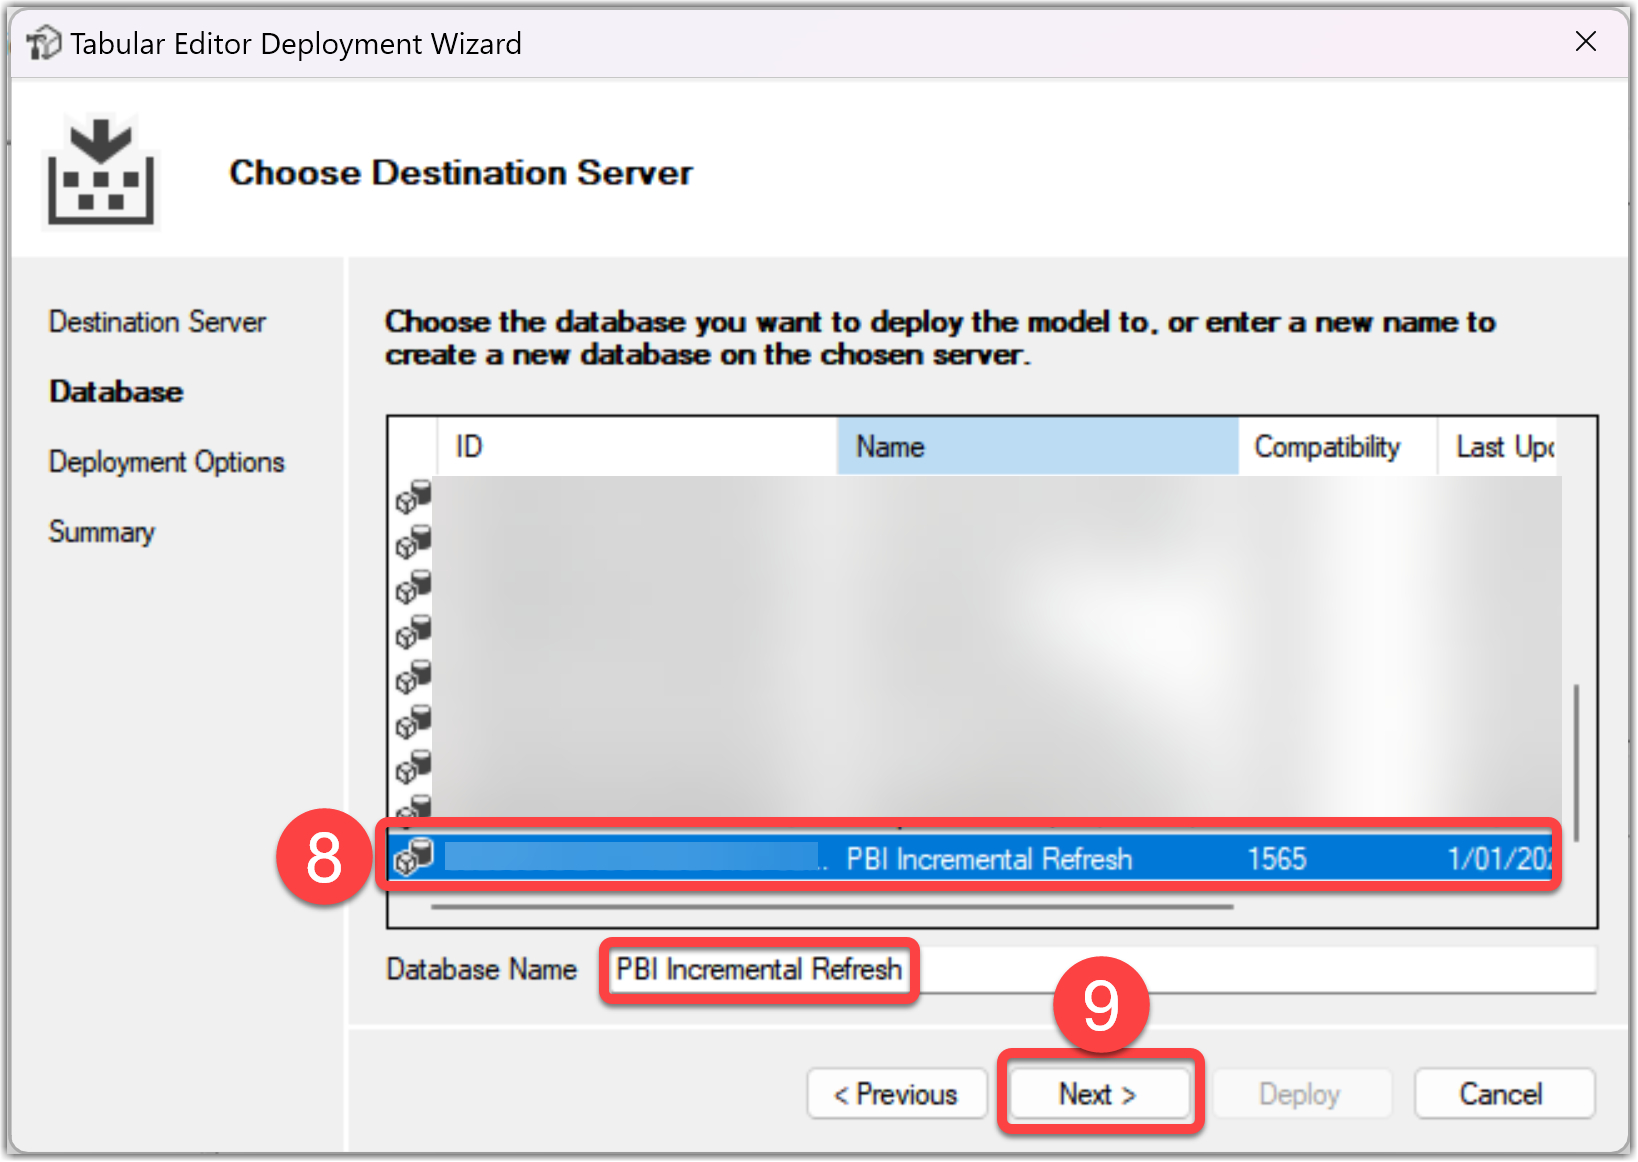
- Select the desired Semantic Model
- Click the Next button
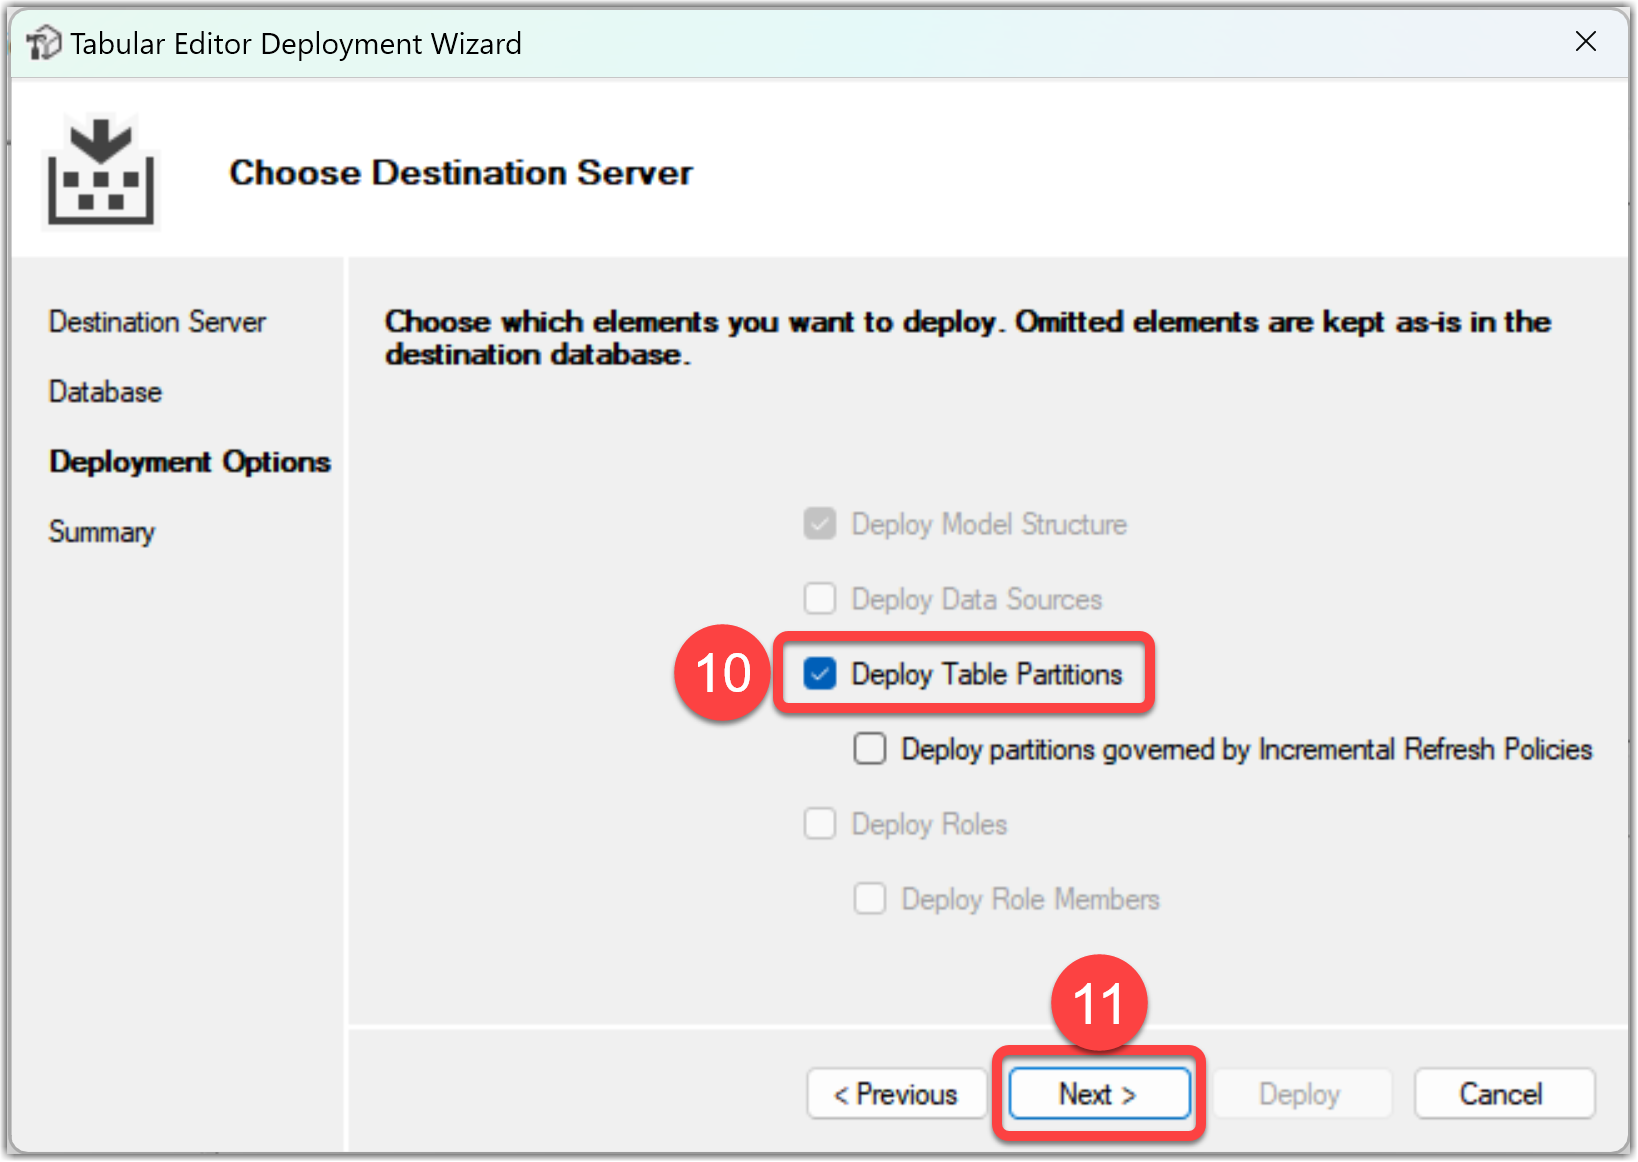
- Select the Deploy Table Partitions option
- Click the Next button
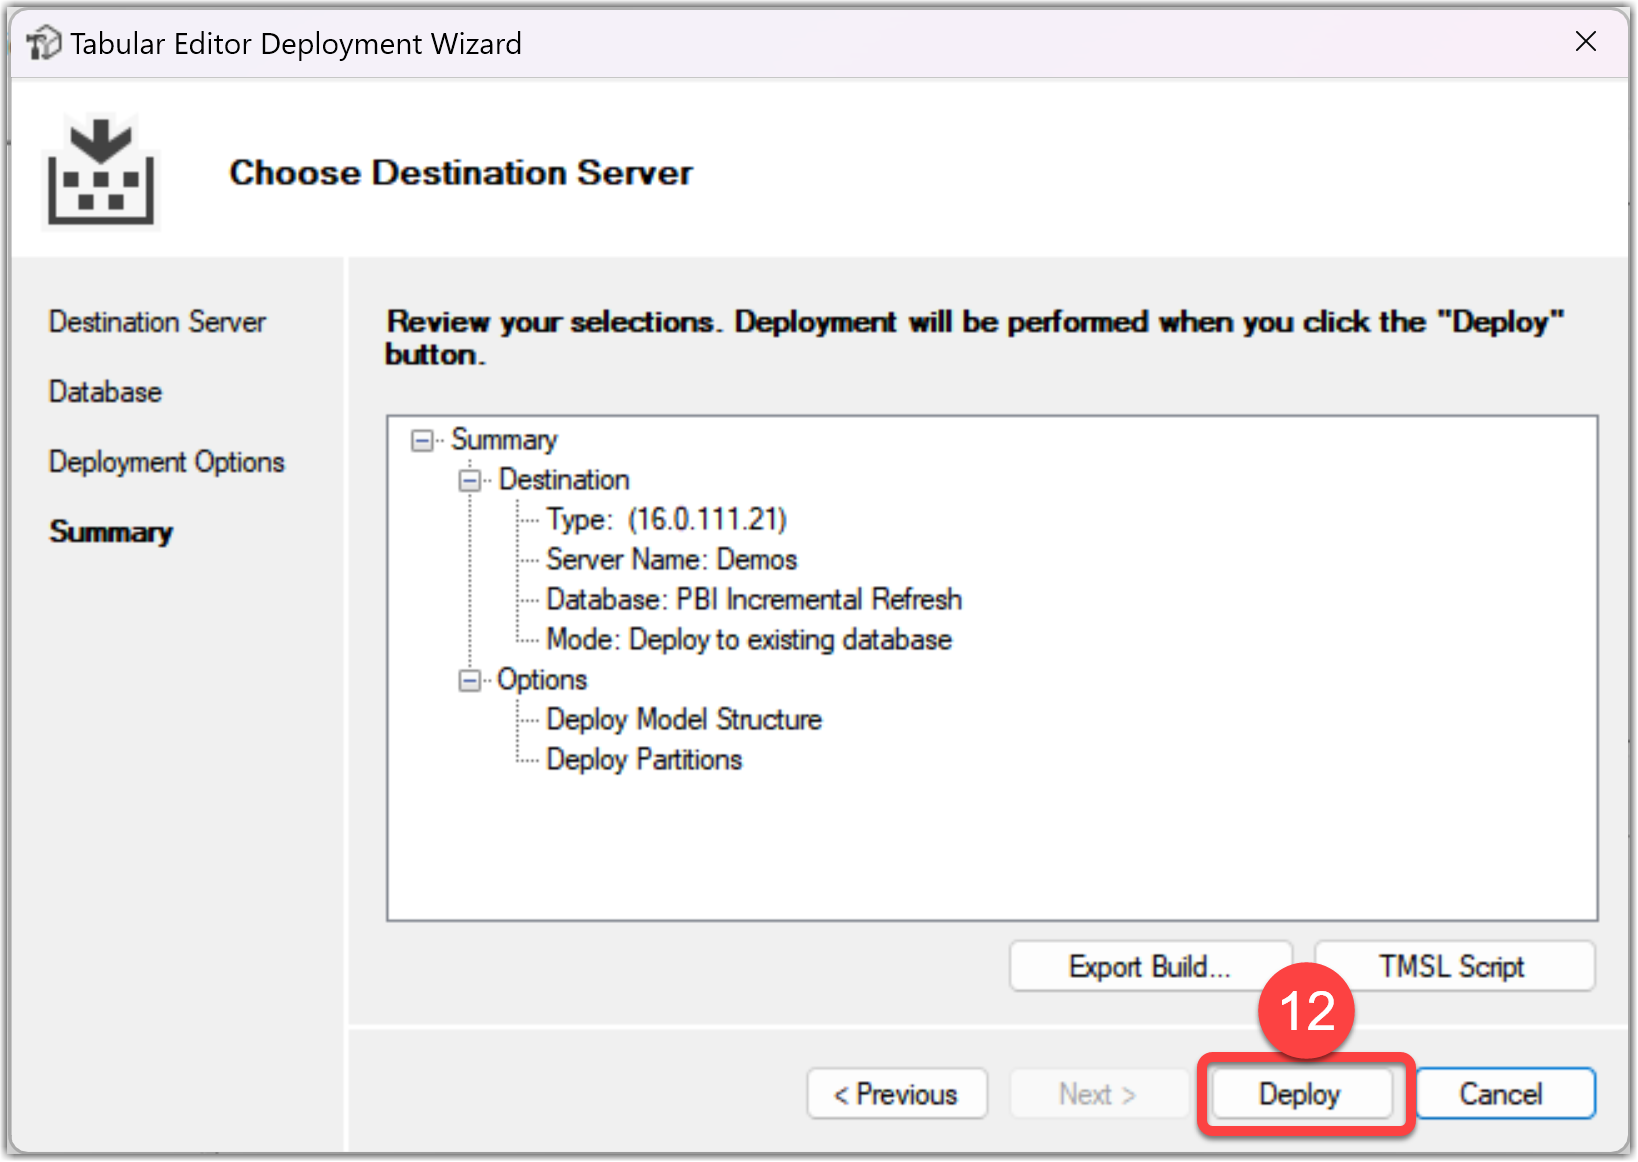
- Review your selection then click the Deploy button
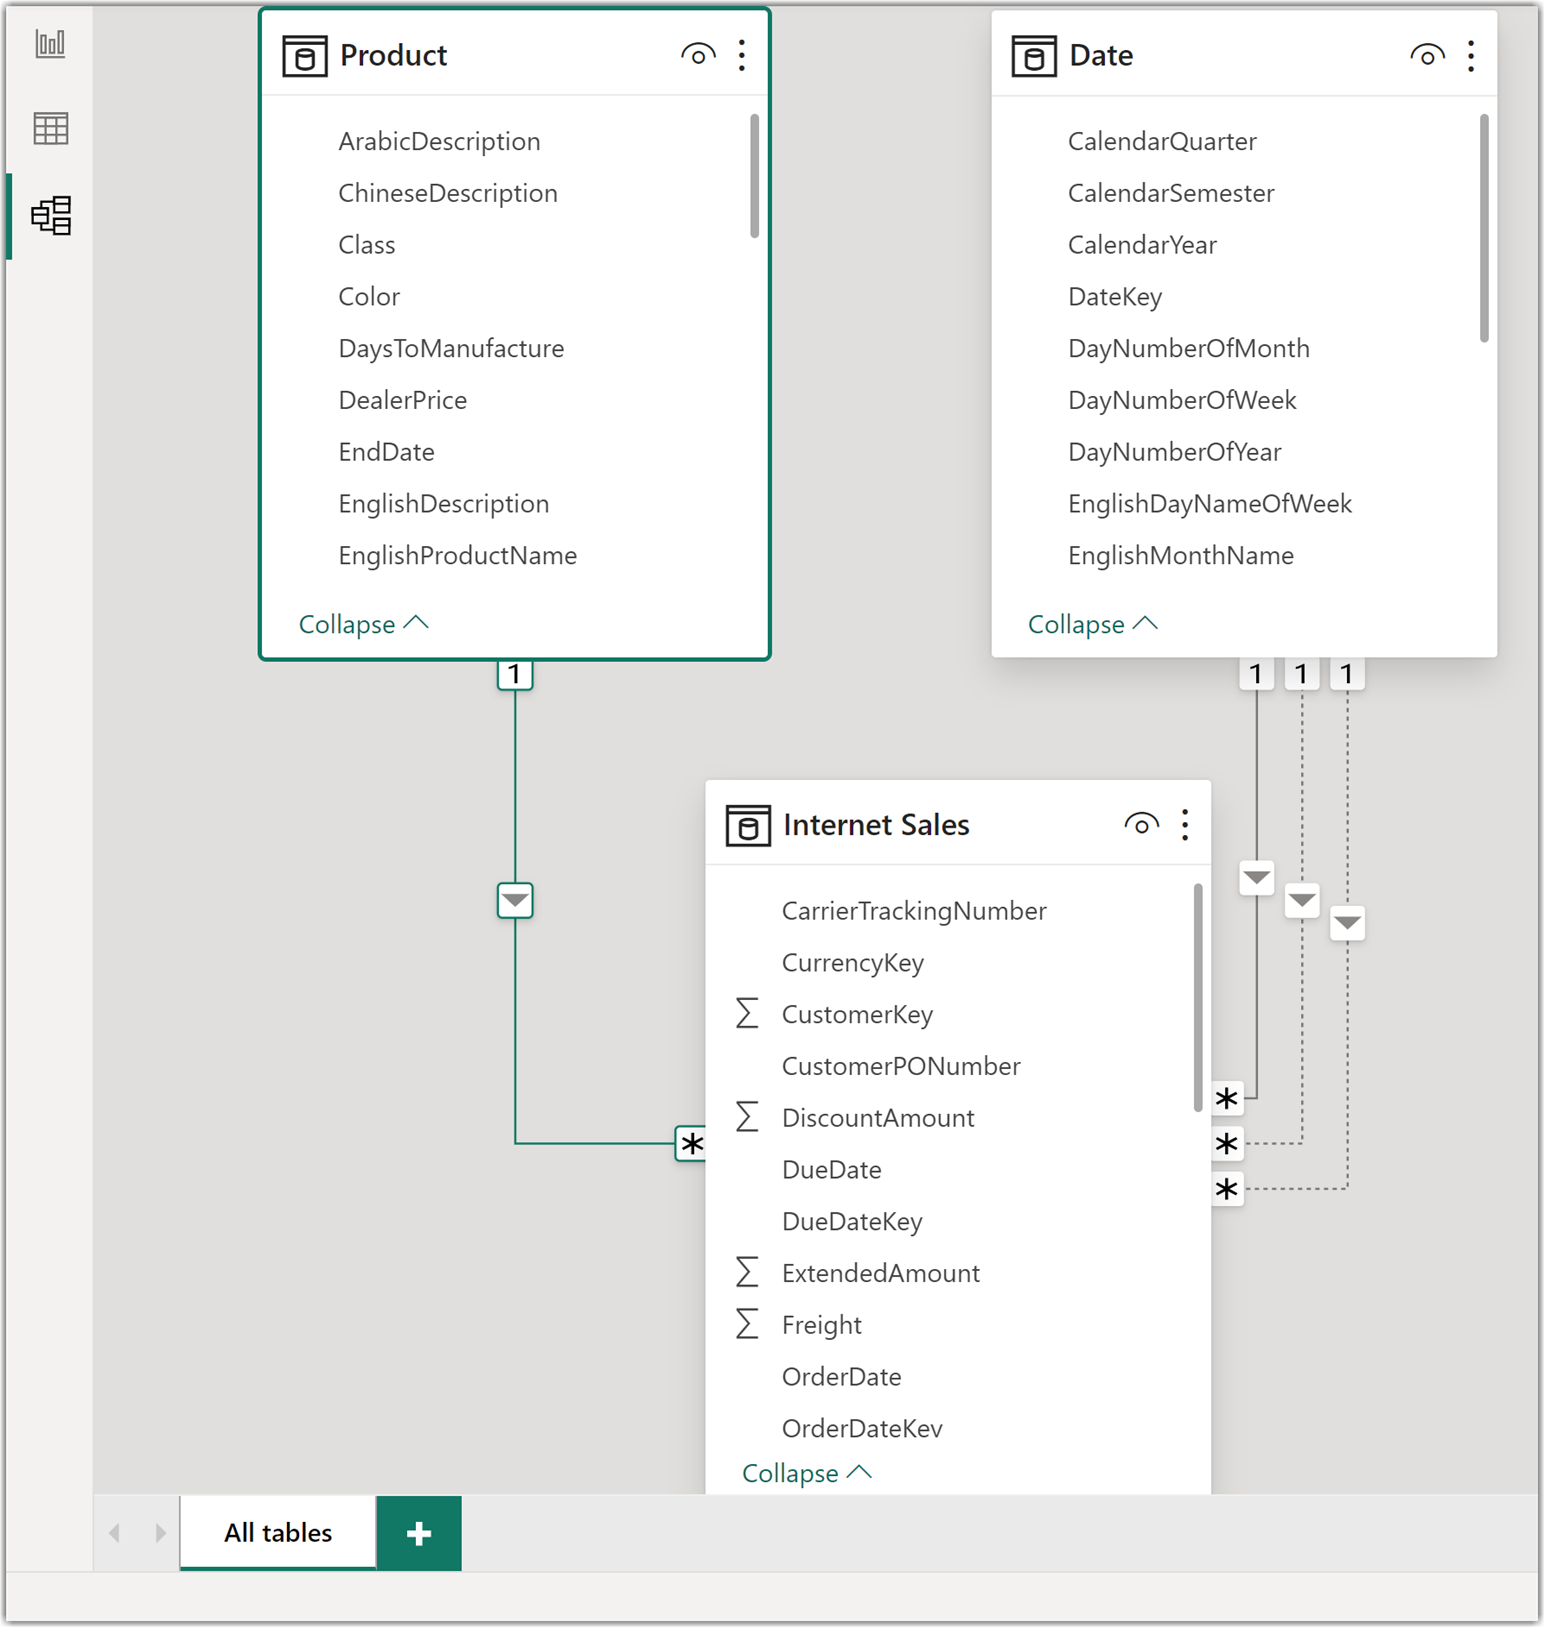
At this point, the changes are published to the Fabric Service. The following image shows the Semantic Model on the Service with the applied changes.
As you see, while publishing the changes from Power BI Desktop to the Service using Tabular Editor is a simple process, we need to be careful that, unlike ALM Toolkit, Tabular Editor publishes the current data model and all changes to the Service. This means that we do not have the option to select the changes to be applied to the Service.
Important Notes
So far we have learned two methods to publish the changes from Power BI Desktop to the Semantic Model on Fabric without affecting the tables with incremental refresh. However, these methods only work for scenarios that do not require a full refresh of a table with incremental refresh partitions.
A full refresh is required regardless of the publishing method, when there are changes in the Power BI Desktop that affect the query or the partition settings, such as changing the filter range, the incremental policy, or the table structure such as adding new columns, removing columns, renaming columns, etc. A full refresh is also required when there are structural changes in the source table. During a full refresh, the existing partitions will be removed, new partitions will be generated and reloaded from the data source.
Conclusion
In this post, we have learned how to deal with some intricacies of publishing Power BI solutions with Incremental Data Refresh. We’ve learned to be careful when we publish changes from Power BI Desktop to the Fabric Service. Otherwise, we lose the data partitions created before which is pretty crucial for production environments where we need to keep all the data intact as well as safely deploy the changes to the model. To avoid this problem, we discussed using alternative tools such as the ALM Toolkit and Tabular Editor. This way, we can keep our data partitions intact and update only what we need. We have shown you how to use these tools in this blog series.
I hope you find this post helpful for improving your Power BI publishing experience. As always, please share your thoughts with us in the comments section below.
Discover more from BI Insight
Subscribe to get the latest posts sent to your email.