Datatype Conversion in Power Query Affects Data Modeling in Power BI

Datatype Conversion in Power Query Affects Data Modeling in Power BI

In my consulting experience working with customers using Power BI, many challenges that Power BI developers face are due to negligence to data types. Here are some common challenges that are the direct or indirect results of inappropriate data types and data type conversion:

  • Getting incorrect results while all calculations in your data model are correct.
  • Poor performing data model.
  • Bloated model size.
  • Difficulties in configuring user-defined aggregations (agg awareness).
  • Difficulties in setting up incremental data refresh.
  • Getting blank visuals after the first data refresh in Power BI service.

In this blogpost, I explain the common pitfalls to prevent future challenges that can be time-consuming to identify and fix.

Background

Before we dive into the topic of this blog post, I would like to start with a bit of background. We all know that Power BI is not only a reporting tool. It is indeed a data platform supporting various aspects of business intelligence, data engineering, and data science. There are two languages we must learn to be able to work with Power BI: Power Query (M) and DAX. The purpose of the two languages is quite different. We use Power Query for data transformation and data preparation, while DAX is used for data analysis in the Tabular data model. Here is the point, the two languages in Power BI have different data types.

The most common Power BI development scenarios start with connecting to the data source(s). Power BI supports hundreds of data sources. Most data source connections happen in Power Query (the data preparation layer in a Power BI solution) unless we connect live to a semantic layer such as an SSAS instance or a Power BI dataset. Many supported data sources have their own data types, and some don’t. For instance, SQL Server has its own data types, but CSV doesn’t. When the data source has data types, the mashup engine tries to identify data types to the closest data type available in Power Query. Even though the source system has data types, the data types might not be compatible with Power Query data types. For the data sources that do not support data types, the matchup engine tries to detect the data types based on the sample data loaded into the data preview pane in the Power Query Editor window. But, there is no guarantee that the detected data types are correct. So, it is best practice to validate the detected data types anyway.

Power BI uses the Tabular model data types when it loads the data into the data model. The data types in the data model may or may not be compatible with the data types defined in Power Query. For instance, Power Query has a Binary data type, but the Tabular model does not.

The following table shows Power Query’s datatypes, their representations in the Power Query Editor’s UI, their mapping data types in the data model (DAX), and the internal data types in the xVelocity (Tabular model) engine:

Power Query and DAX (data model) data type mapping

As the above table shows, in Power Query’s UI, Whole Number, Decimal, Fixed Decimal and Percentage are all in type number in the Power Query engine. The type names in the Power BI UI also differ from their equivalents in the xVelocity engine. Let us dig deeper.

Continue reading “Datatype Conversion in Power Query Affects Data Modeling in Power BI”

Endorsement in Power BI, Part 2, How to Endorse?

Endorsement in Power BI, Part 2, How to Endorse?

In the previous post I explained the basic concepts around endorsement in Power BI. We discussed that users’ ability to collaborate in creating and sharing artifacts is one of the key aspects of users’ experience in Power BI. But it would be hard, if not impossible, to identify the quality of the artifact without a mechanism to identify the artifact’s quality in large organisations. Endorsement is the answer to this challenge. We discussed the following in the previous post:

In this post, I explain the following:

How do Power BI administrators enable certification and grant rights to security groups?

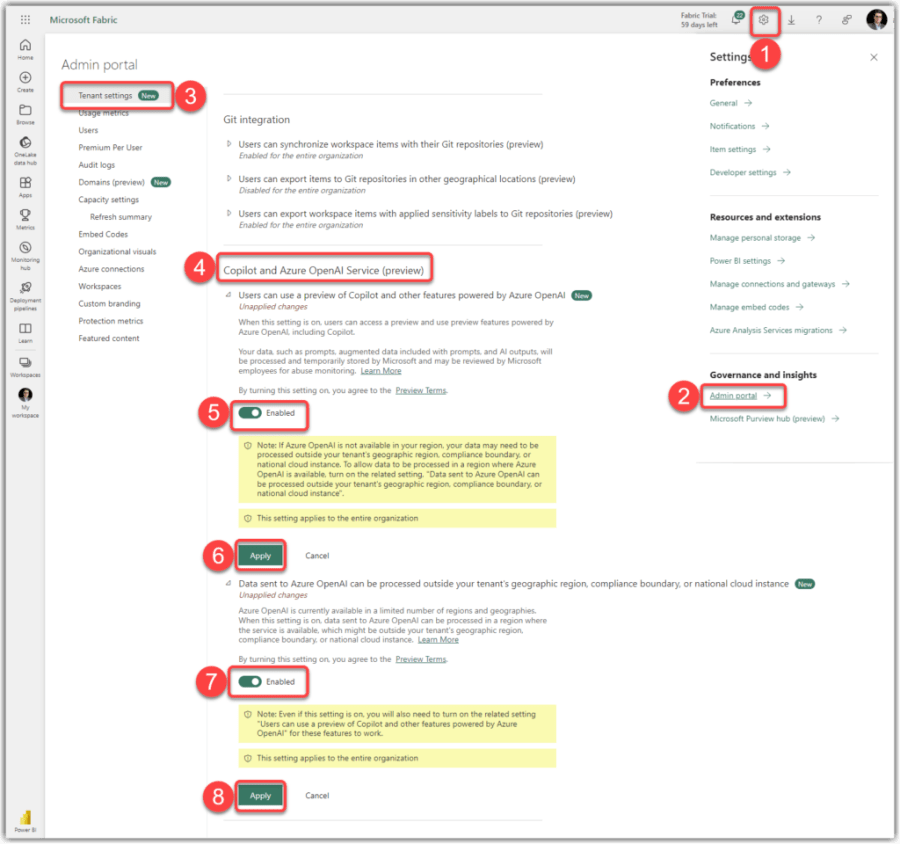
In the previous post, we discussed that a Power BI administrator must enable certification and grant sufficient rights to the security groups. Therefore, all members of the specified security group are authorised to certify the artifacts. If you are a Power BI administrator, follow these steps to do so:

  1. After logging into Power BI Service, click the Settings button
  2. Click Admin Portal
  3. From the Tenant settings, scroll down to find the Export and sharing settings
  4. Find and expand the Certification setting
  5. Enable certification
  6. Put the certification process documentation URL (if any)
  7. It is not recommended to enable this feature for the entire organisation. So, select the Specific security groups option
  8. Type the security group name and select it from the list
  9. Click the Apply button

The following image shows the above steps:

Enabling certification from the Admin Portal in Power BI Service

It may take up to 15 minutes for the changes to go through. After that, all the members of the specified security can certify the artifacts. In the next section, we see how to certify the supported artifacts.

Note

Everyone who has “write” permission on the Workspace containing the artifact can promote it. Therefore, the users or security groups with one of the AdminMember, or Contributor roles in the Workspace can promote the artifacts.

However, one should not promote the artifacts just because he/she can. The organisations usually have a promotion process to follow, but the boundaries around promoting are often much more relaxed than certifying it.

Continue reading “Endorsement in Power BI, Part 2, How to Endorse?”

Endorsement in Power BI, Part 1, The Basics

Content Endorsement in Power BI, Part 1, The Basics

As you may already know, Power BI is not a report-authoring tool only. Indeed, it is much more than that. Power BI is an all-around data platform supporting many aspects you’d expect from such a platform. You can ingest the data from various data sources, transform it, model it, visualise and share it with others. Read more about what Power BI is here.

One of the key aspects of users’ experience in Power BI is their ability to collaborate in creating and sharing artifacts, making it an easy-to-use and convenient platform. But the convenience comes with the cost of having a lot of shared artifacts in large organisations raising concerns about the artifact’s quality and trustworthiness. It would be hard, if not impossible, to identify the quality of the artifacts without a mechanism to identify the quality of the artifacts. Endorsement is the answer to this.

In this series of blog posts, I answer the following questions:

But before we start, we need to know what content means in Power BI.

What does Content Mean in Power BI?

Update:
Microsoft lately updated the “Content” terminology, which is slightly different from when I wrote this blog. So I replaced content with artifact that is a more generic term. While the term content is not relevant to the topic anymore, I decided to keep this section explaining what content means in Power BI.

When we use the term Content in the context of Power BI, we refer to the artifacts related to visuals in Power BI Service. We currently have the following artifacts in Power BI:

From those artifacts, the Reports, Dashboards and Apps are Contents.

Continue reading “Endorsement in Power BI, Part 1, The Basics”

Dynamically Passing Parameters to a SQL Stored Procedure in Excel 365 Using Power Query

In September 2014, I wrote a blog post on dynamically passing parameters from PowerPivot to a SQL Server stored procedure using VBA. Back then, VBA was a real lifesaver. It perhaps still is for many of us. But frankly, I even forgot how to write VBA. Maybe it is time to look at it again. I also wrote a quick tip in August 2020 about doing a similar thing in Power BI using Query Parameters. Check it out if you’re keen to know how it works in Power BI.

Eight years later, one of my weblog readers asked how to do the same thing in later versions of Excel; he is specifically asking for Excel 2019. I thought it would be good to cover this topic after 8 years and see how it works now. So, here it is, a new blog post.

The Problem

From time to time, Excel users require to get the data from a SQL Server stored procedure. The stored procedures usually accept some input parameters and return the results. But how can we dynamically pass values to the stored procedures from cells in Excel to SQL Server?

Prerequisites

For this blog post, I use SQL Server 2019 and Microsoft’s famous sample database, AdventureWorks2019. You can find Microsoft’s other sample databases here. I also use Excel 365, it should work the same way in Excel 2019, though.

The Solution

I discuss two approaches to overcome the challenge. Both approaches use Power Query slightly differently. In both approaches, we parameterise the SQL Statement of the SQL Server connector, passing the values to the parameters from an Excel table. One approach requires ignoring the Privacy Levels in Power Query, while the other does not. Both approaches work, but, depending on your preferences, you may prefer one over the other.

As mentioned, I use the AdventureWorks2019 sample database that contains a couple of stored procedures. I use the dbo.uspGetBillOfMaterials stored procedure accepting two parameters, @StartProductID and @CheckDate.

Approach 1: Parameterising the SQL connector’s SQL Statements, Ignoring Privacy Levels

Follow these steps to pass the parameters’ values from an Excel sheet to the stored procedure and get the results in Excel:

  1. In Excel, navigate to the Data tab
  2. Click the Get Data dropdown
  3. Hover over the From Database option and click the From SQL Server Database
  4. Enter the Server
  5. Enter the Database
  6. Expand the Advanced options
  7. Type EXEC [dbo].[uspGetBillOfMaterials] @StartProductID = 727, @CheckDate = N'2013-01-01' in the SQL statement textbox
  8. Click OK
Using SQL Statement in Power Query for Excel
  1. Click the dropdown on the Load button
  2. Click Load to
Load to Options to Load the Results of Power Query query into an Excel Sheet or PowerPivot Model

From here, we have some options to load the results either into an Excel sheet or the PowerPivot data model. We want to load the data into the PowerPivot data model in this example.

  1. Select Only Create Connection
  2. Check the Add this data to the Data Model option
  3. Click OK
Loading the Power Query Data into PowerPivot in Excel
Continue reading “Dynamically Passing Parameters to a SQL Stored Procedure in Excel 365 Using Power Query”