In the previous blog, I covered the practical setup for agentic AI workflows with VS Code, GitHub Copilot, and safe local MCP testing. I explained why VS Code is a good starting point, which extensions and MCP servers make sense for Power BI and Microsoft Fabric work, and why we should be careful before trusting new tools with real models.
This post continues from that point and focuses only on the hands-on process. The idea is simple: now that the setup is ready, let’s use it for a real modelling task and see what actually happens.
What This Blog Will Cover #
In this post, I want to show a practical end-to-end workflow:
- using Ask mode to frame a safe modelling task
- using Plan mode to create a controlled implementation path
- using Agent mode to execute the approved steps
- using simple generated markdown files as working notes, guardrails, and checkpoints
- reviewing the results inside Power BI Desktop
- reflecting on what worked well and where caution is still needed
The Scenario #
Here is a practical scenario. My sample semantic model contains 54 measures spread across multiple tables, which is not a good structure. I want the AI agent to inspect the model through the Power BI Modeling MCP Server, create a dedicated measure table, create the relevant display folders, and then move the measures into the right folders. Doing that by hand would be slow and a bit painful. This is exactly the kind of task where agentic AI can help in a practical way. So, for this walkthrough, I have my Power BI solution open in Power BI Desktop and VS Code open beside it, and I make sure that I am already signed in to GitHub in VS Code.
Just to avoid confusion, this walkthrough uses a local modelling workflow against Power BI Desktop. Microsoft also documents the Power BI remote MCP server, which is useful to know about, but that is not the focus of this example.
The Workflow #
The workflow is simple. First, I open the project folder in VS Code so GitHub Copilot in VS Code can work against the same workspace and files I am working with. Then I use Ask mode to explain the problem clearly and point Copilot to the Power BI Modeling MCP Server. After that, I switch to Plan mode and ask Copilot to produce the implementation steps. Once I am happy with the plan, I move to Agent mode and ask Copilot to carry out the approved changes.

In other words, we are not asking Copilot to “fix the model” in a vague way. We are giving it a specific modelling task, the right MCP capability, and a clear sequence to follow. That matters a lot, because the quality of the result usually depends on how clearly we define the job and how carefully we review the proposed steps.
This is also where the concept of Human in the Loop (HITL) becomes important. It is closely related to the feedback loop, but they are not exactly the same thing. HITL means the human stays involved at important checkpoints. The feedback loop is the repeated process where the agent does part of the work, the human reviews the result, gives feedback, and then the agent continues with better context. In this workflow, HITL means I review the plan, approve the key steps, check the output in Power BI Desktop, and decide whether the result is good enough to continue. This is not just a safety habit, it is part of how we make agentic AI practical in real Power BI work.
If you like to listen to the content on the go, here is the AI generated podcast explaining everything about this blog?
Going Through the Workflow in VS Code #
Now let’s walk through that workflow inside VS Code. The goal here is to keep it very simple so you can see how the flow works from the first prompt to the actual implementation.
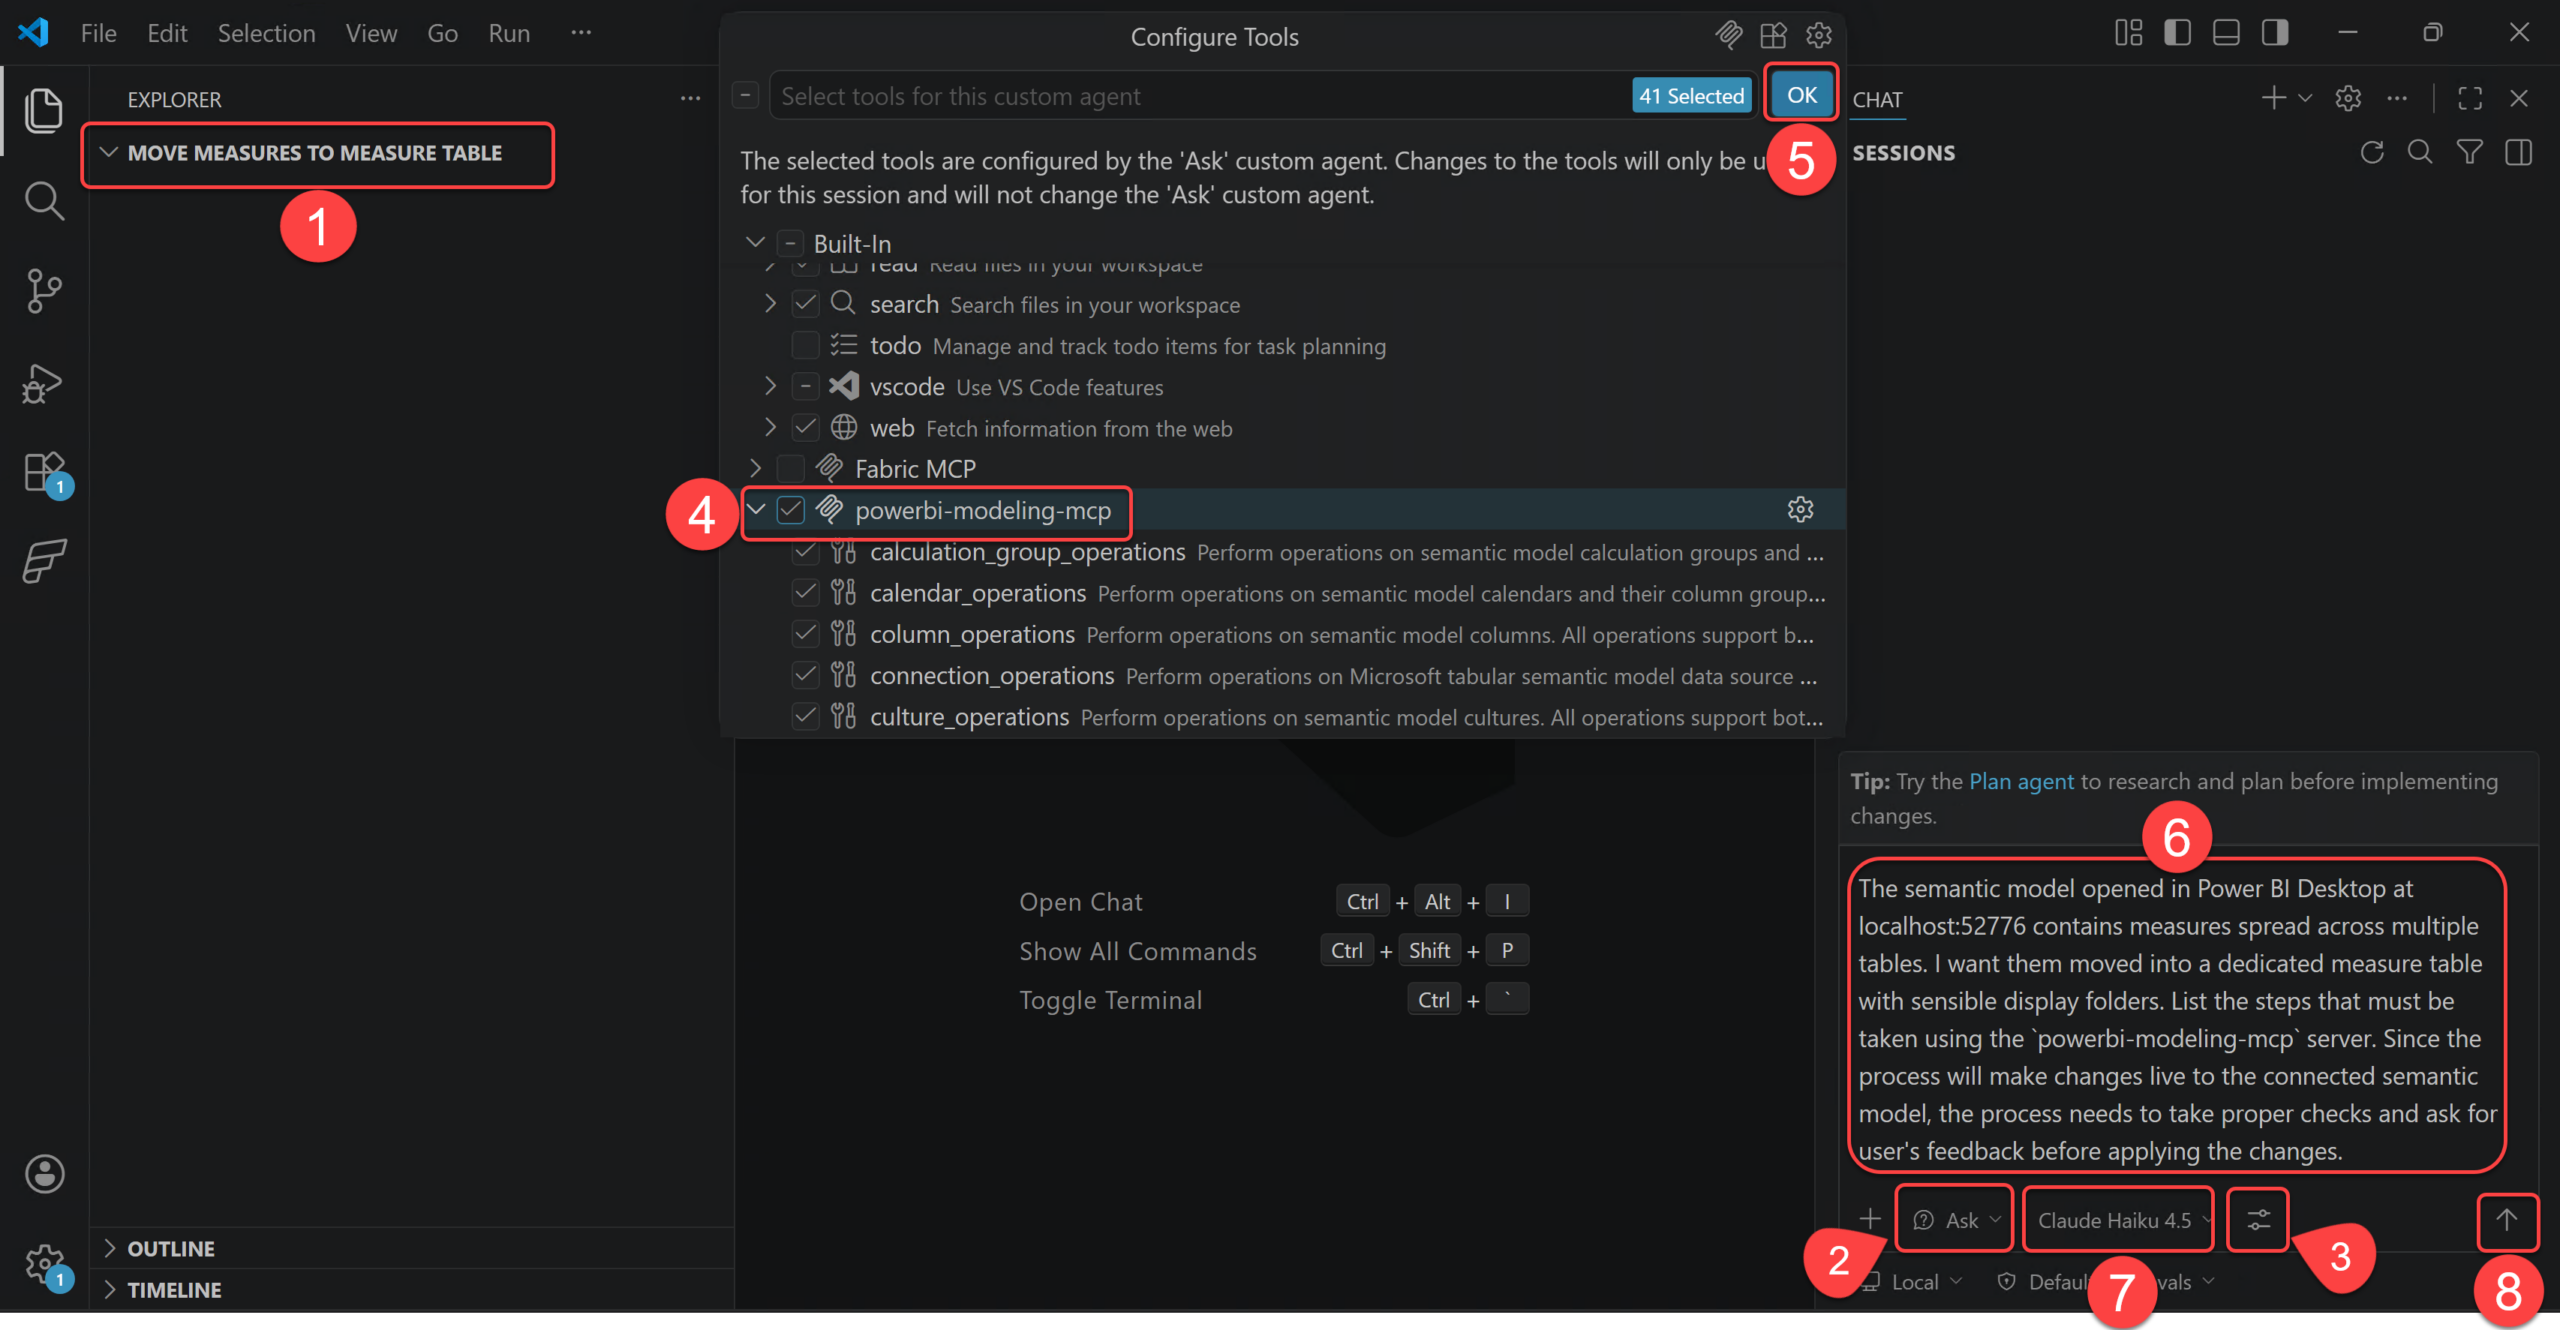
- Open the desired folder (preferably one that contains your Power BI project if you use PBIP) in VS Code. This matters because Copilot works against the current workspace, so the files and context available in that folder help it understand what you are working on.
- Change the agent mode to Ask mode.
- Click the Config Tools.
- Tick the powerbi-modeling-mcp.
- Click OK.
- In the chat box, describe the modelling problem clearly. In our example it is:
“The semantic model opened in Power BI Desktop at localhost:52776 contains measures spread across multiple tables. I want them moved into a dedicated measure table with sensible display folders. List the steps that must be taken using the
powerbi-modeling-mcpserver. Since the process will make changes live to the connected semantic model, the process needs to take proper checks and ask for user’s feedback before applying the changes.“.
The localhost:52776 is the local server my Power BI Desktop instance is currently running. You do not need to mention it, but I do, because I want my prompt to me as deterministic as possible. If you are unfamiliar with the localhost:52776, check out these old blogs about it.
- Select the Claude Haiku 4.5 model, I select this model as I am currently using the Free licensing plan.
- Press Enter or click the Send button.
At this point, you may get a different response from GitHub Copilot than the one I got on my machine, and that is perfectly normal. The exact wording can vary a bit. But the response I got was exactly what I wanted, because it showed that Copilot had understood the task properly and had already framed it as a controlled workflow with review points. I am copying that response here directly so you have a better idea of how Copilot had understood the context so far on my machine:
I’ll outline the steps to safely move measures into a dedicated measure table using the
powerbi-modeling-mcpserver with proper validation and user feedback points.## Process Steps
### 1. Connect to the Semantic Model
Usemcp_powerbi-model_connection_operationswith theGetConnectionoperation to verify connection tolocalhost:52776(Power BI Desktop).### 2. Inventory Current Measures
Usemcp_powerbi-model_measure_operationswith theListoperation to:
– Retrieve all measures across all tables
– Note their current table assignments and display folders
– Create a mapping of measures to their source tablesUser Checkpoint: Present the inventory and ask which measures should be moved (allow filtering or manual selection).
### 3. Create Dedicated Measure Table
Usemcp_powerbi-model_table_operationswith theCreateoperation to:
– Create a new table (e.g., named “Measures” or “_Measures”)
– This table should be marked as hidden if desired (isHidden: true)
– No columns needed (it’s a container-only table)### 4. Plan Display Folder Structure
Analyze the current measures and group them logically:
– Group by business domain (Sales, Finance, HR, etc.)
– Or by measure type (Calculations, Aggregations, etc.)
– Create a folder hierarchy using thedisplayFolderpropertyUser Checkpoint: Show the proposed display folder structure and ask for approval before proceeding.
### 5. Move Measures to Dedicated Table
Usemcp_powerbi-model_measure_operationswith:
–Moveoperation to reassign measures to the new dedicated table
– Batch multiple moves in one operation for efficiency
– Set appropriatedisplayFoldervalues during the moveUser Checkpoint: Show the move plan with before/after details before executing.
### 6. Validate the Changes
Usemcp_powerbi-model_measure_operationswith theListoperation to:
– Verify all measures are now in the dedicated table
– Confirm display folders are applied correctly
– Check that no measures were missed### 7. Hide Empty Source Tables (Optional)
Usemcp_powerbi-model_table_operationswith theUpdateoperation to:
– Mark original measure source tables as hidden if they now contain no visible measures
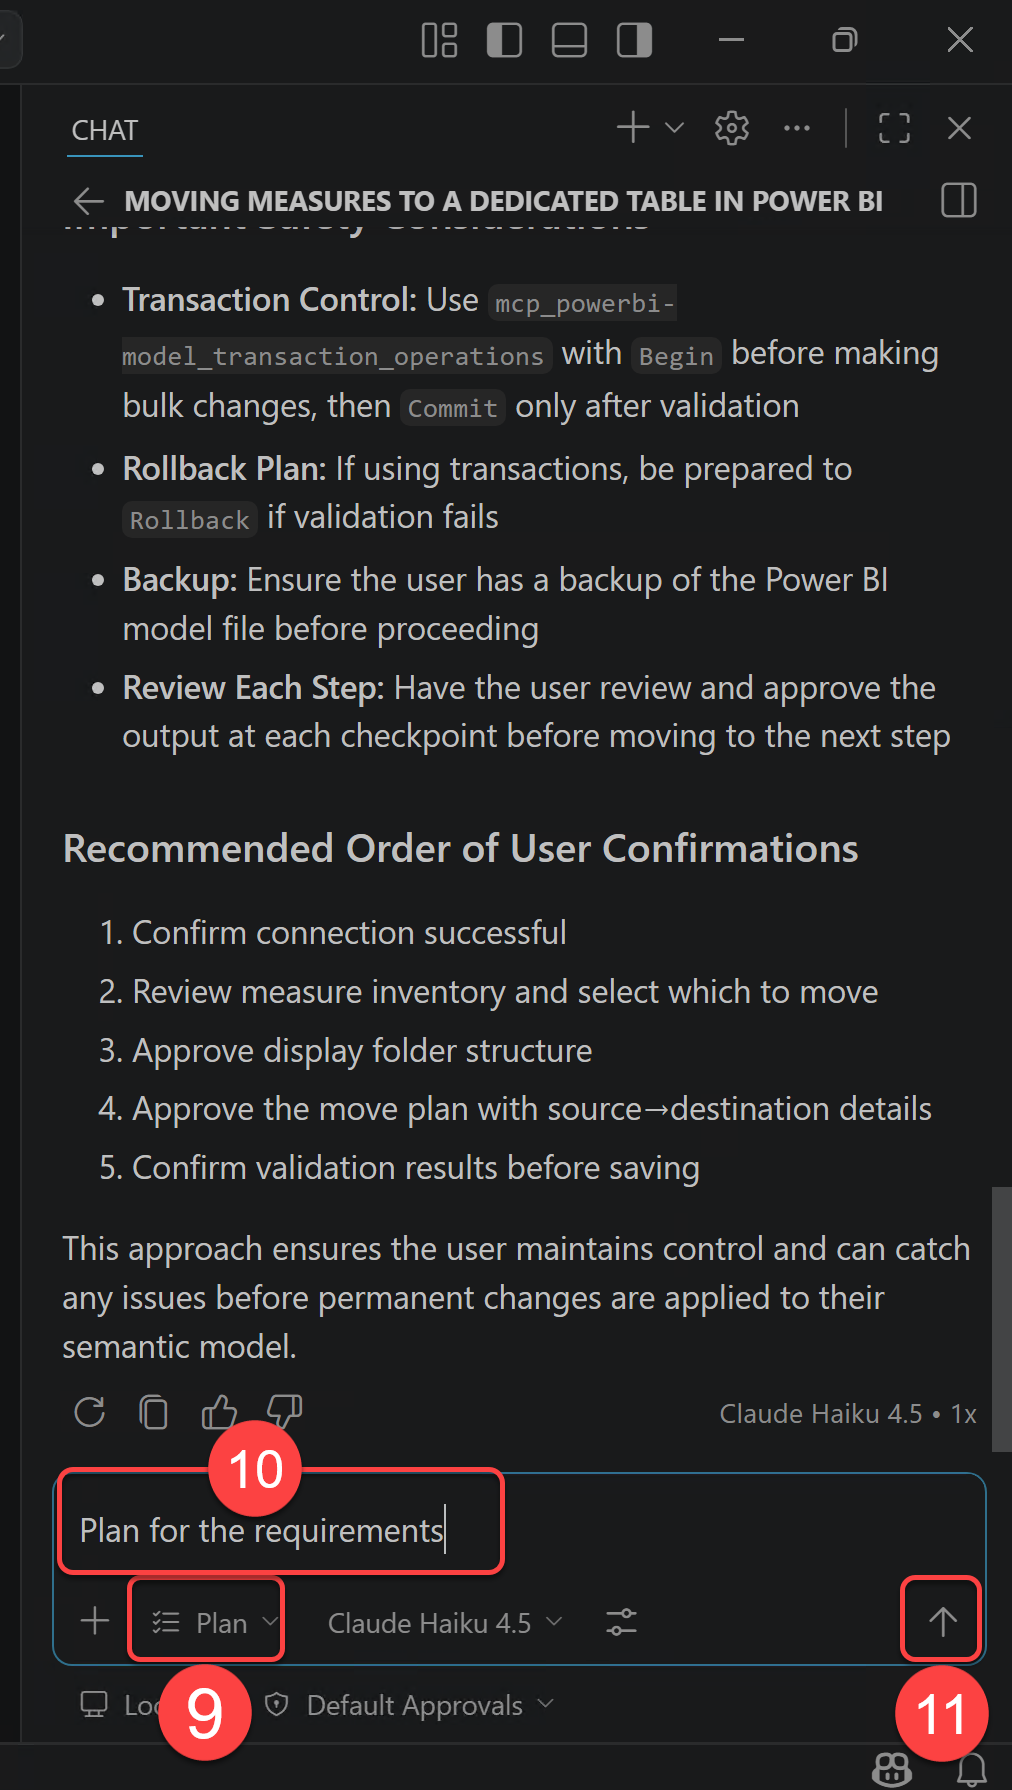
– Or leave them visible if they still serve other purposes## Important Safety Considerations
– Transaction Control: Use
mcp_powerbi-model_transaction_operationswithBeginbefore making bulk changes, thenCommitonly after validation
– Rollback Plan: If using transactions, be prepared toRollbackif validation fails
– Backup: Ensure the user has a backup of the Power BI model file before proceeding
– Review Each Step: Have the user review and approve the output at each checkpoint before moving to the next step## Recommended Order of User Confirmations
1. Confirm connection successful
2. Review measure inventory and select which to move
3. Approve display folder structure
4. Approve the move plan with source->destination details
5. Confirm validation results before savingThis approach ensures the user maintains control and can catch any issues before permanent changes are applied to their semantic model.
- Change the agent mode to Plan.
- Prompt the agent to Plan for the requirements.
- Press Enter or click the Send button.
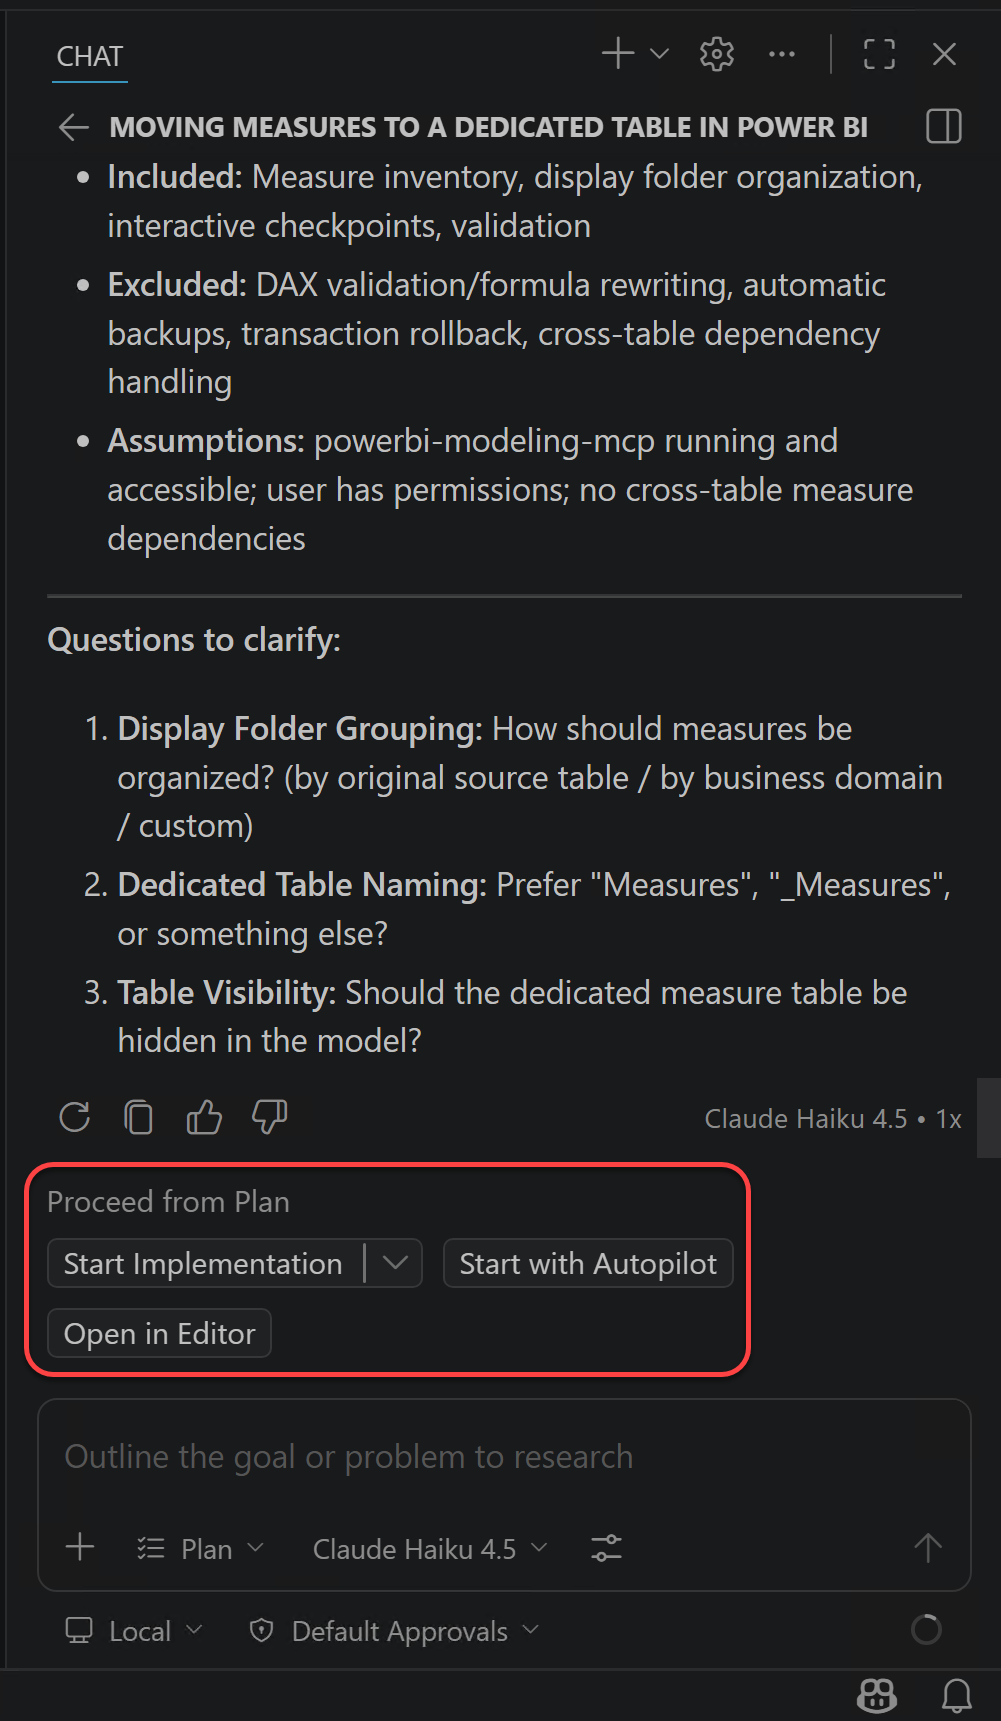
- Copilot may ask for clarification about the expected outcome of the plan. In my case, it gave me three options. The following image shows those options and the choice I made. Then I clicked the Submit button.

Now Copilot continues the planning process based on my answers. After a couple of seconds, it comes back with a plan and gives me three options:
- Start Implementation: This tells Copilot to begin implementing the approved plan step by step.
- Start with Autopilot: This tells Copilot to move faster with less manual interruption, which can be useful but also needs more trust from the user.
- Open in Editor: This opens the generated plan in the editor so you can inspect or refine it more comfortably.
I choose the second option here because I do not want this blog to become too long and full of repeated approval screenshots. This is a sample model in a test setup, so I am comfortable with moving a little faster for the sake of the walkthrough. In a real project, especially on a shared or important semantic model, I would choose the more careful path and review each approval step manually.
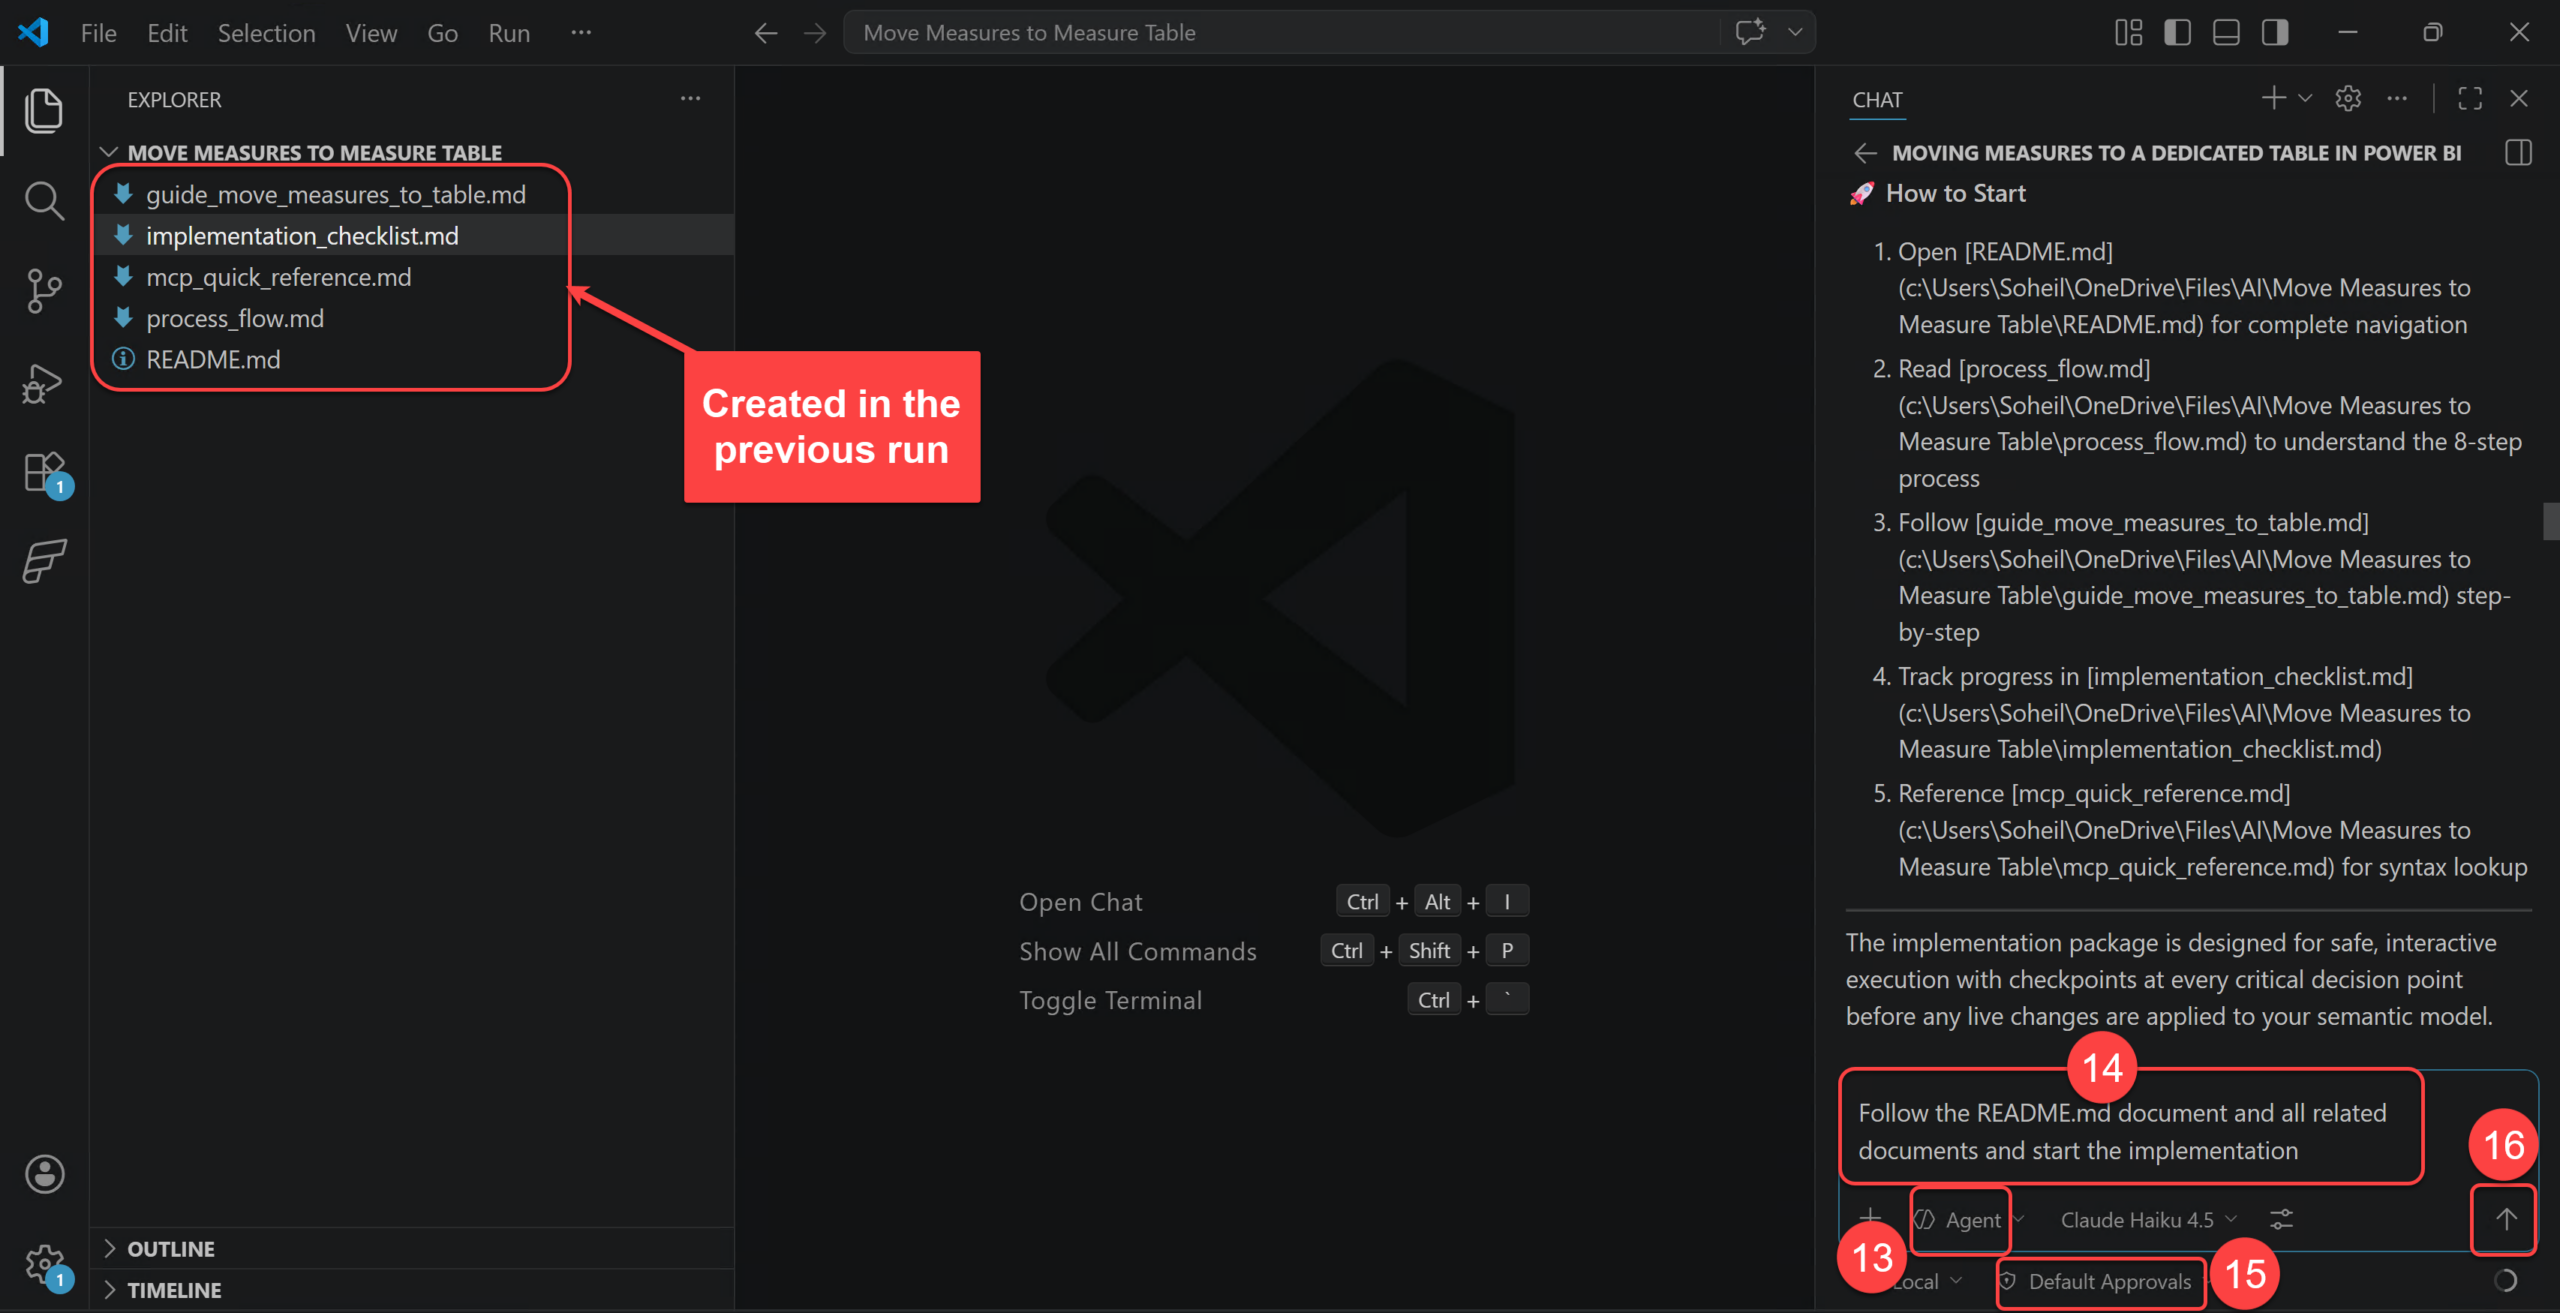
The results so far are five markdown files created in my project folder instead of starting the actual implementation. The reason is that I have explicitly asked Copilot in my prompt to “the process needs to take proper checks and ask for user’s feedback before applying the changes” so Copilot understood that the implementation package must be designed for safe, interactive execution with checkpoints at every critical decision point before any live changes are applied to my semantic model. So Copilot created a comprehensive 5-document implementation package for safely moving measures to a dedicated table using the powerbi-modeling-mcp server. All files are ready in my workspace. These files are:
- Open
README.mdfor complete navigation - Read
process_flow.mdto understand the 8-step process - Follow
guide_move_measures_to_table.mdstep-by-step - Track progress in
implementation_checklist.md - Reference
mcp_quick_reference.mdfor syntax lookup
Before continuing, it is worth pausing on these files for a moment. In Part 1, I explained that agentic AI is not just a chat response. It is a workflow where the agent plans, uses tools, follows guardrails, keeps useful context, and produces outputs we can review. These markdown files are a simple example of that idea in practice.
For example, process_flow.md is the planning part, guide_move_measures_to_table.md behaves like a small skill or recipe, implementation_checklist.md works as memory and checkpoints, and mcp_quick_reference.md documents the tools exposed by the MCP server. The README.md ties them together so the agent and the human can follow the same path. This is not a fancy setup, but it makes the work more explicit and easier to inspect.
This is another practical form of HITL. The generated files give me something concrete to review before the agent continues. Instead of trusting a hidden chain of steps, I can inspect the process, adjust it if needed, and only then let the agent move forward.
Let’s continue.
- I keep the Agent mode.
- I use this prompt to trigger the implementation:
Follow the README.md document and all related documents and start the implementation. - I set the permissions to Default Approvals.
- Click the Send button to send the prompt.
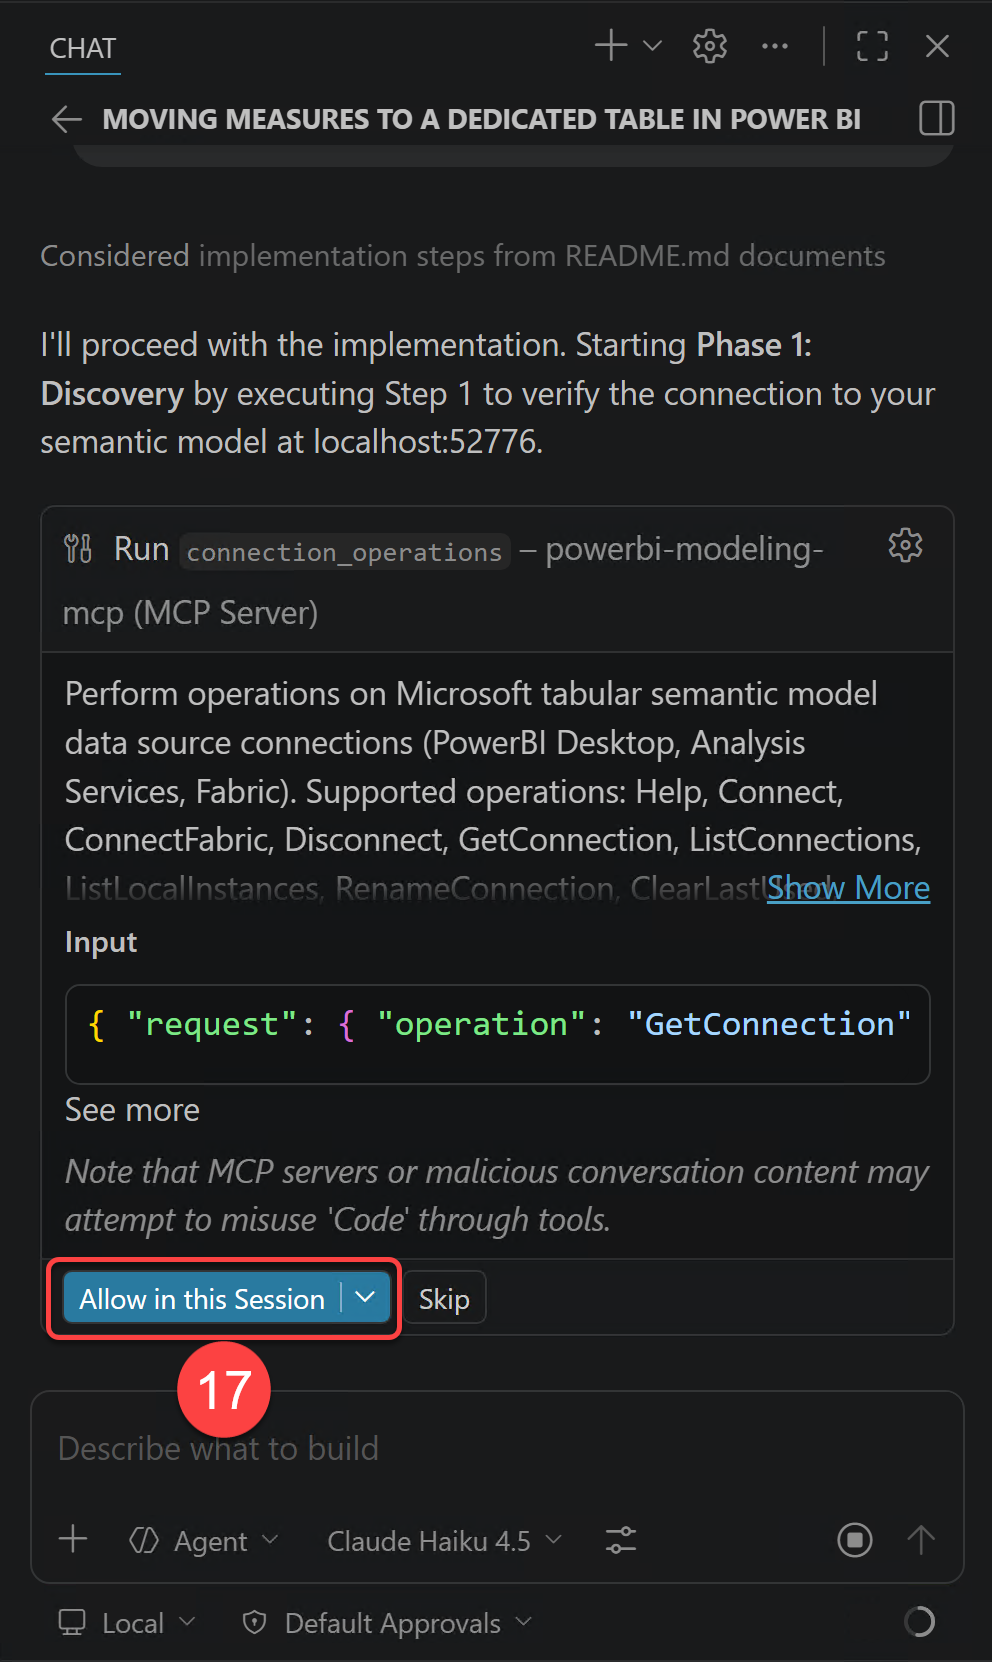
- In the first step I must confirm what the agent must do which is connecting to the semantic model from the
powerbi-modeling-mcp. So I click the Allow in this Session button.
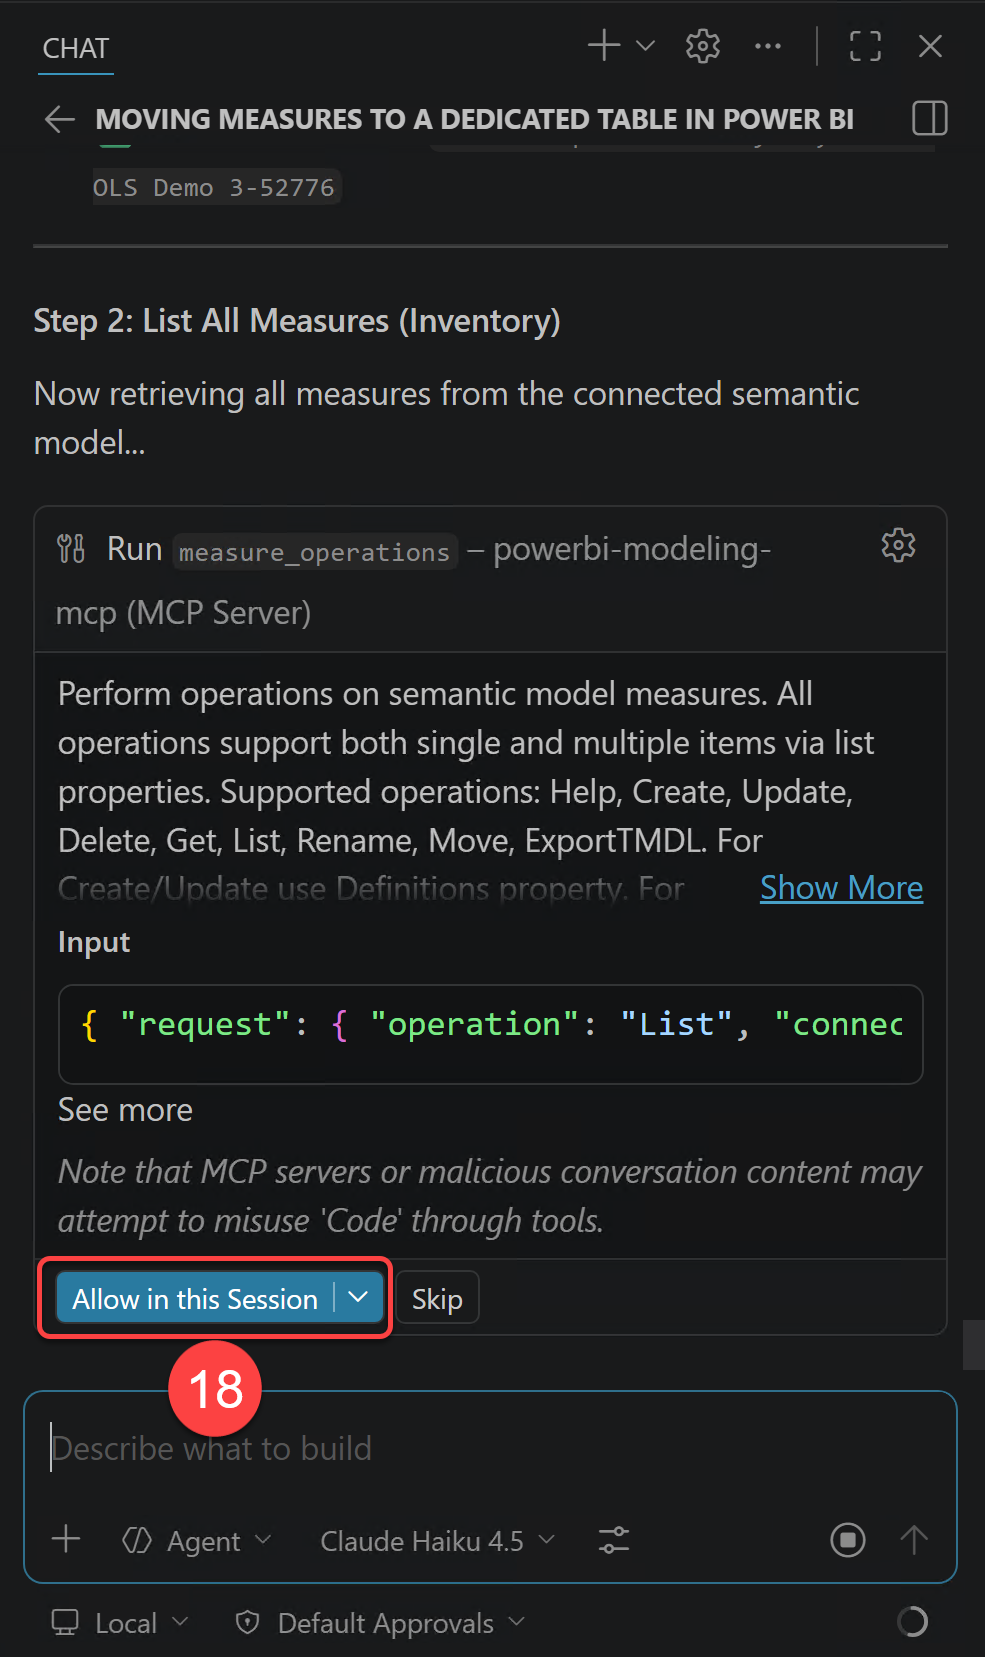
- I also allow Step 2 which is listing all measures.
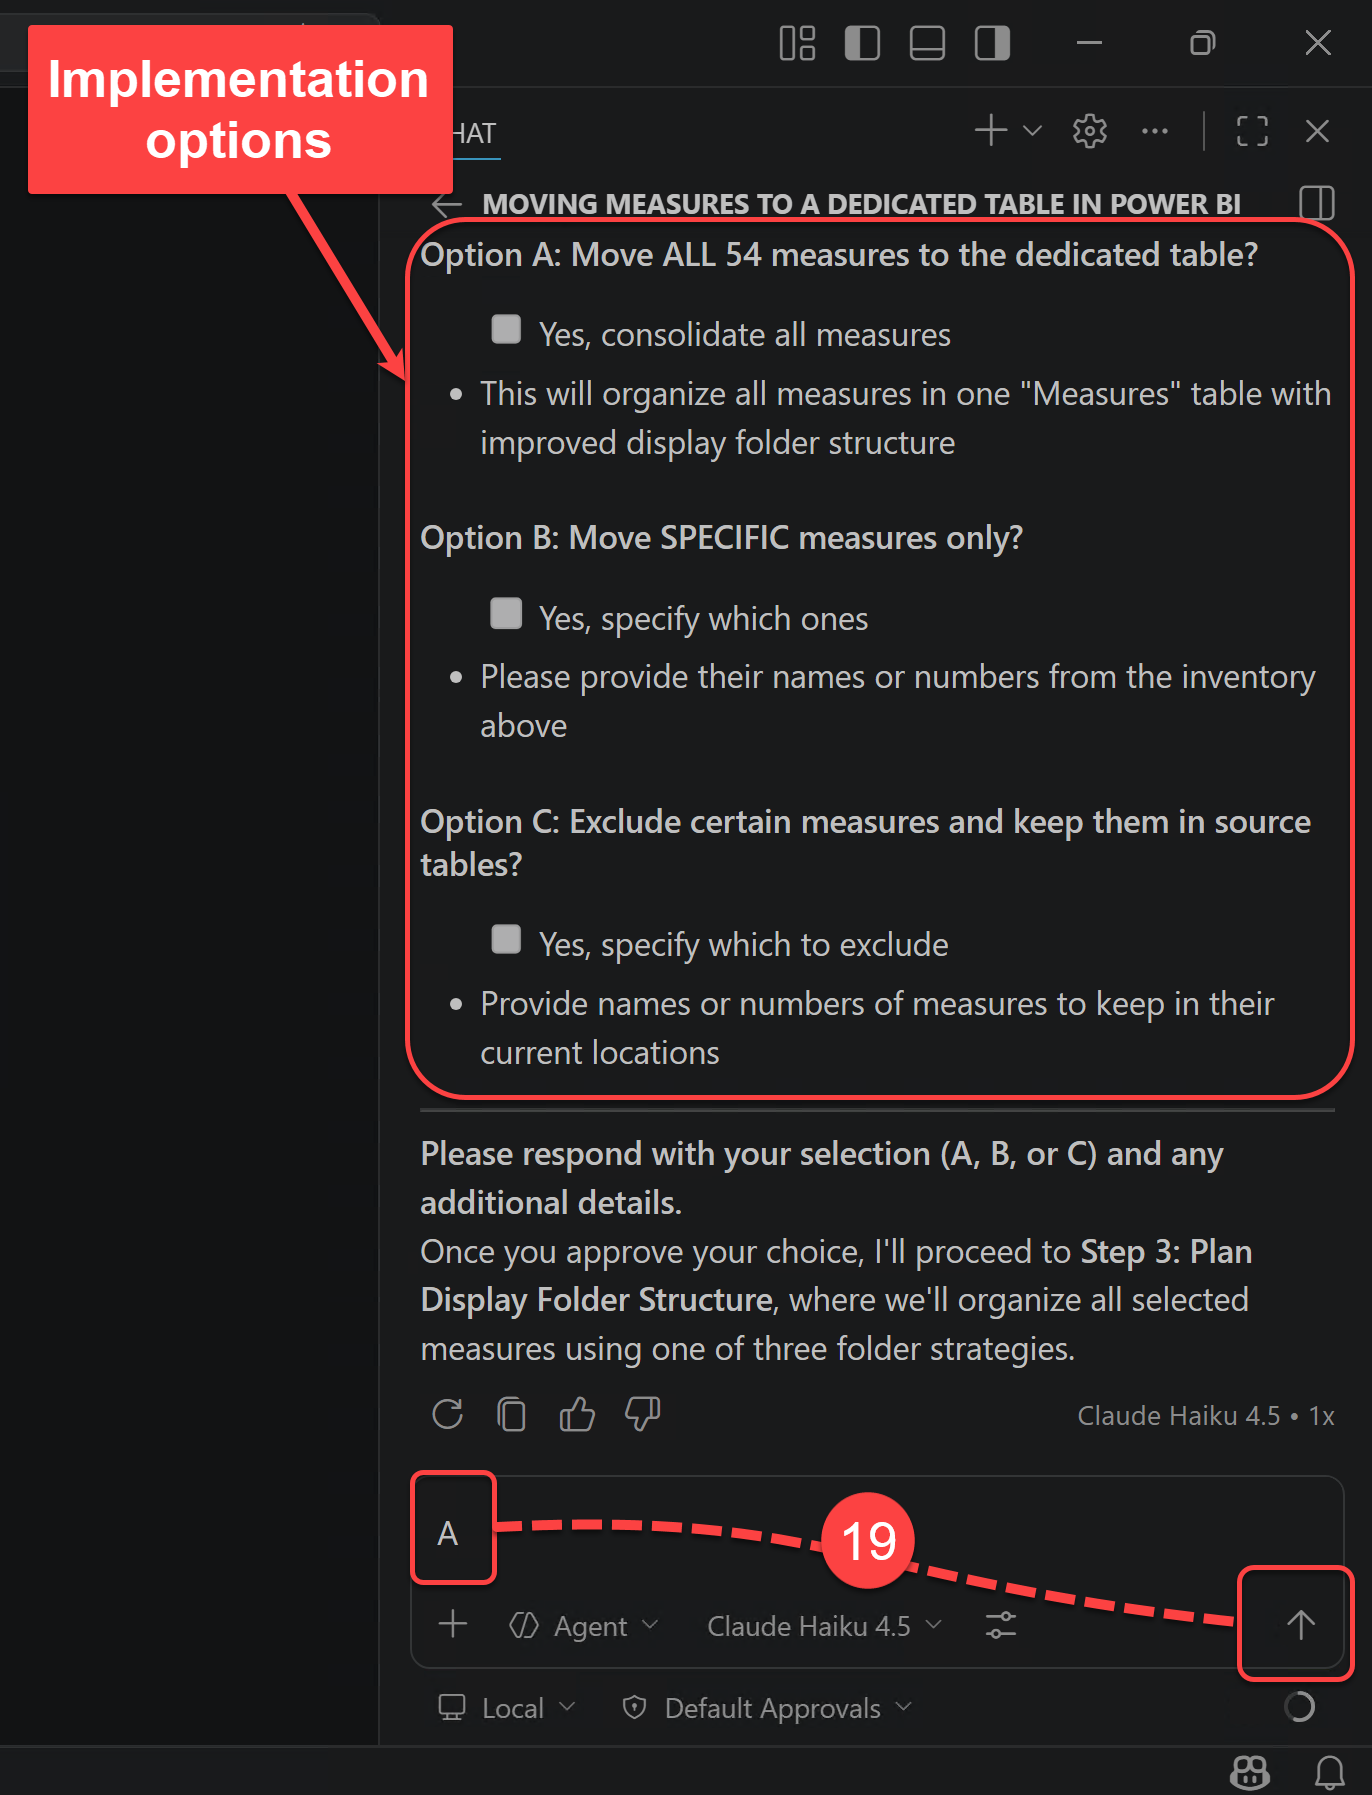
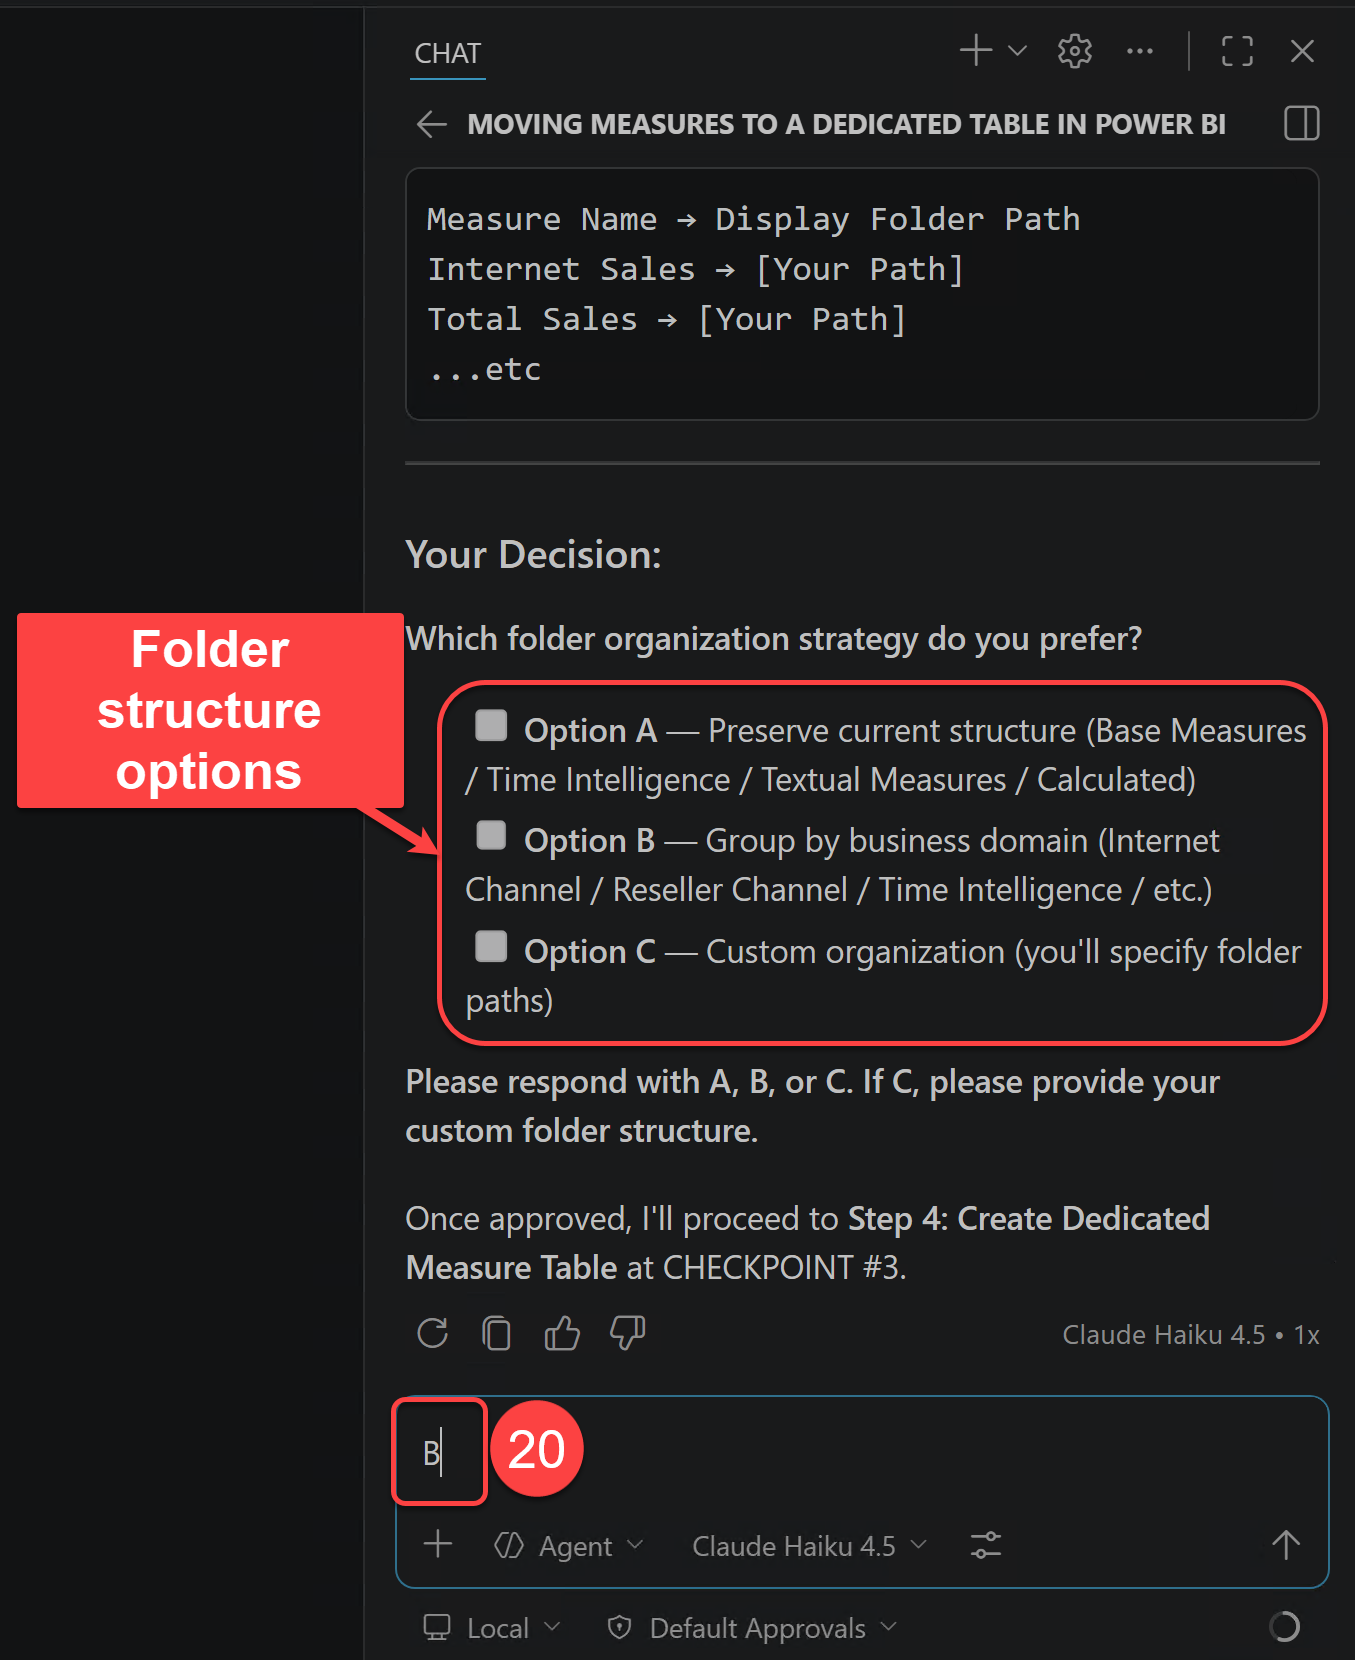
- Using the MCP server, Copilot correctly identified all measures. It now gives me three options for the next step. The first option is what I am after, therefore I type in A and click the Send button.
At this point Copilot presents three different strategies for organising my measures in Display Folders. The options are:
- Option A: Group by Original Display Folder (Preserve Current Structure). Maintains the existing folder hierarchy, adding unfoldered measures to logical groups.
- Option B: Group by Business Domain (Logical Business Grouping). Organizes measures by business function and type.
- Option C: Custom Organization. You define the display folder structure exactly as needed.
- In my setup the second option is what I am after, therefore I type B in the chat box and send my response.
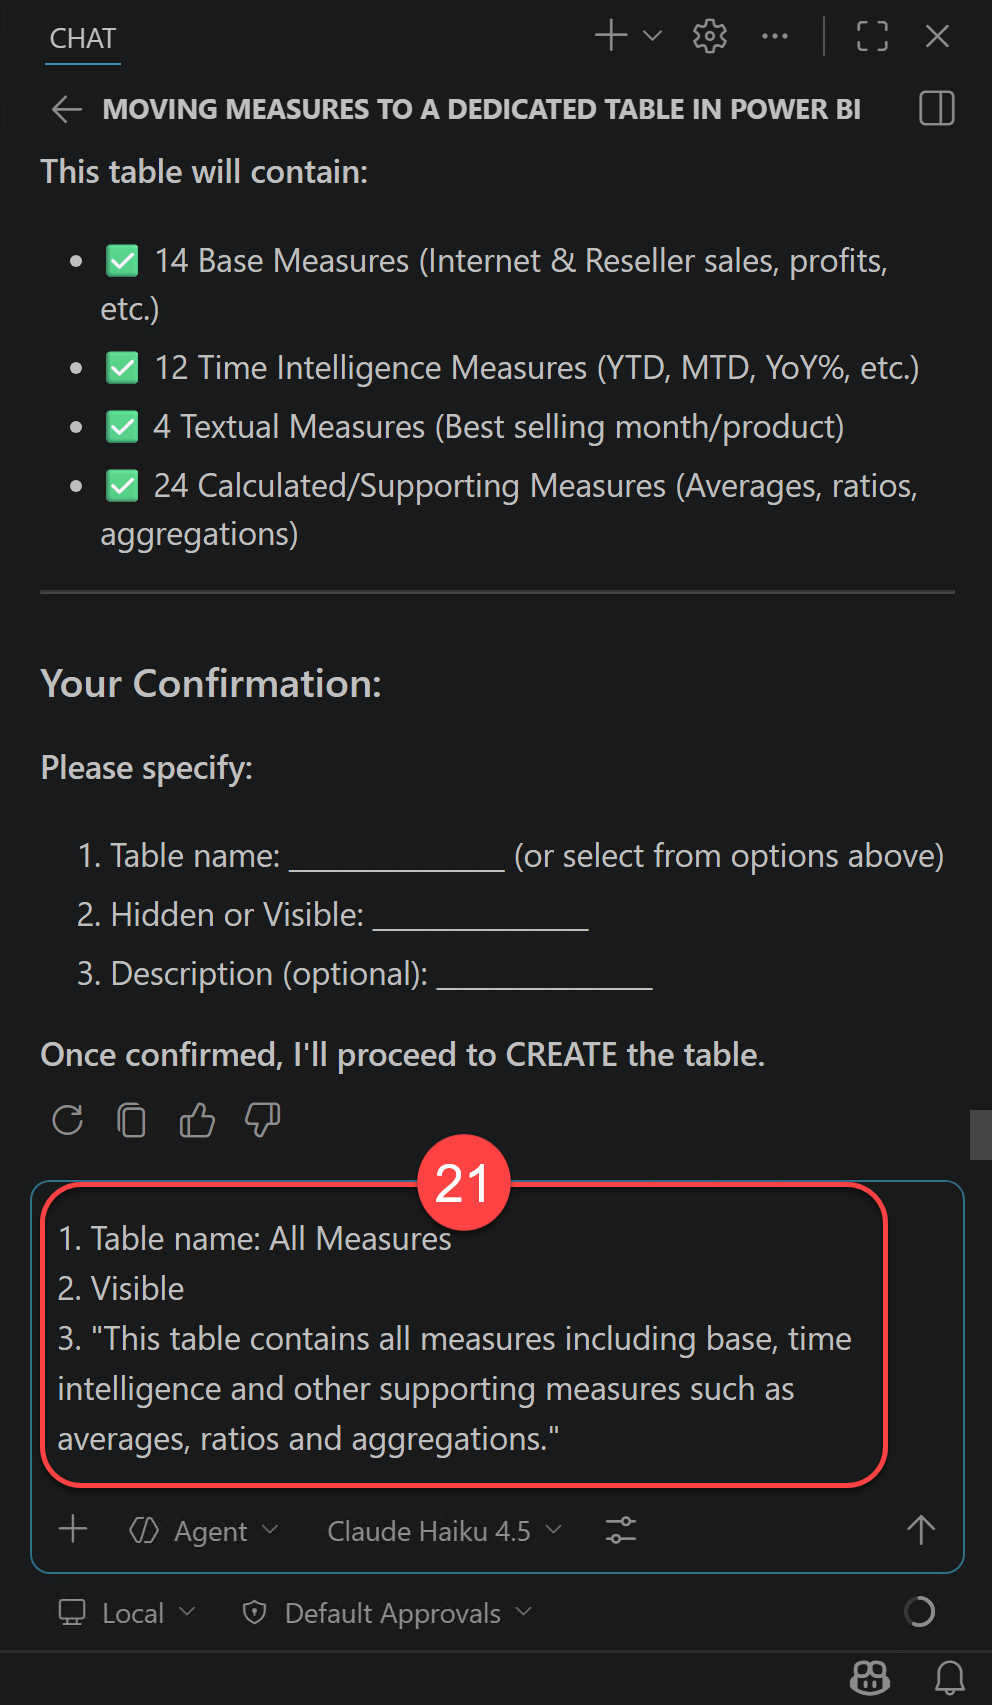
- I am now asked to confirm some information about the measure table to be created. I type in my response and send.
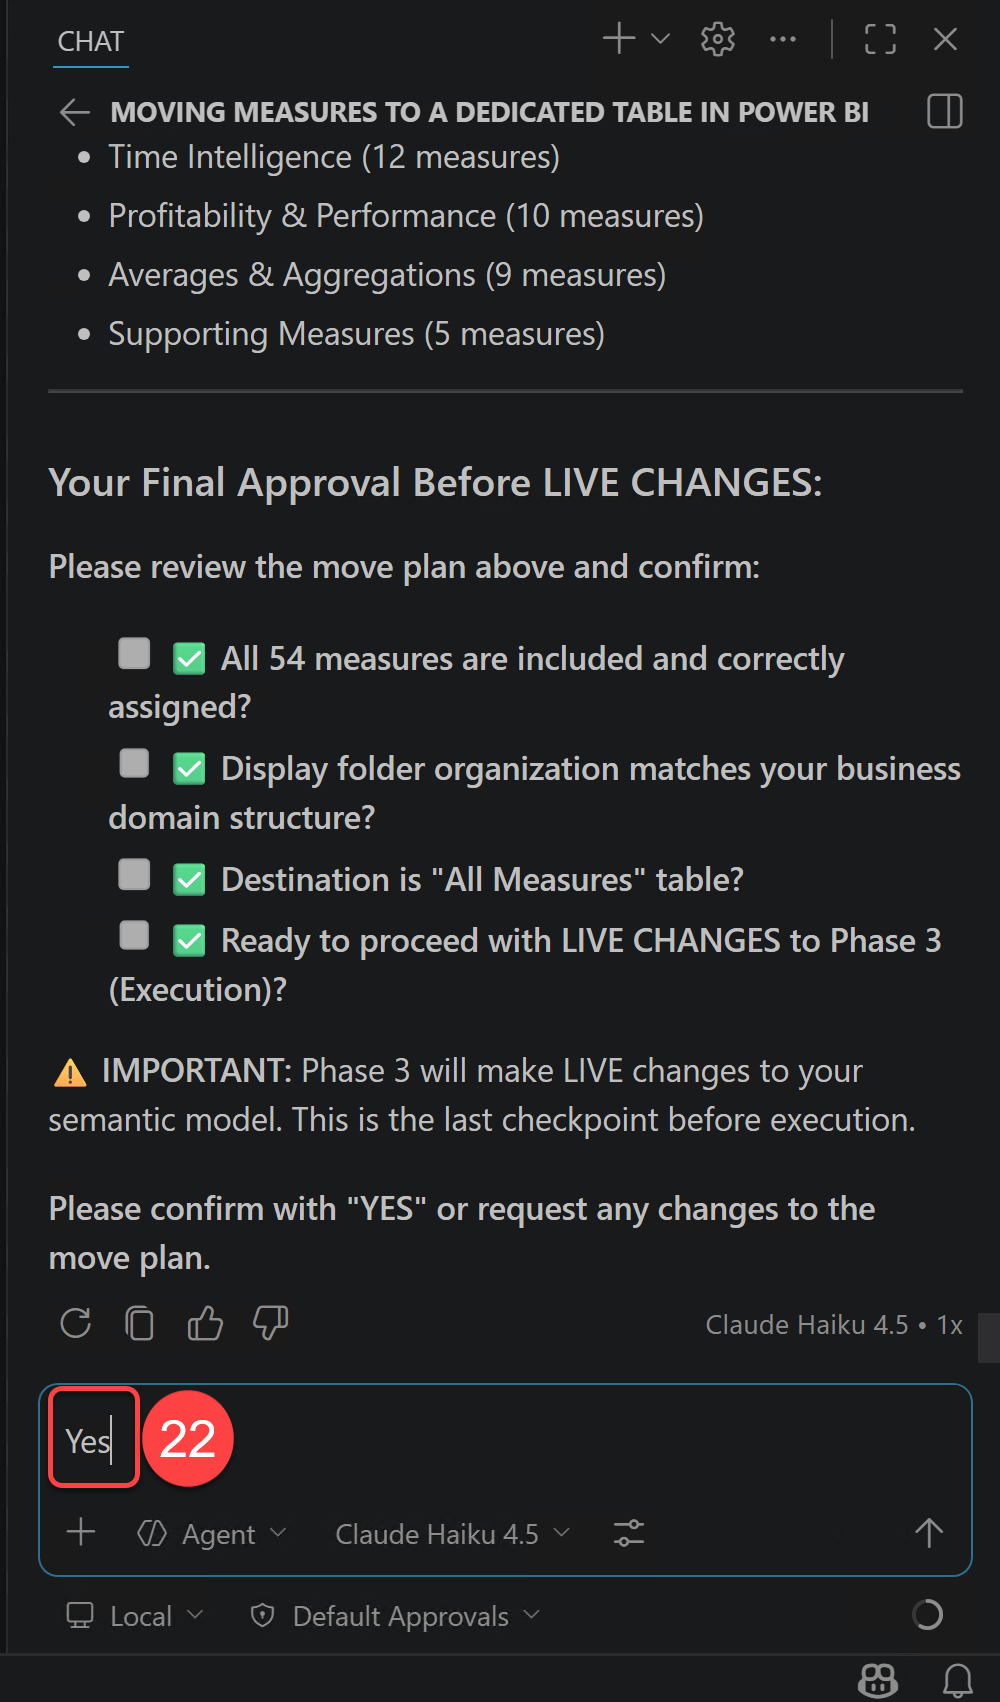
- This is the very last step that I must confirm my choices. So I go ahead and type YES and send my response.
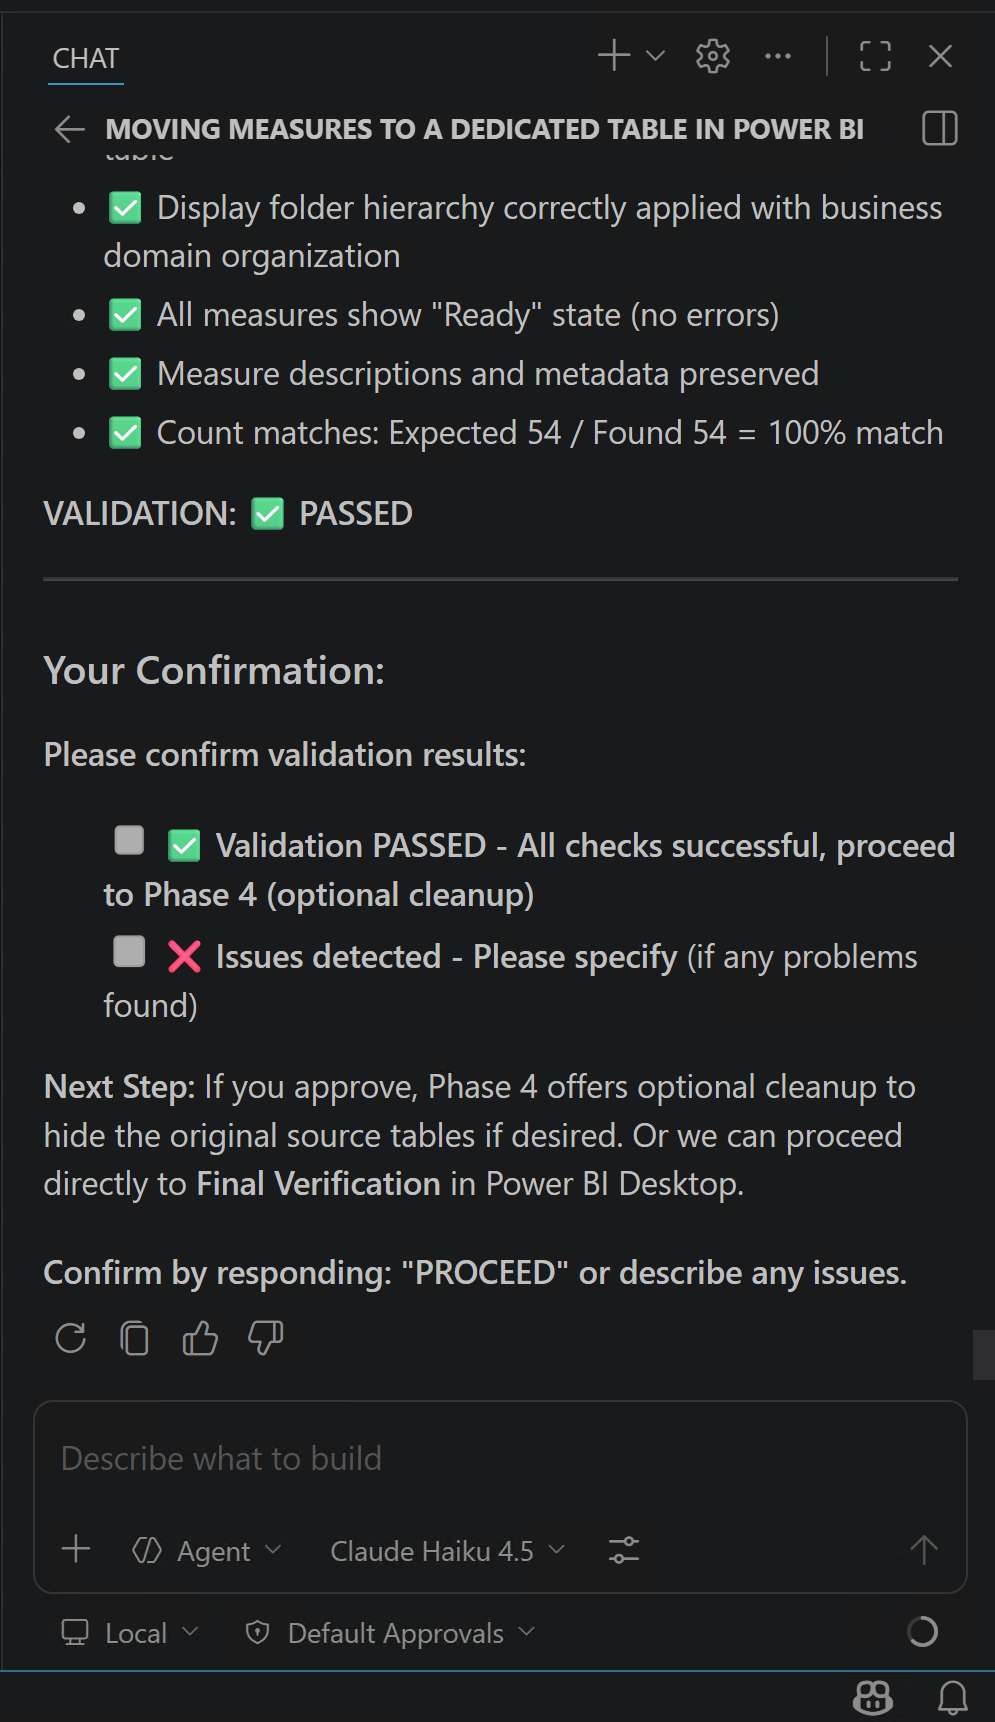
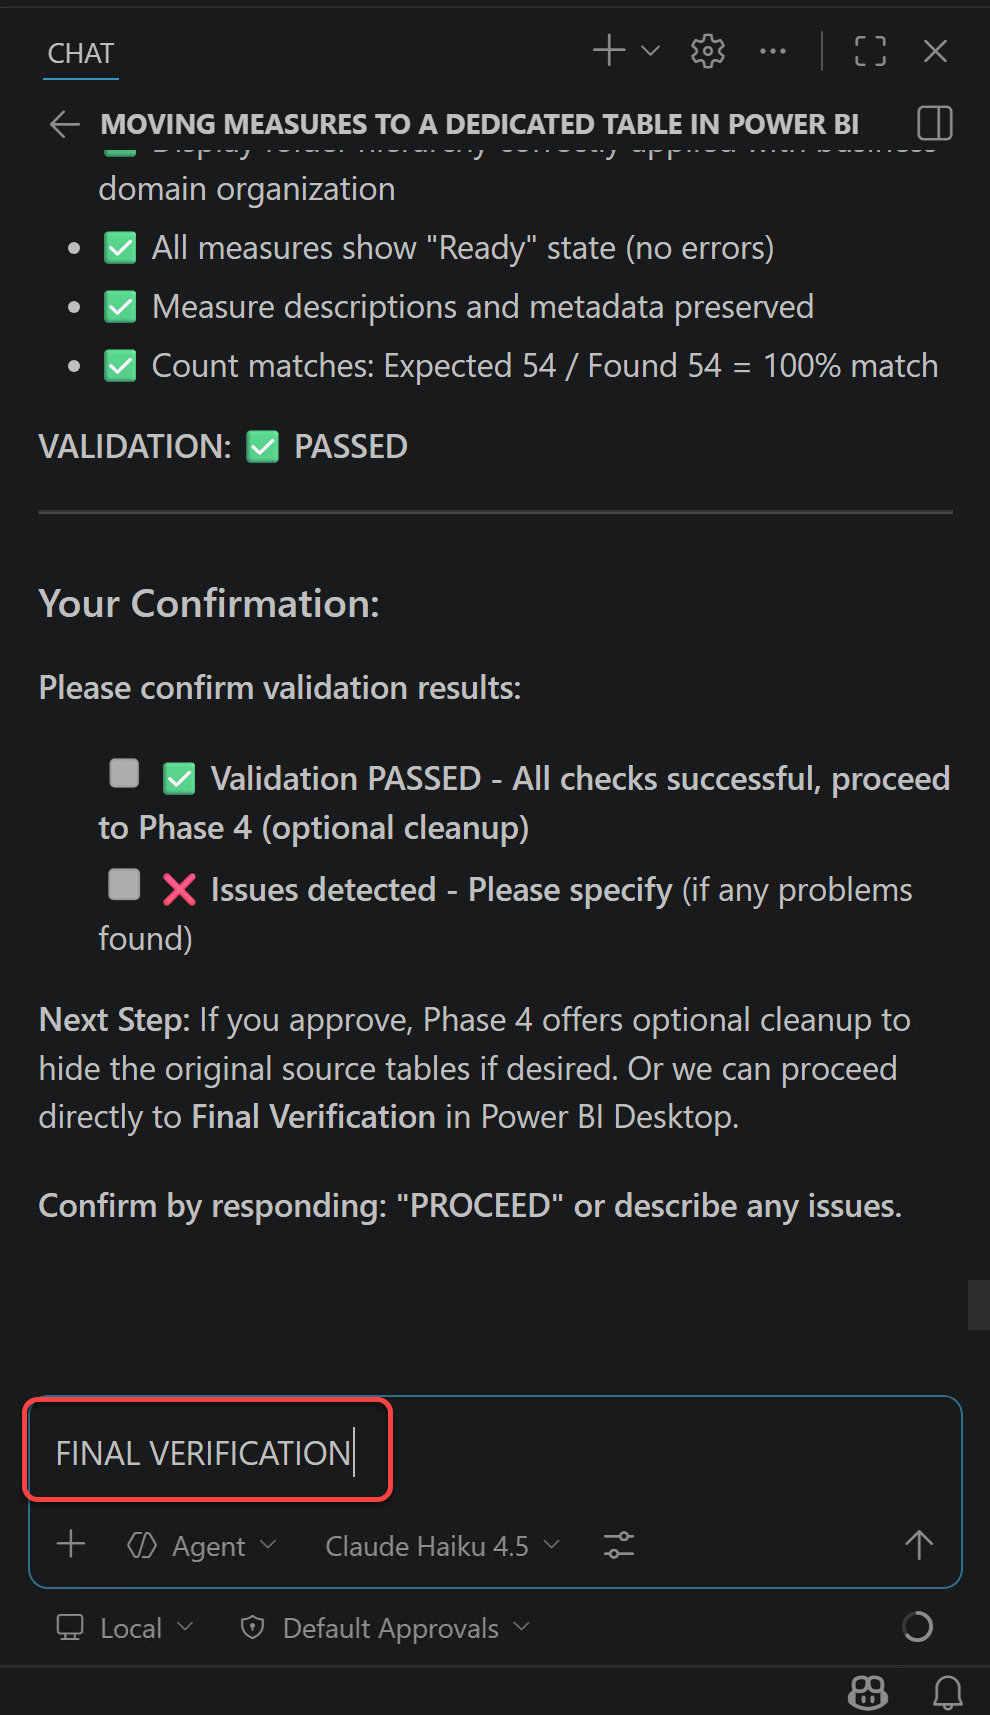
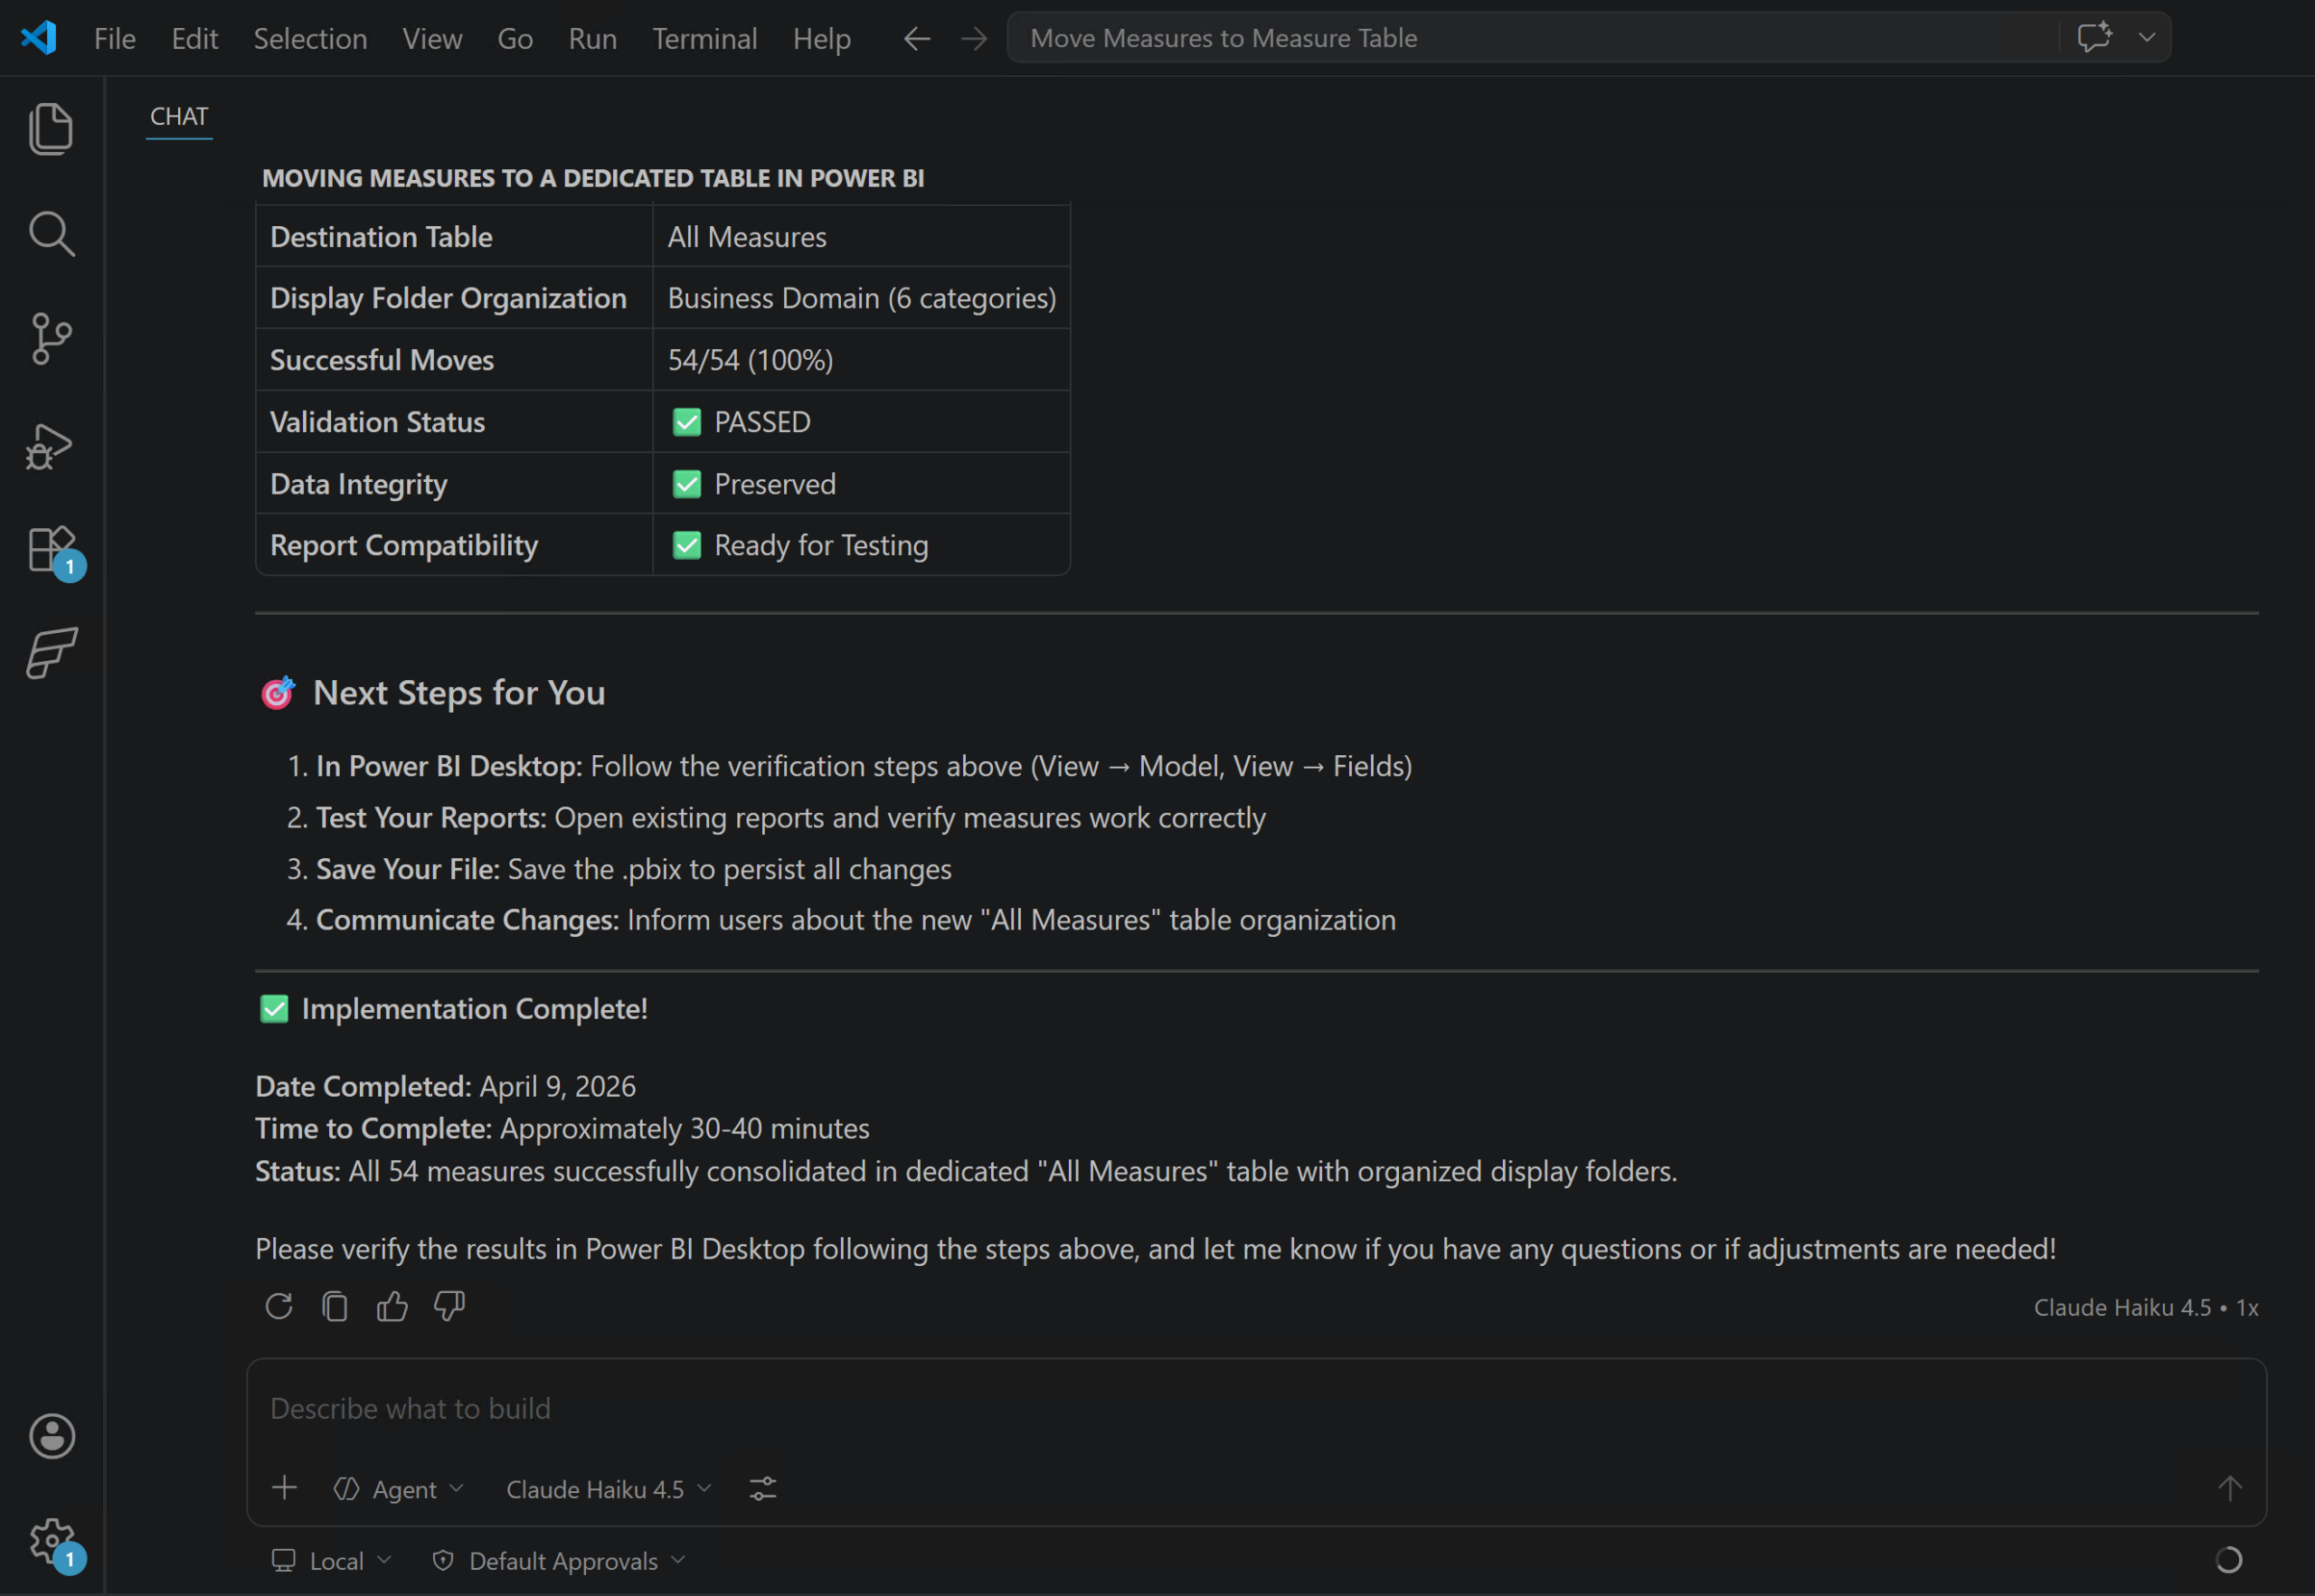
At this stage, the agent shows that the implementation is complete and that the changes have been applied to the semantic model. It also gives me an option to describe any issues for further investigation.
When I look at the semantic model in Power BI Desktop, I can already see that there are some issues. I also get a warning message saying “One or more calculated objects need to be manually refreshed.”, as shown in the following screenshot:
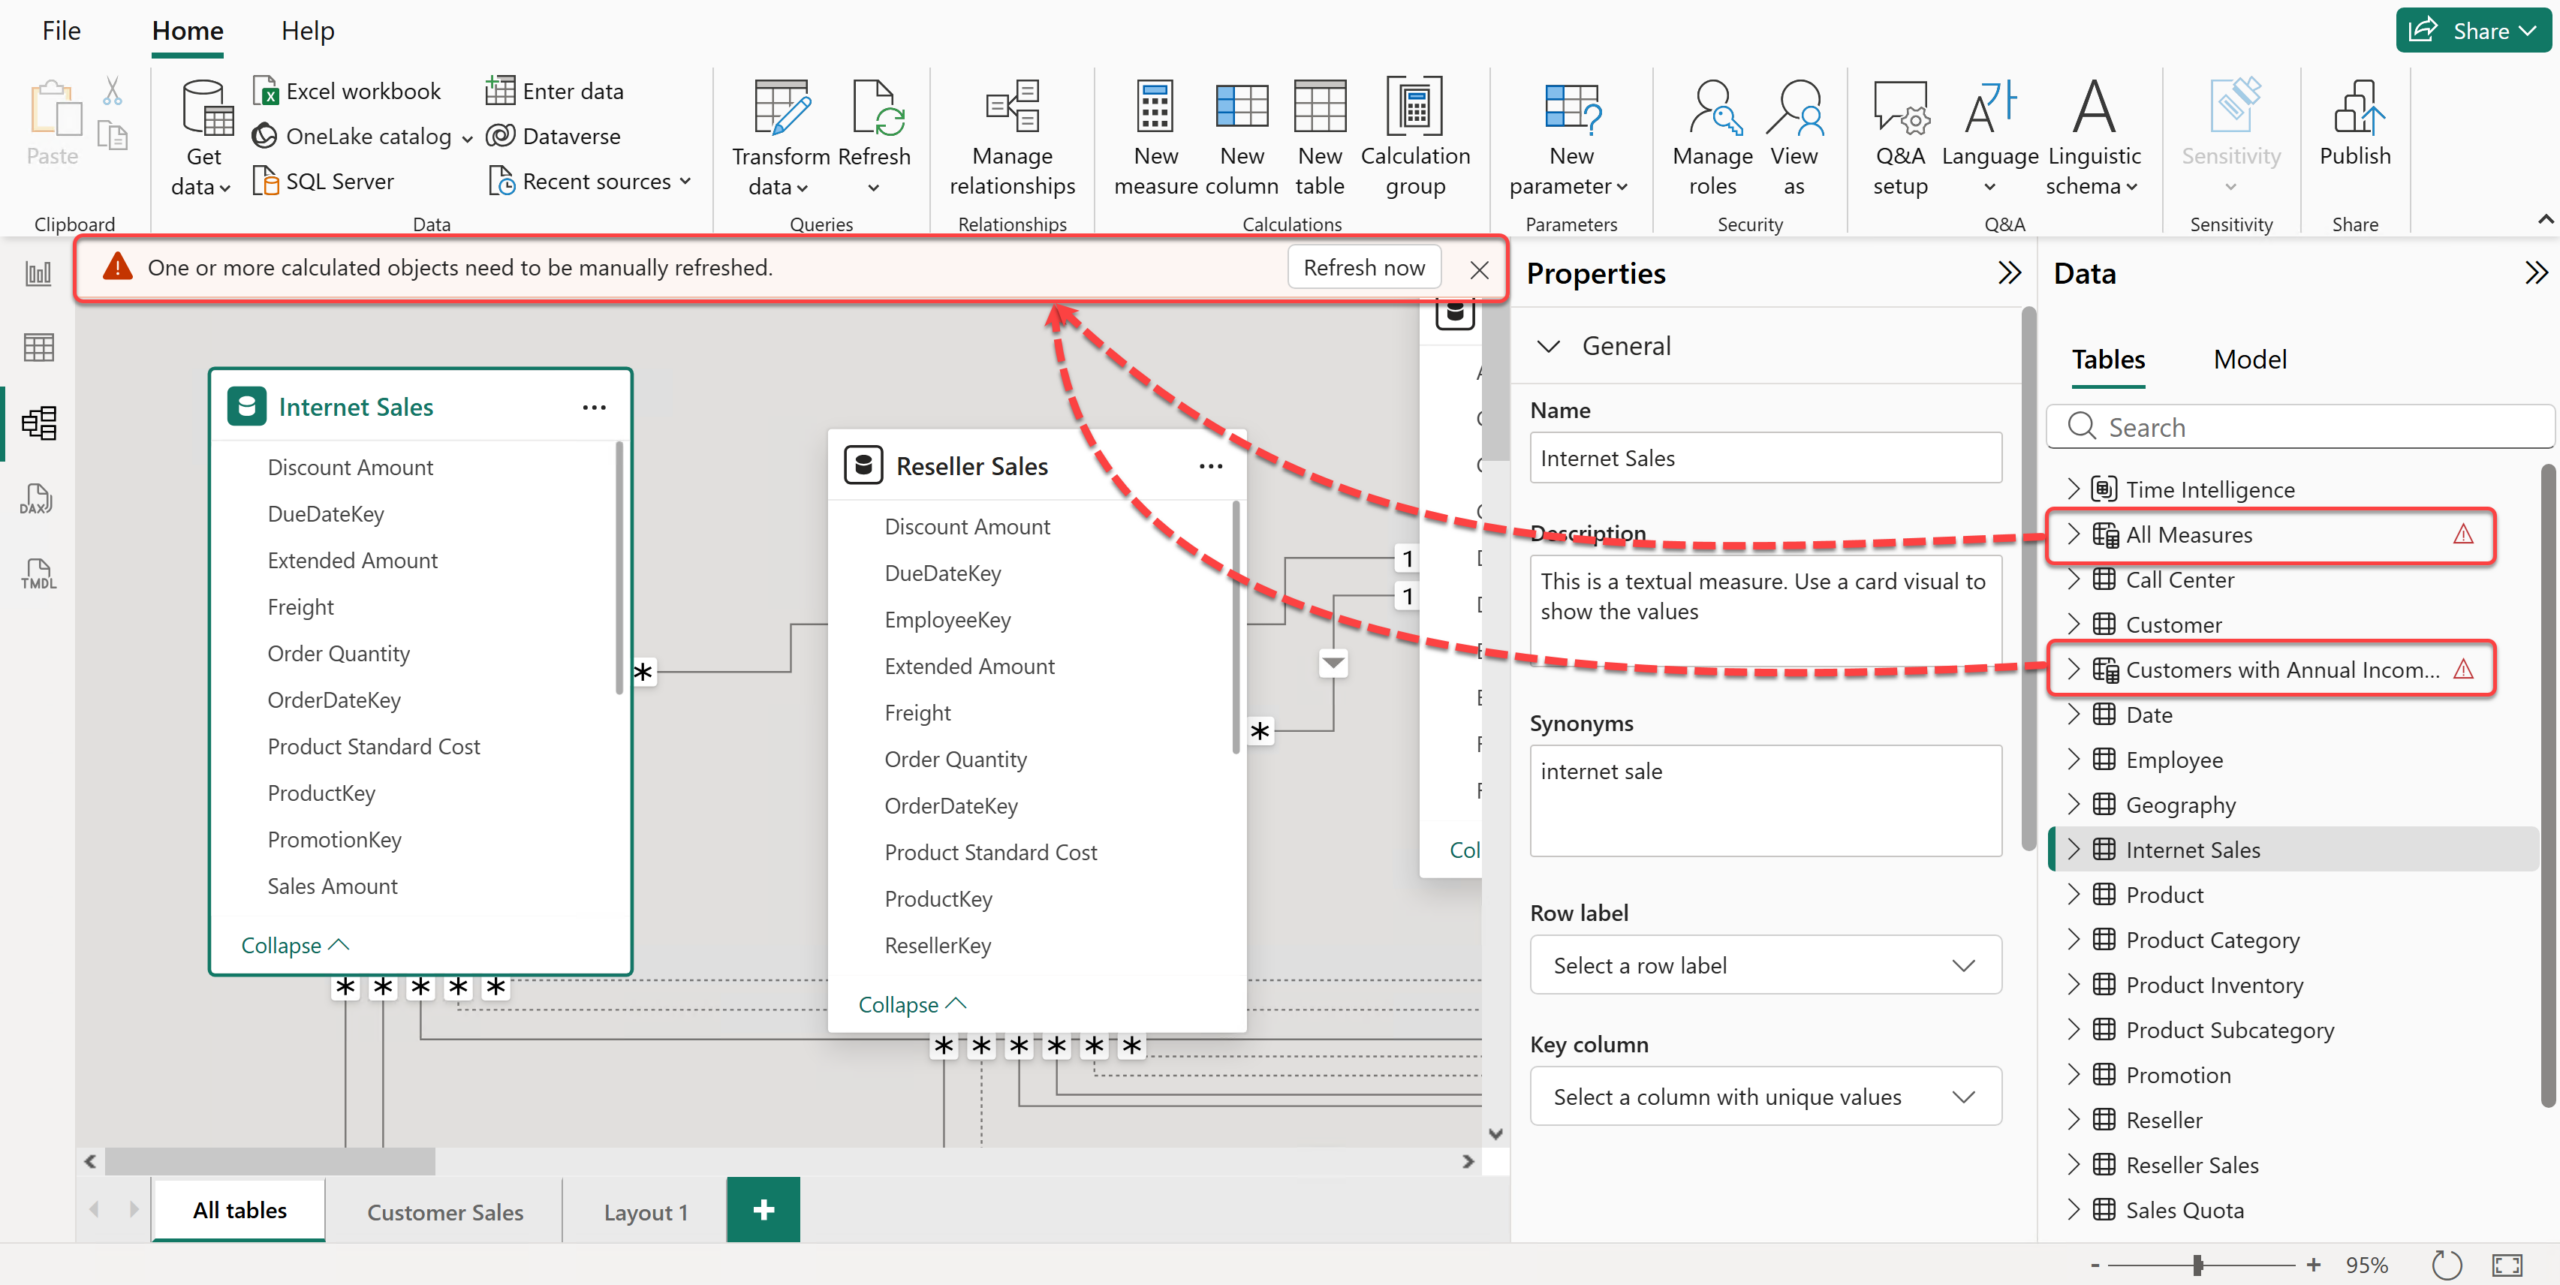
Let’s click the “Refresh Now” button.
Ah, well, apparently that fixed it. As you can see, the new measure table is there, the measures are neatly organised into folders, and the table description has also been added without any obvious issues. That said, in my experience, some problems do not surface in Power BI Desktop until after a full refresh. So I strongly advise refreshing the data before making any further changes to the model. In this case, the refresh completed without any issues.
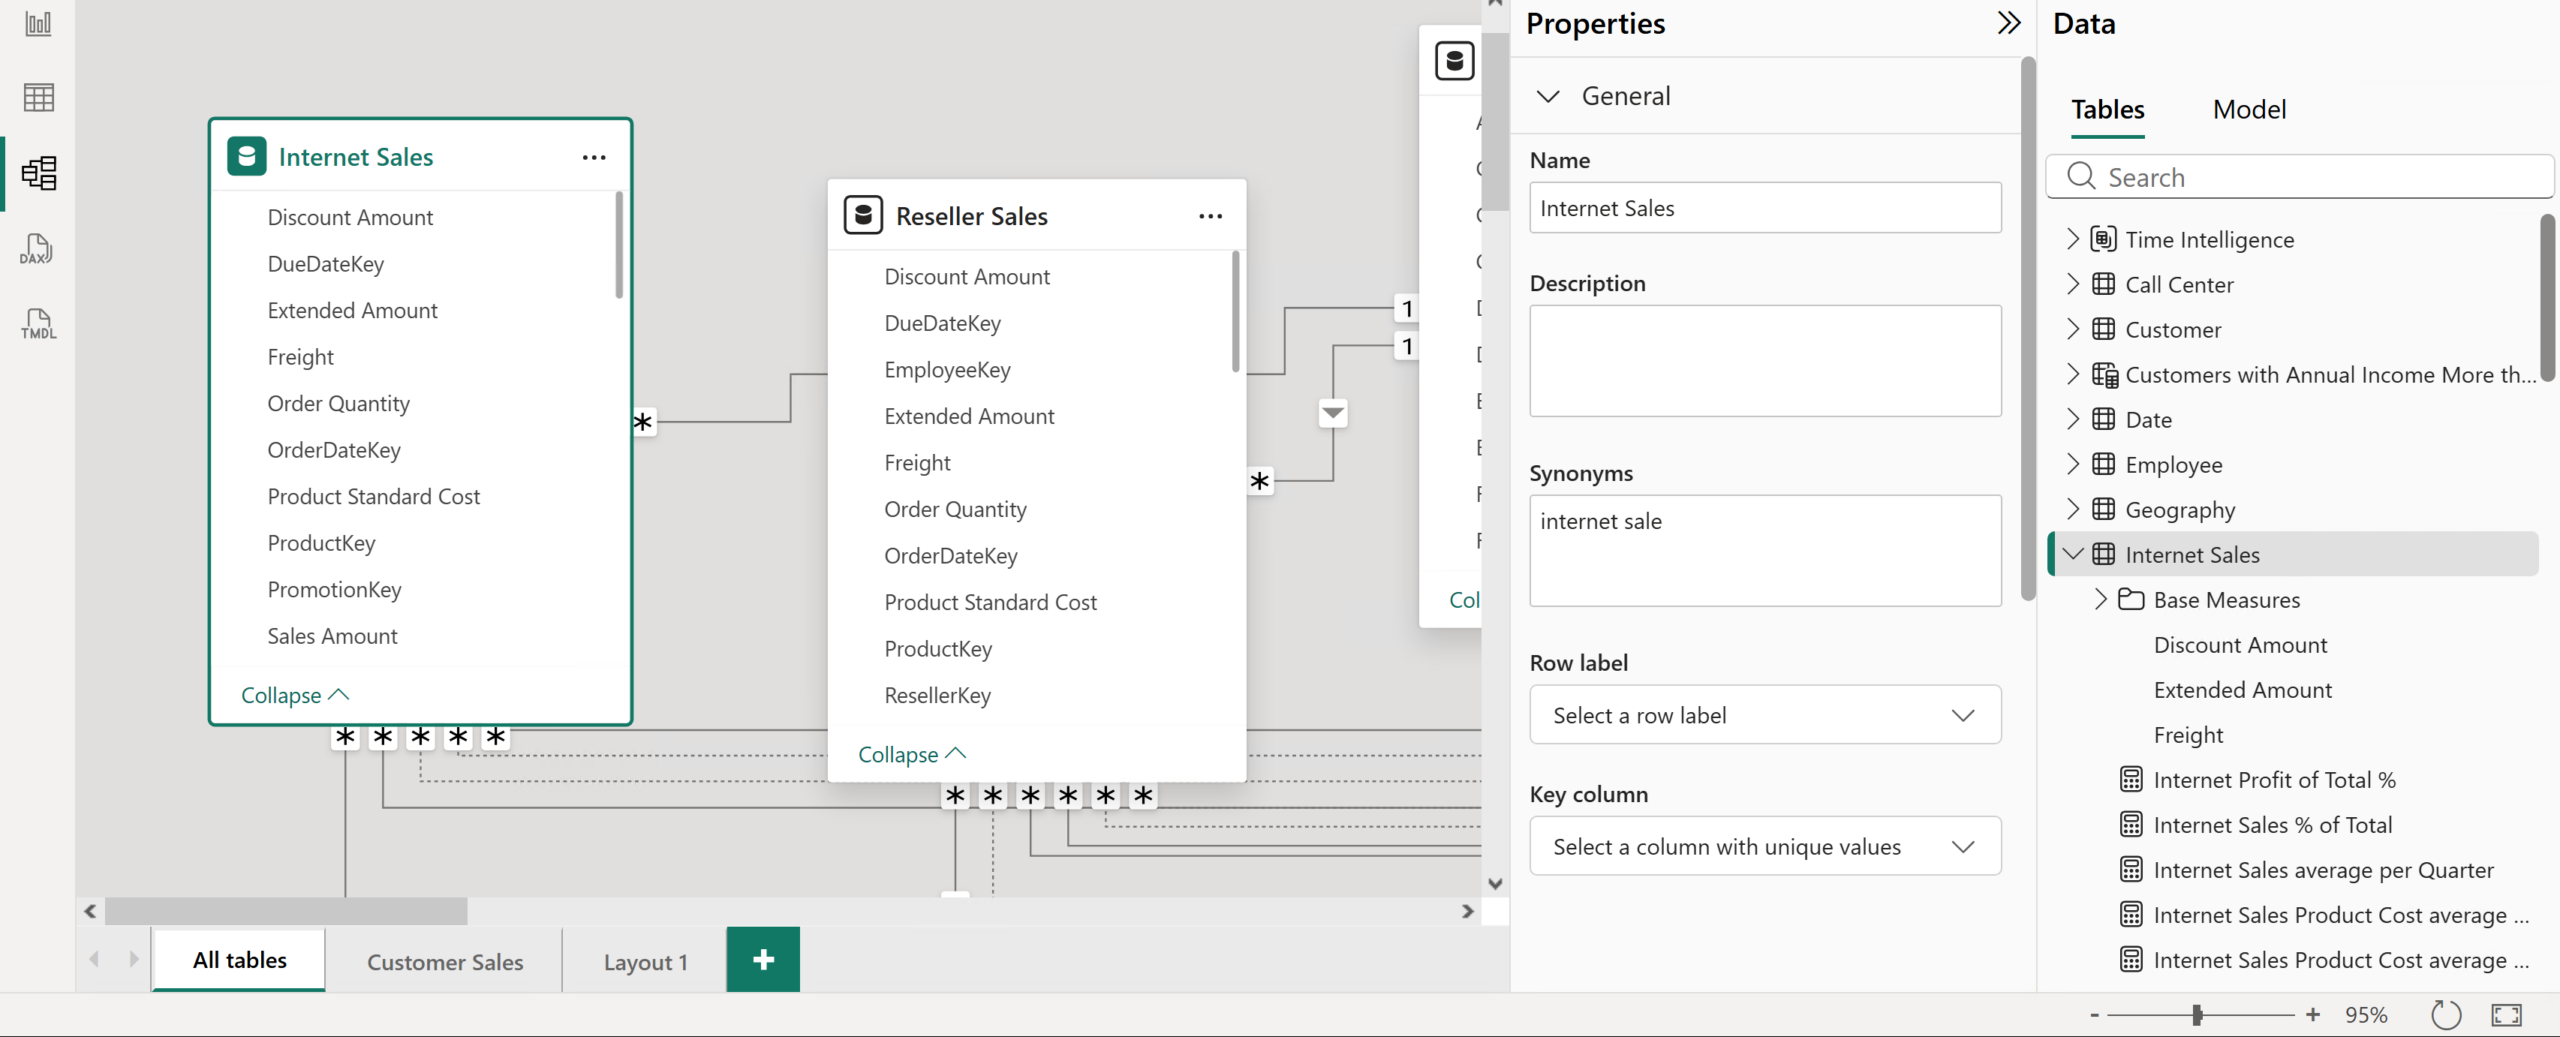
This is how my semantic model looked like before applying the changes using Copilot:
Now I confidently go back to Copilot to confirm the changes.
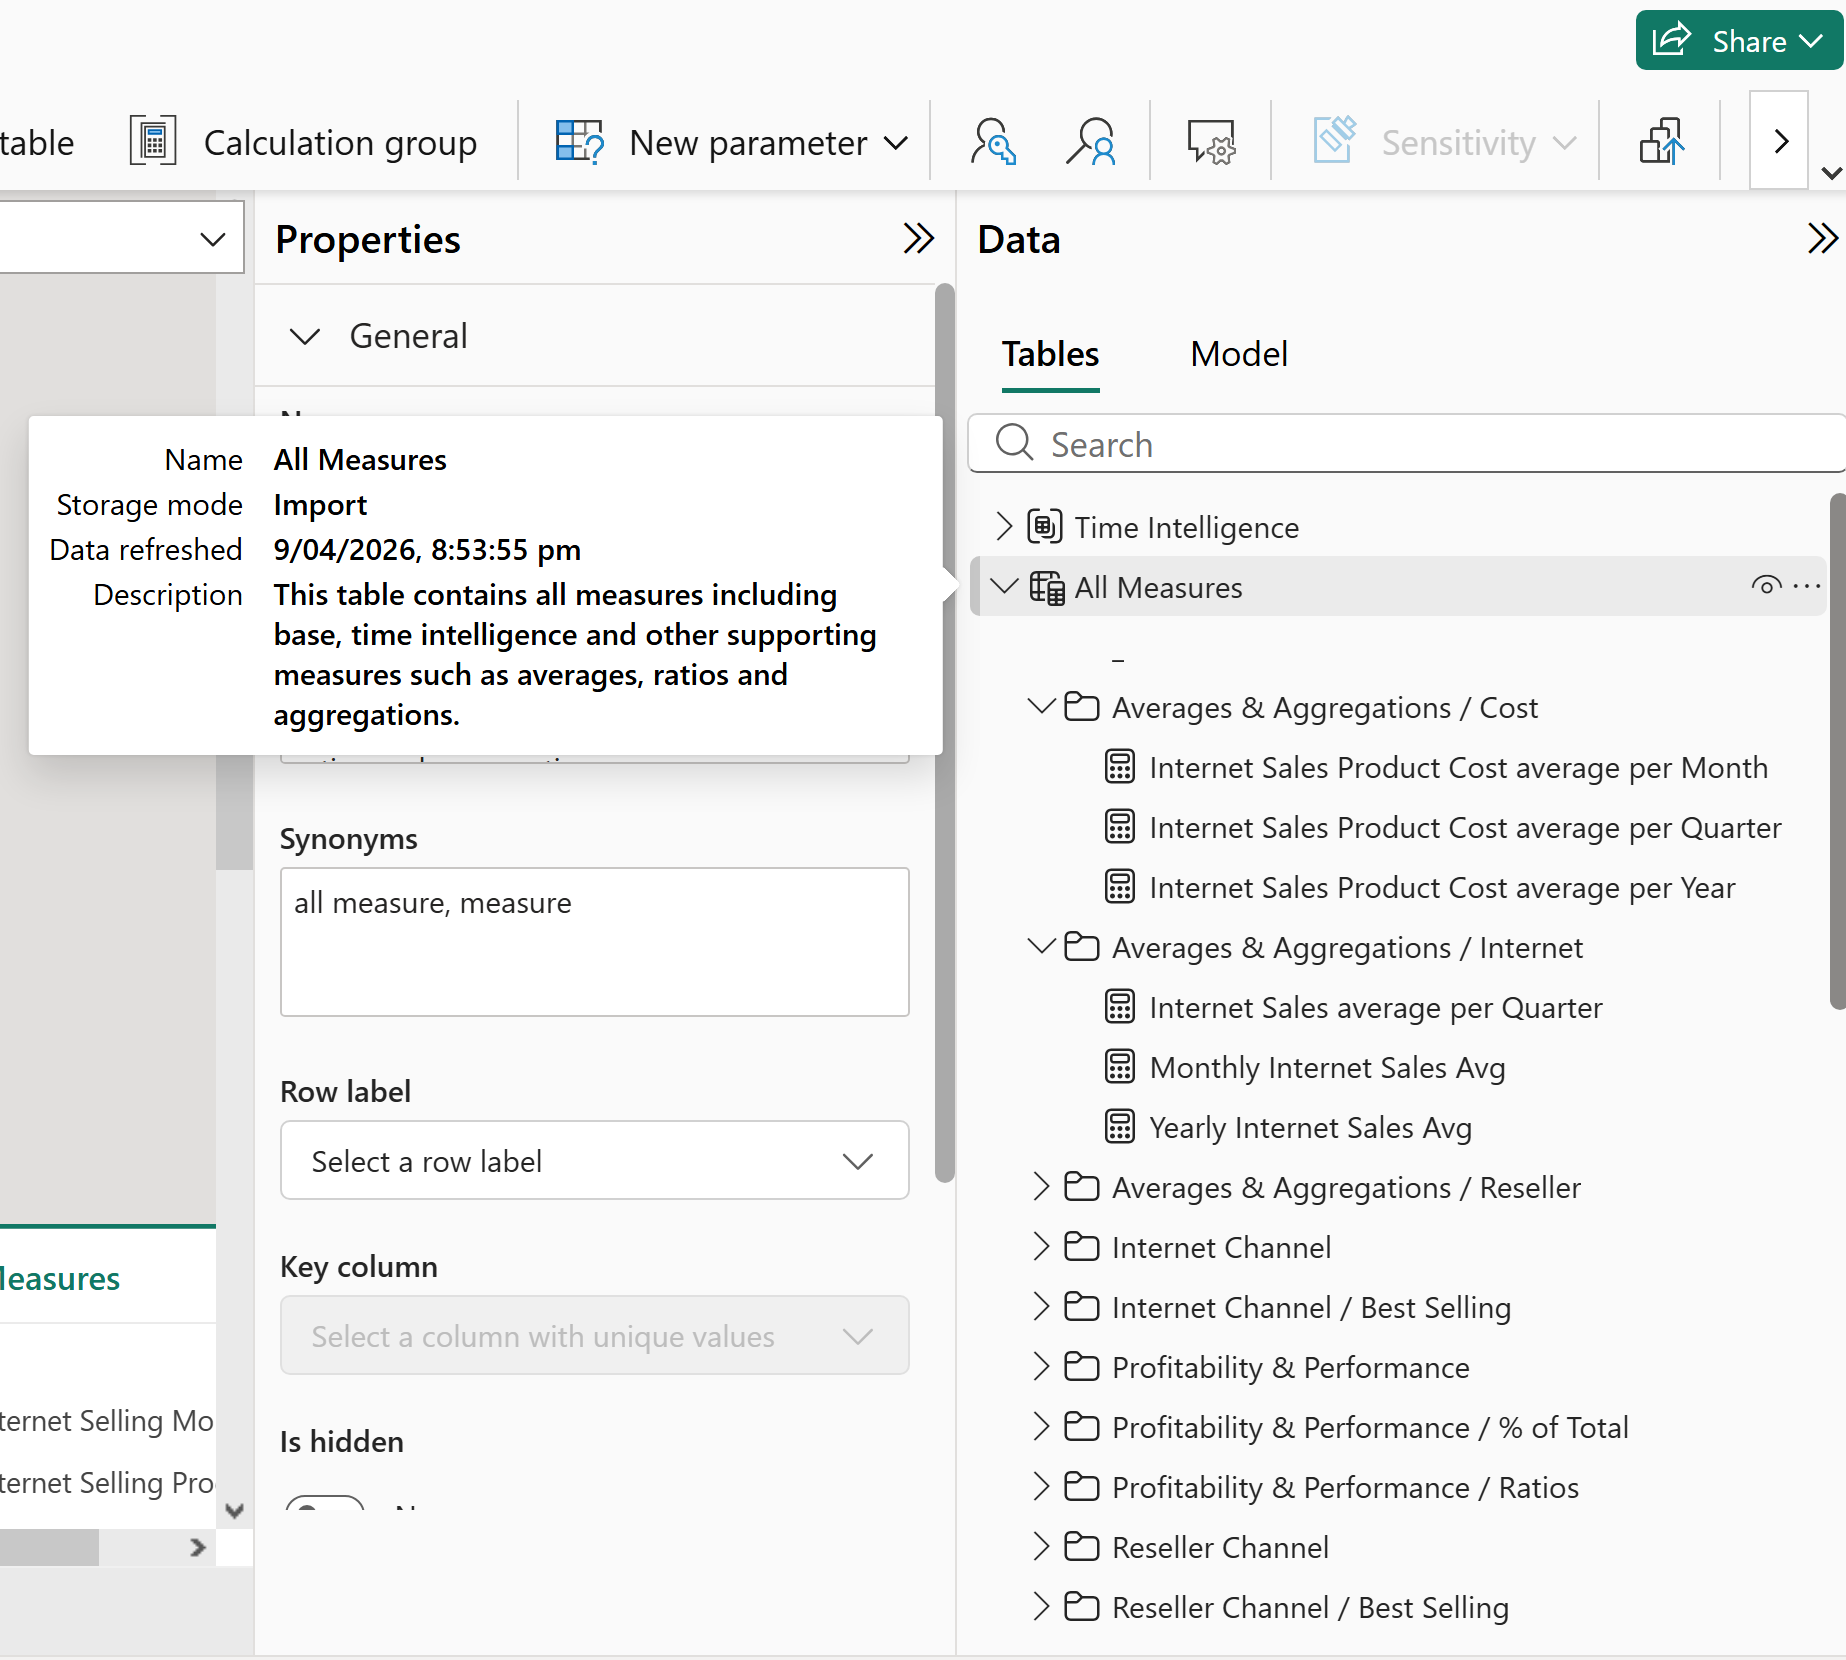
After that, Copilot provides a report on what it has done, which is quite interesting by itself. As the following screenshot shows, it took around 30 to 40 minutes to safely move 54 measures into a dedicated “All Measures” table and organise them into well-structured display folders.
My estimate is that a professional developer could probably do the same work manually, without using Agentic AI, in around 30 to 90 minutes (or even more), depending on the complexity of the folder structure and how carefully they wanted to validate each step.
However, there is an important point here. The agent will not always do the job exactly how we expect it to do it the first time. Sometimes we need one or more iterations to get the result exactly how we want it. In this example, you may have noticed in the previous screenshot that the folder structure is not perfect. The agent created folders such as Averages & Aggregations / Cost, Averages & Aggregations / Internet, and Averages & Aggregations / Reseller. In practice, I would prefer a single Averages & Aggregations folder with three subfolders named Cost, Internet, and Reseller.
This is something we could have reduced with a more deterministic prompt. For example, I could have described the exact folder hierarchy I wanted, where it should be applied, and how nested folders should be named. In larger projects, repository custom instructions can also help keep repeated expectations more consistent across prompts. Because I did not do that clearly enough at the beginning, the next meaningful step is another iteration to ask the agent to correct the folder structure. So the lesson is simple:
Either spend a wee bit more time at the beginning to describe what you want, where you want it applied, and how you want it done, or expect to spend that time later through follow-up iterations. There are ways to make agents behave more deterministically, and I will cover those situations in future posts.
So, in this particular task, we may not have saved a huge amount of time. But imagine a more complex activity, such as adding meaningful descriptions to all measures in a large semantic model. My estimate is that a professional developer could easily spend 3 to 6 hours to manually doing that properly, especially if they needed to understand the business meaning of each measure and keep the wording consistent. With AI, I think the execution time could still be around 30 to 40 minutes, assuming the model is accessible, the prompts are clear, and the output is reviewed carefully.
A note about the Autopilot option, I am working on a test system, and the semantic model is only a sample model, so I am not too worried if the process breaks it. But you should still be careful with the autopilot option, especially when you are working on a real model or anything you cannot easily recover.
Final Thoughts #
If there is one message I want this walkthrough to leave behind, it is this:
Agentic AI works best when the task is specific, the tools are clear, and the checkpoints are real.
Do not ask the agent to do a vague “cleanup” on a real semantic model and hope for the best. Give it a narrow task, review each decision, and validate the result inside Power BI Desktop before you trust the outcome.
In Power BI and Fabric work, those checkpoints are not optional in my view. They are the thing that turns a risky automated change into a controlled professional workflow. That is a slower way to start, but it is much safer, and in my view it is also the more professional way to work with these tools.
One more thing that is worth mentioning is licensing. Everything I showed in this blog was done by using the Free licensing tier of GitHub Copilot. For a free experience, this is actually amazing. But we should not forget that the Free tier has limited capabilities and limited credits. Unfortunately, I forgot to take a screenshot of the remaining credits at the end of preparing the samples for this blog, but take it from me, the whole process consumed almost 35% of my free credit, which is not too bad at all.
In the next blog, I will go through more complex scenarios using a paid GitHub Copilot licensing tier and more advanced models available in GitHub Copilot. See you then.
Discover more from BI Insight
Subscribe to get the latest posts sent to your email.