Power BI is a powerful tool for creating and sharing interactive data visualizations. But how can you collaborate with other developers on your Power BI projects and ensure quality and consistency across your reports? In this series of blog posts, I will show you how to integrate Power BI with Azure DevOps, a cloud-based software development and delivery platform. We can integrate Azure DevOps with Power BI Service (Fabric) as well as Power BI Desktop.
The current post explains how to set up Azure DevOps and connect a Power BI Workspace.
The next blog post will explain how to use it on your local machine to integrate your Power BI Desktop projects with Azure DevOps.
A brief history of source control systems
Before we dive into the details of Power BI and Azure DevOps integration, let’s take a moment to understand what source control systems are and why they are essential for any software project.
Source control systems, also known as version control systems or revision control systems, are tools that help developers manage the changes made to their code over time. They allow developers to track, compare, and roll back changes when necessary and collaborate with other developers on the same project.
There are two main types of source control systems: centralised and distributed. Centralised source control systems use Client-server approach to store all the code and its history in a single server, and developers need to connect to that server to access or modify the code. Examples of centralised source control systems are Microsoft’s Team Foundation Server (TFS) which rebranded to Azure DevOps Server in 2018, IBM’s ClearCase, and Apache’s Subversion.
On the other hand, distributed source control systems use a peer-to-peer approach, allowing each developer to have a local copy of the entire code repository, including its history. Developers can work offline and sync their changes with other developers through a remote server. Examples of distributed source control systems are Git Software and Mercurial, which takes us to the next section. Let’s see what Git is.
What is Git, and why use it?
Git is one of the world’s most popular and widely used distributed source control systems. It was created by Linus Torvalds, the creator of Linux, in 2005. Git has many advantages over centralised source control systems, such as:
- Speed: Git is fast and efficient, performing most operations locally without network access.
- Scalability: Git can easily handle large and complex projects, as it does not depend on a single server.
- Flexibility: Git supports various workflows and branching strategies, allowing developers to choose how they want to organise their code and collaborate with others.
- Security: Git uses cryptographic hashes to ensure the integrity and authenticity of the code.
- Open-source: Git is free and open-source, meaning anyone can use it, modify it, or contribute to it.
While Git is pretty good, it has some disadvantages compared with a centralised source control system. Here are some:
- Complexity: Git has a steep learning curve, especially for users who are new to distributed version control systems. Understanding concepts such as branching, merging, rebasing, and resolving conflicts can be challenging for beginners and sometimes even seasoned Git users.
- Collaboration challenges: While distributed version control systems like Git enable easy collaboration, they can also lead to collaboration issues. Multiple developers working on the same branch simultaneously may encounter conflicts that need to be resolved, which can introduce complexities and require extra effort.
- Performance with large repositories: While Git performs pretty well on most operations, it can get abortive when working with large repositories containing many files or a long history of commits. Operations such as cloning or checking out large repositories can be time-consuming.
What is Azure DevOps, and what does it relate to Git?
Azure DevOps is Microsoft’s cloud-based platform providing a set of tools and services for software development. It encompasses a range of capabilities for managing, planning, developing, testing, and delivering software applications. Azure DevOps offers:
- Azure Boards: A tool for planning, tracking, and managing work items, such as user stories, tasks, bugs, etc.
- Azure Repos: A tool for hosting Git repositories online, which is the main focus of this blog post.
- Azure Pipelines: A tool for automating builds, tests, and deployments.
- Azure Test Plans: A tool for creating and running manual and automated tests.
- Azure Artifacts: A tool for managing packages and dependencies.
Azure DevOps also integrates with other tools and platforms, such as GitHub, Visual Studio Code, and now, Power BI. This takes us to the next section of this blog post, Integrating Power BI with Azure DevOps.
How to integrate Power BI with Azure DevOps
Now that we understand what Git and Azure DevOps are let’s see how we can integrate Power BI with Azure DevOps.
Integrating Power BI with Azure DevOps has two different integrations. Cloud integration and local machine integration have the following requirements.
Prerequisites #
To follow along with this tutorial, you will need:
- In the cloud:
- An Azure DevOps Service
- A Power BI account with one of the following licenses to enable Power BI Workspace integration with Azure DevOps.:
- Power BI PPU (Premium Per User)
- Premium Capacity
- Embedded Capacity (EM/A)
- Fabric Capacity
- On your local machine:
- The latest version of Power BI Desktop (June 2023 or later)
- Either Visual Studio or VS Code
As stated earlier, this post explains the Cloud integration partTherefore, we require to have an Azure DevOps Service and a Power BI account with a Premium licencing plan in order to integrate Power BI with Azure DevOps.
In the following few sections, we look into more details and go through them together step-by-step.
Azure DevOps Service #
Right off the bat, everyone with a personal Microsoft account (yes, a personal account such as Hotmail, MSN, Outlook, or Live) or an organisational account can use Azure DevOps Service for free (up to 5 users). If you already have an Azure DevOps Service, you can access it via https://aex.dev.azure.com/ to see the existing Organizations after passing you credentials, which looks like the following image:
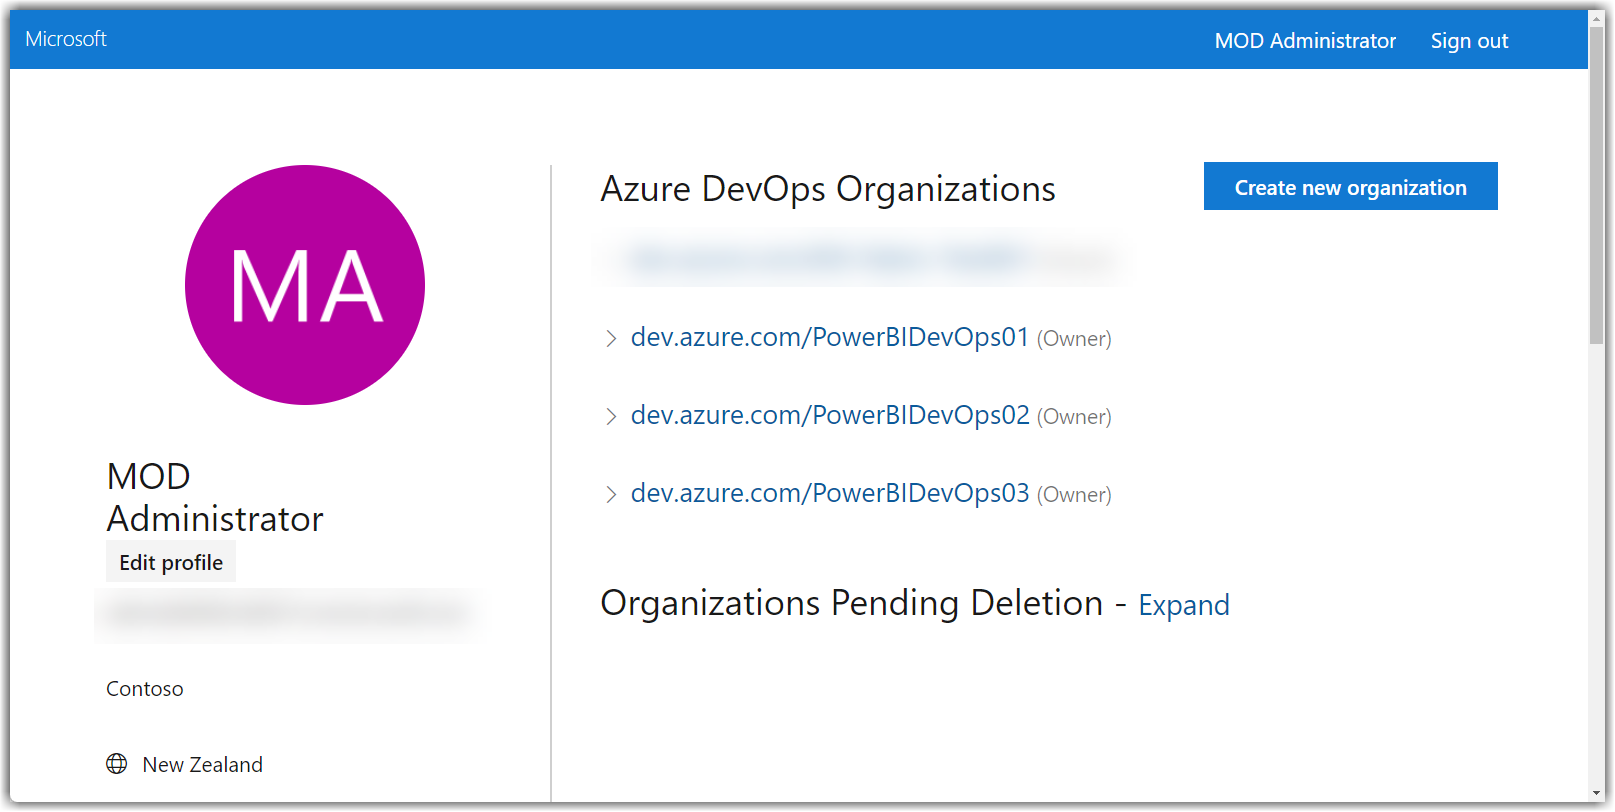
Azure DevOps Existing Organizations
If this is the first time you’re logging into Azure DevOps, then you will need to provide some more details, as shown in the following image:
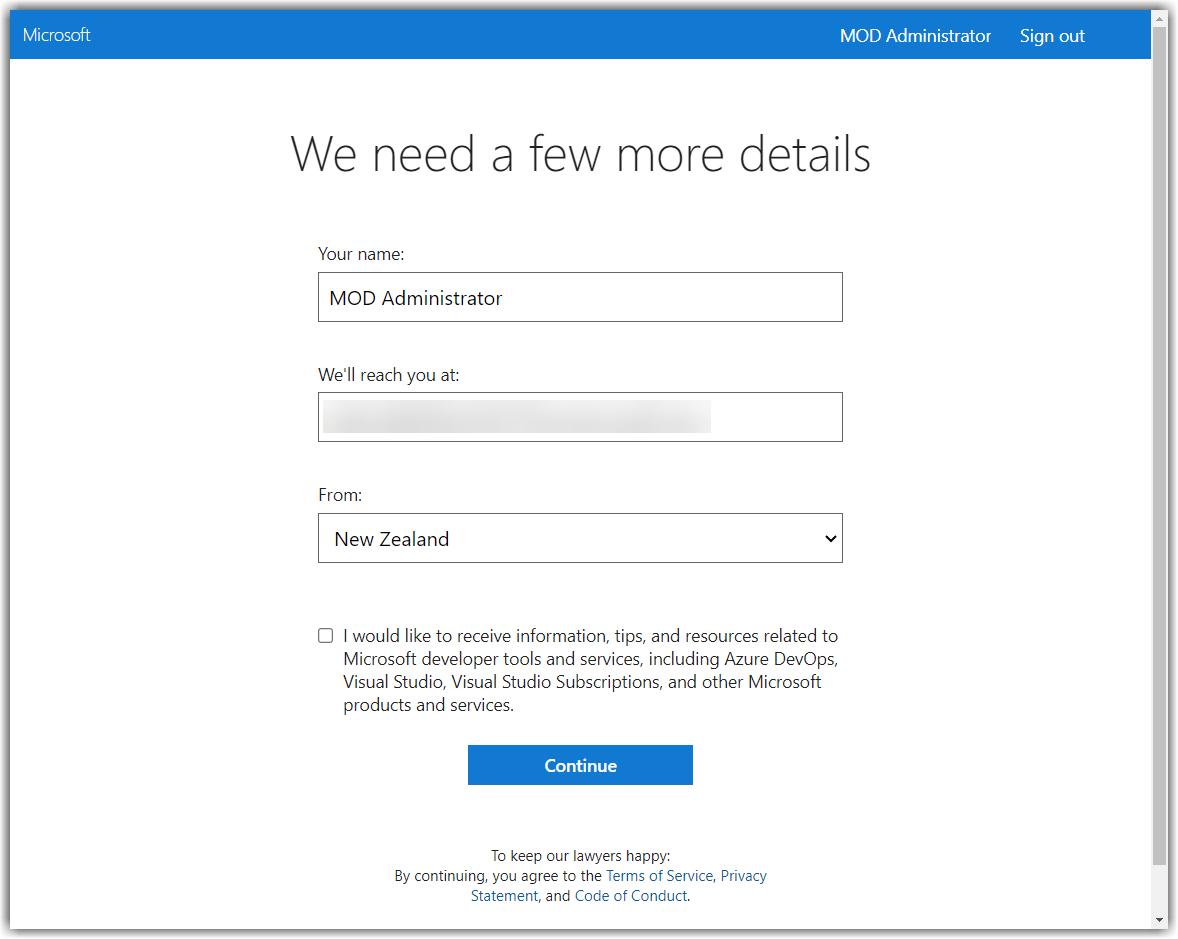
First login to Azure DevOps
In Azure DevOps, Organization refers to a logical container that hosts a set of projects and resources. It serves as a top-level administrative unit that allows for managing and organising various teams, repositories, pipelines, and other artefacts related to software development and delivery.
As mentioned earlier, everyone can create an Azure DevOps account and consequently create new Organizations. However, this freedom can be restricted. Read more here.
Note:
Organization names are globally unique as their generated URL follows the “https://dev.azure.com/{your_organization_name}” pattern. Therefore, it is crucial to plan for your organisation structure first.
If there are no existing organisations or you do not have access to any, you’ll see the following page: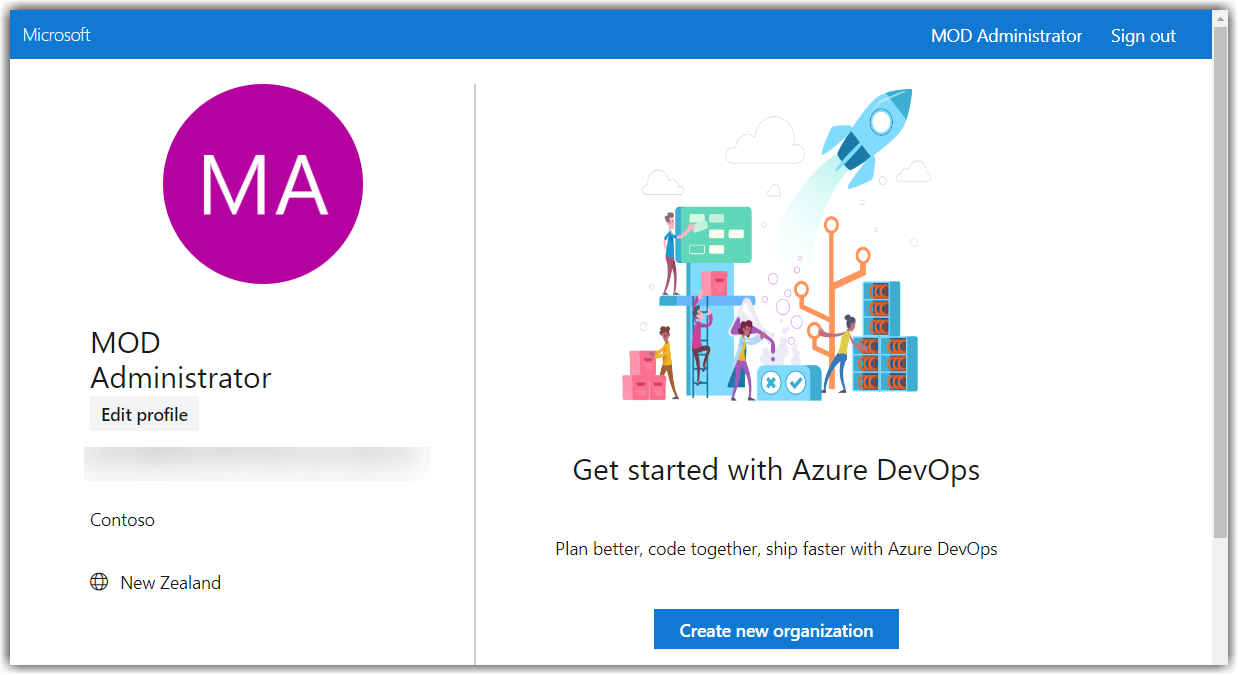
Azure DevOps Create New Organization
Create New Organization in Azure DevOps #
Creating a new organization is easy. In the previous image, click the Create new organization button, then follow these steps:
- On the Get started with Azure DevOps page, click Continue
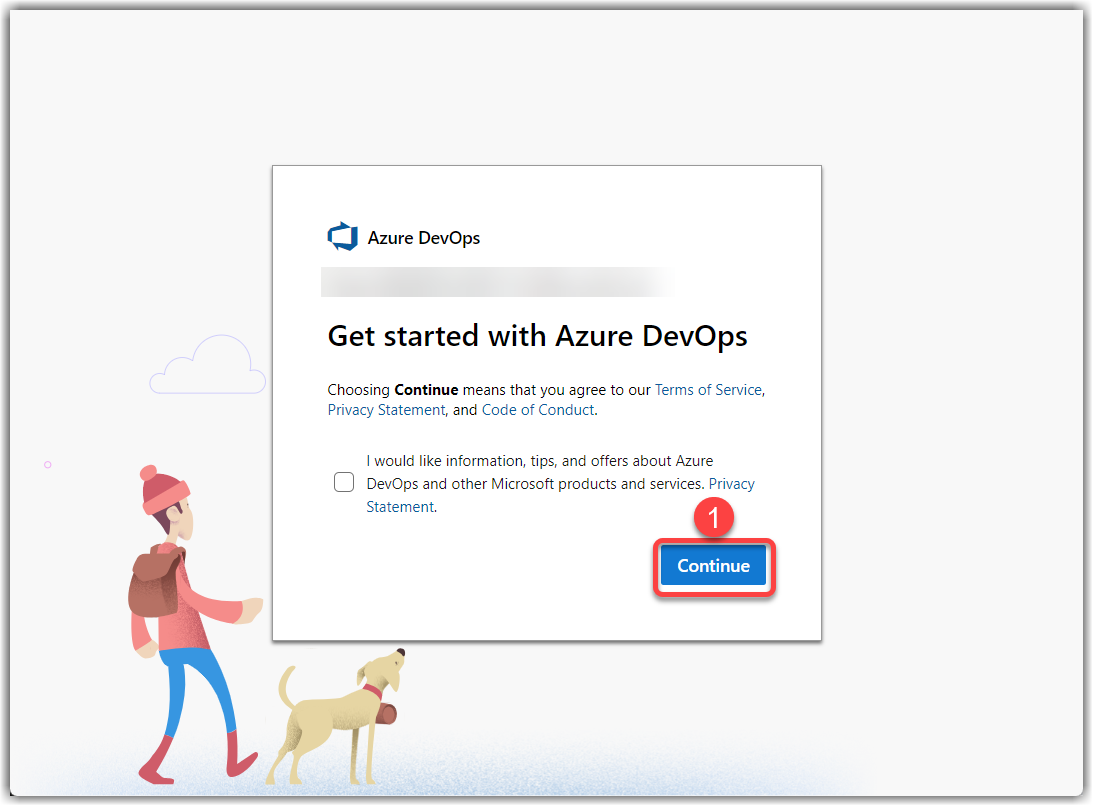
Get started with Azure DevOps
- Type a name for your Azure DevOps organization
- Select a hosting Region. Try to select the same region hosting your Power BI (Fabric) tenant. More on this later
- Enter the validation challenge
- Click the Continue button
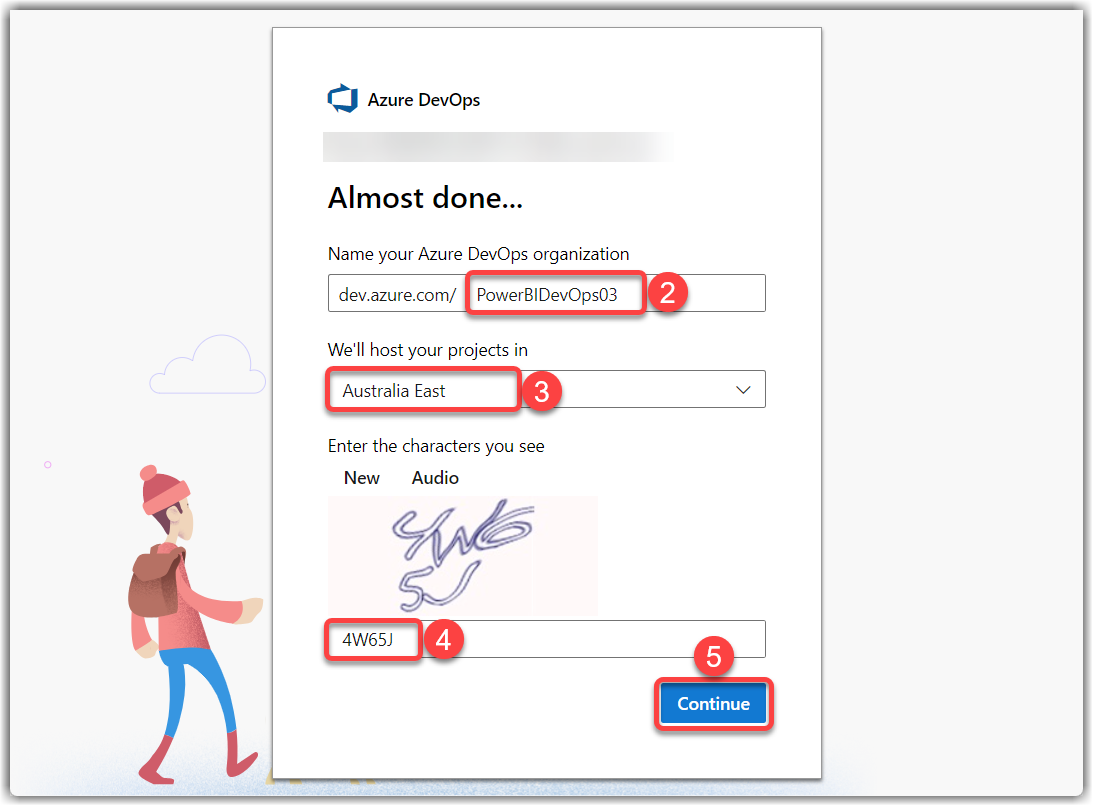
Creating a new organization in Azure DevOps
- Enter a new Project name
- Click the Create project button
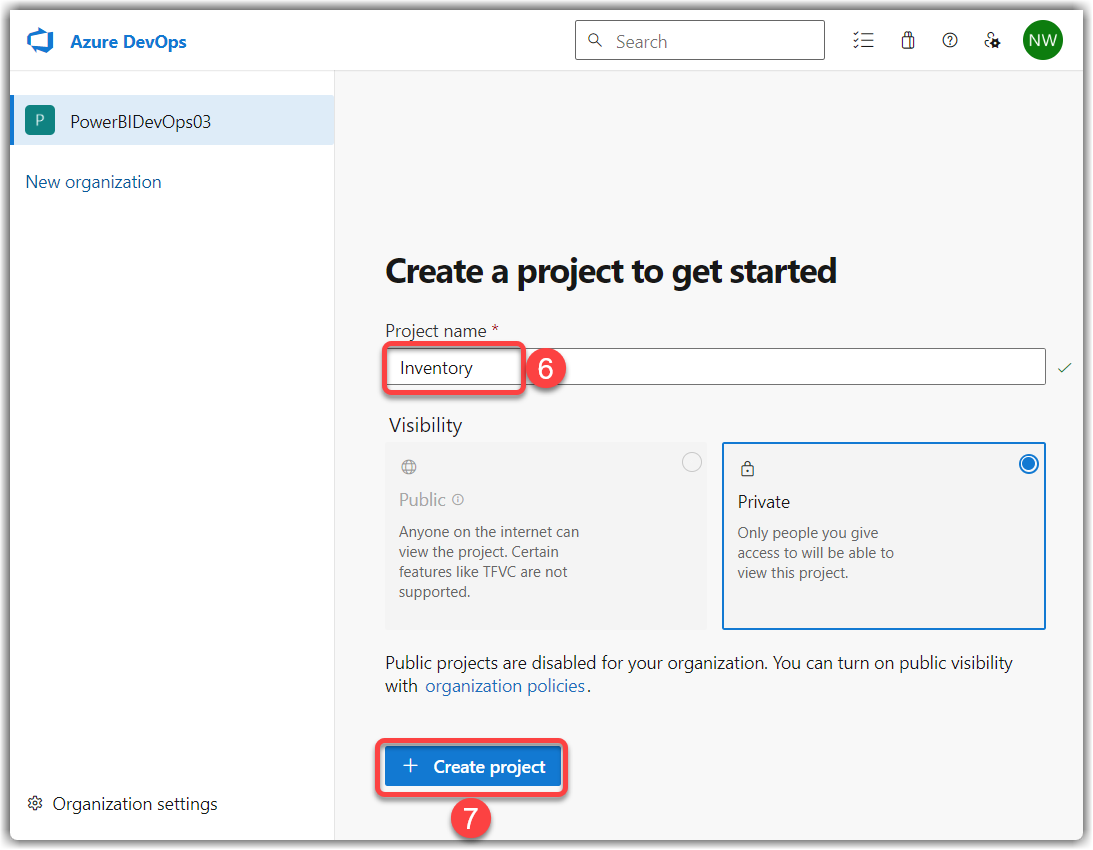
Creating a new project in Azure DevOps
So far, we have created a new Azure DevOps account, defined an organization, and created a project. We will learn later in this blog that Power BI and Azure DevOps integration happens at the Workspace level. Therefore, using the same project name or similar to the related Workspace makes sense. With that, let’s continue.
- Click Repos. Our repo is empty at this stage
- Click the Initialize button to initialise the main branch to the repo
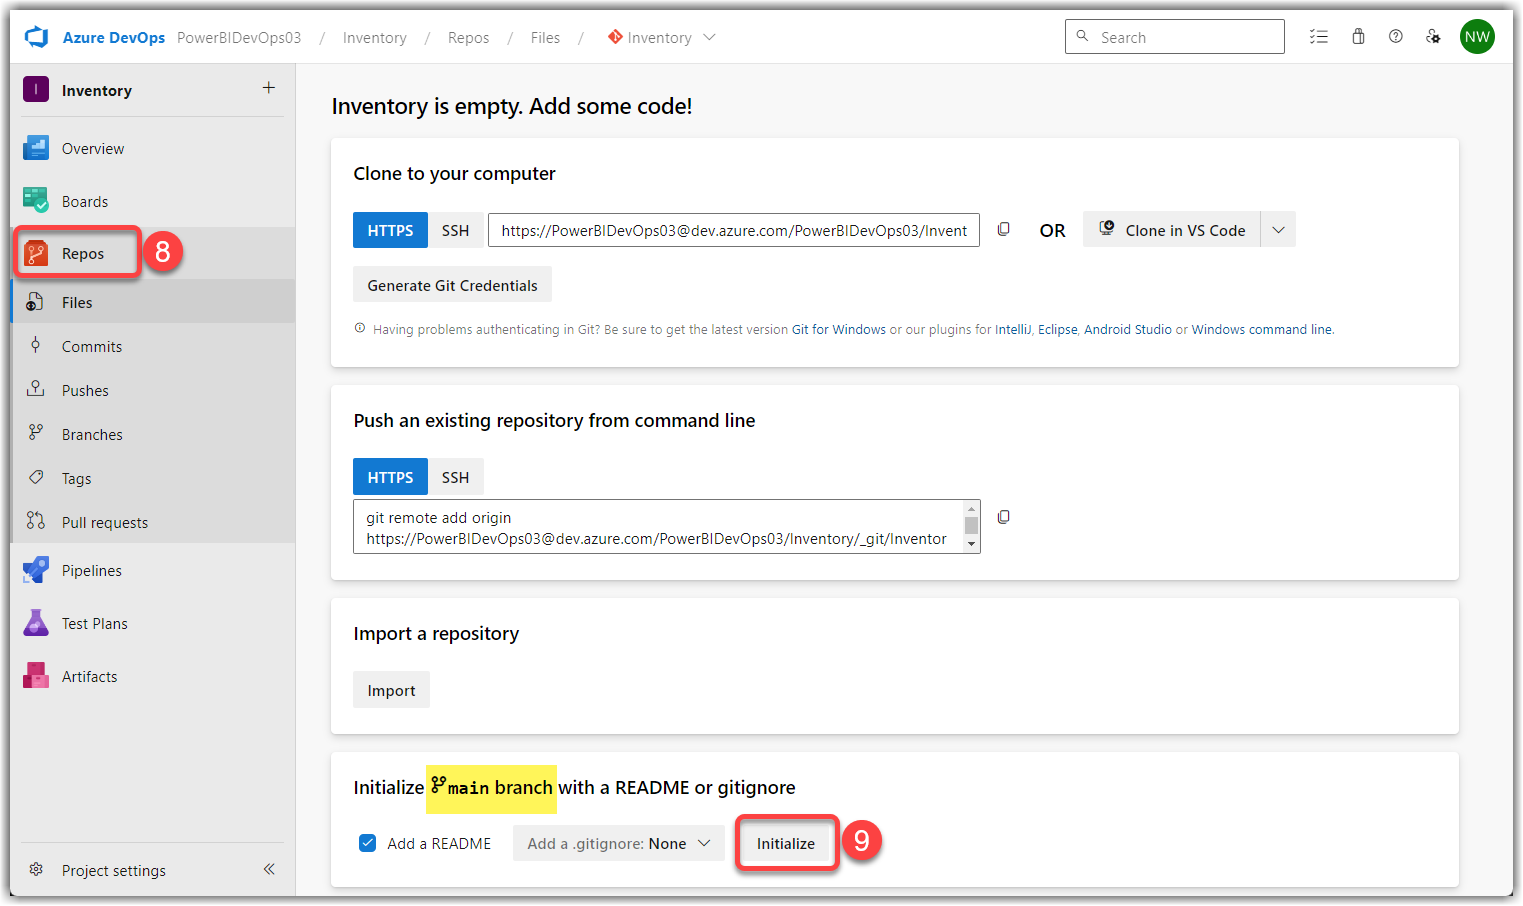
Initialize the main branch in an Azure DevOps Repo
We are all set now. Next, we need to integrate a Power BI Workspace with our Azure DevOps.
Connect Power BI Workspace to Azure DevOps #
Now that we successfully configured Azure DevOps, it is easy to connect Power BI Workspaces to it. As stated earlier, we can only enable this feature on Premium Workspaces (either PPU or a Premium capacity).
If you already have a Premium Workspace, then skip this section. Otherwise, continue reading.
Set Workspaces License #
There are multiple ways to set a license to a Workspace. The following steps show one of those methods.
- In Power BI Service, click Workspaces
- Hover over the desired Workspace and click the ellipsis button
- Click Workspace settings
- Click the Premium pane
- Select the desired license
- Click the Apply button
The following image shows the above steps:
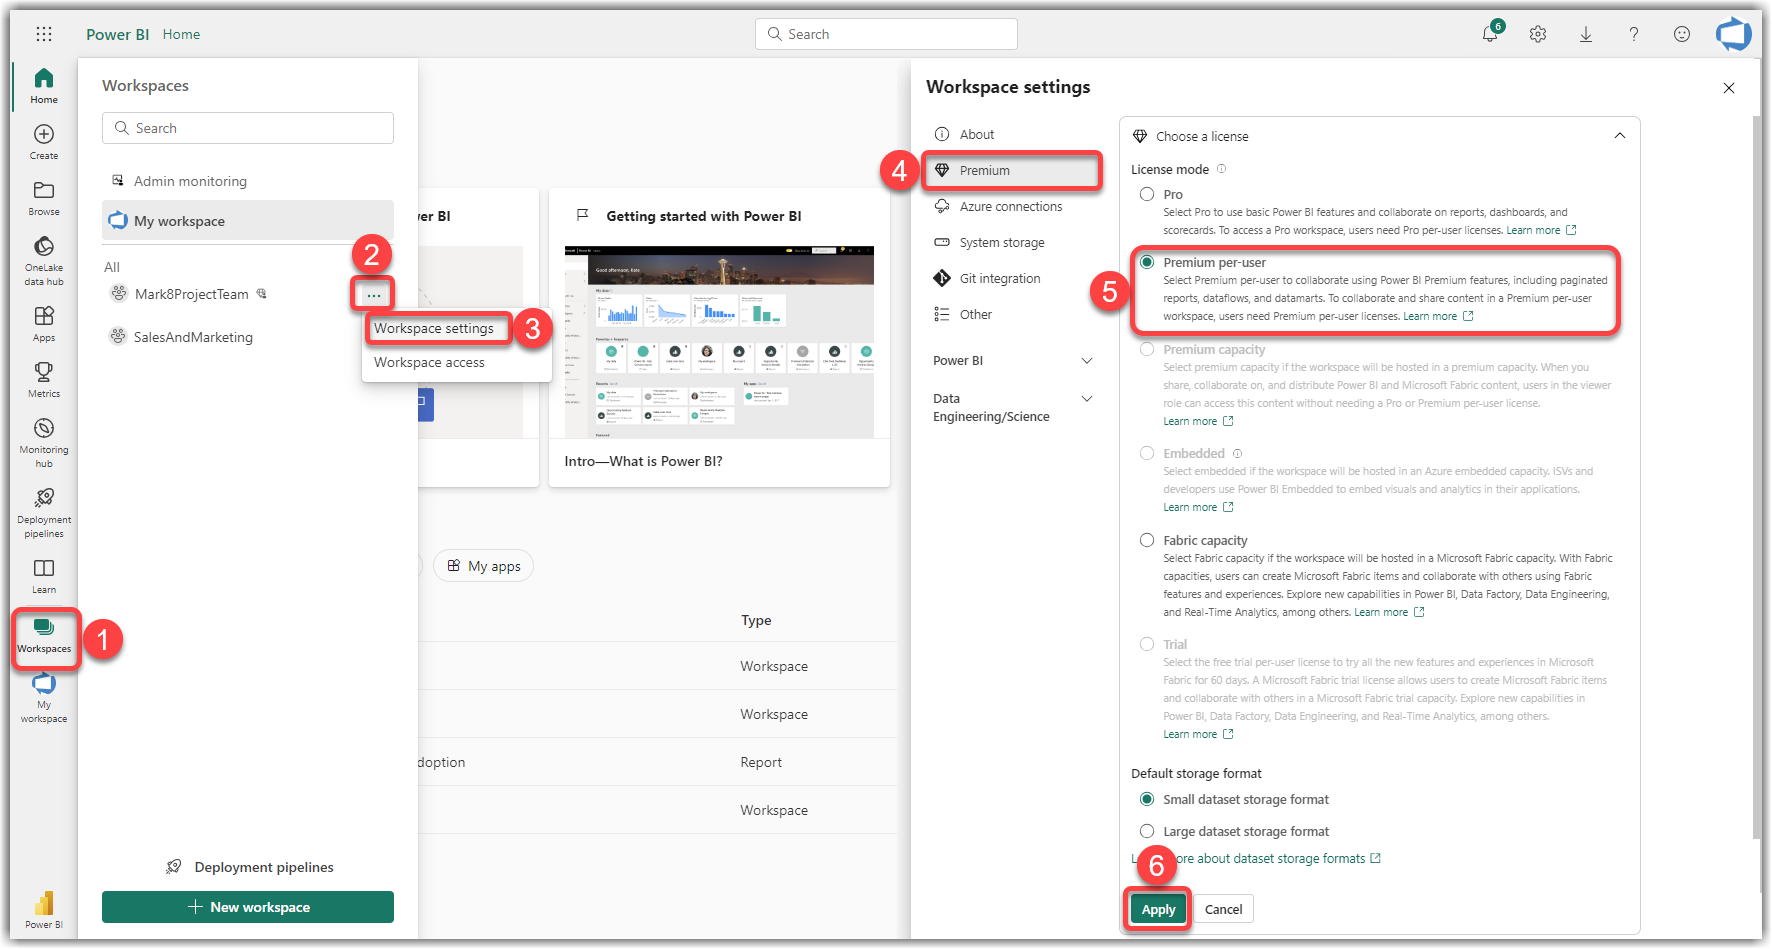
Assigning Power BI Workspace to Premium Licenses
Configure Git Integration in Power BI #
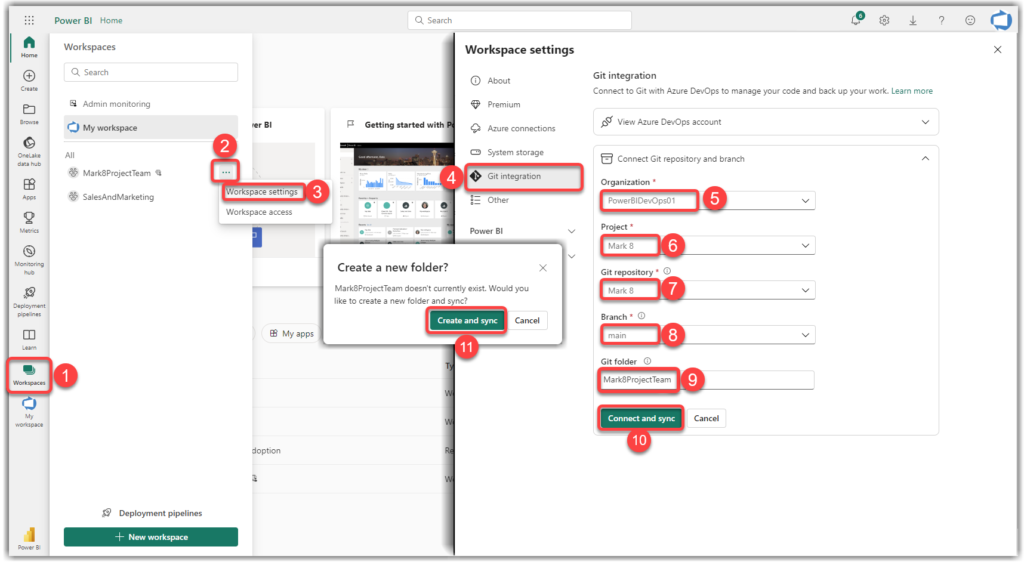
Now that we have a Premium Workspace, let’s enable the Git Integration feature.
Follow these steps:
- From Power BI Service, click Workspaces
- Hover over the desired Workspace and click the ellipsis button
- Click Workspace settings
- Click the Git integration pane
- Select an Organization
- Select the desired Project
- Select a Git repository
- Select a Branch
- Enter the name of the Git folder you want to integrate the supported Power BI artefacts
- Click the Connect and sync button
Notes:
- It’s better to use a Folder Name similar to or the same as the Workspace Name in step 9. The reason is that when we synchronise the Workspace with the Azure DevOps repo, it creates all supported Power BI solutions in this folder.
- If you get the “Unable to connect to Git branch. This workspace is in a different region. Go to the workspace admin settings to enable cross-region connections.” in step 10, then jump to the next section, where I explain how to fix the issue.
Spoiler alert! You have to be an admin to fix this, so if you aren’t, please contact your administrators, and they should be able to fix it for you. If you do not get any errors, continue reading.
- Power BI asks for your confirmation if the folder does not exist. Click the Create and sync button
The following image shows the preceding steps:
After successfully synchronising the supported Power BI items in the Workspace with the Git repository, you should see something like the following image showing the items that are synced and not supported.
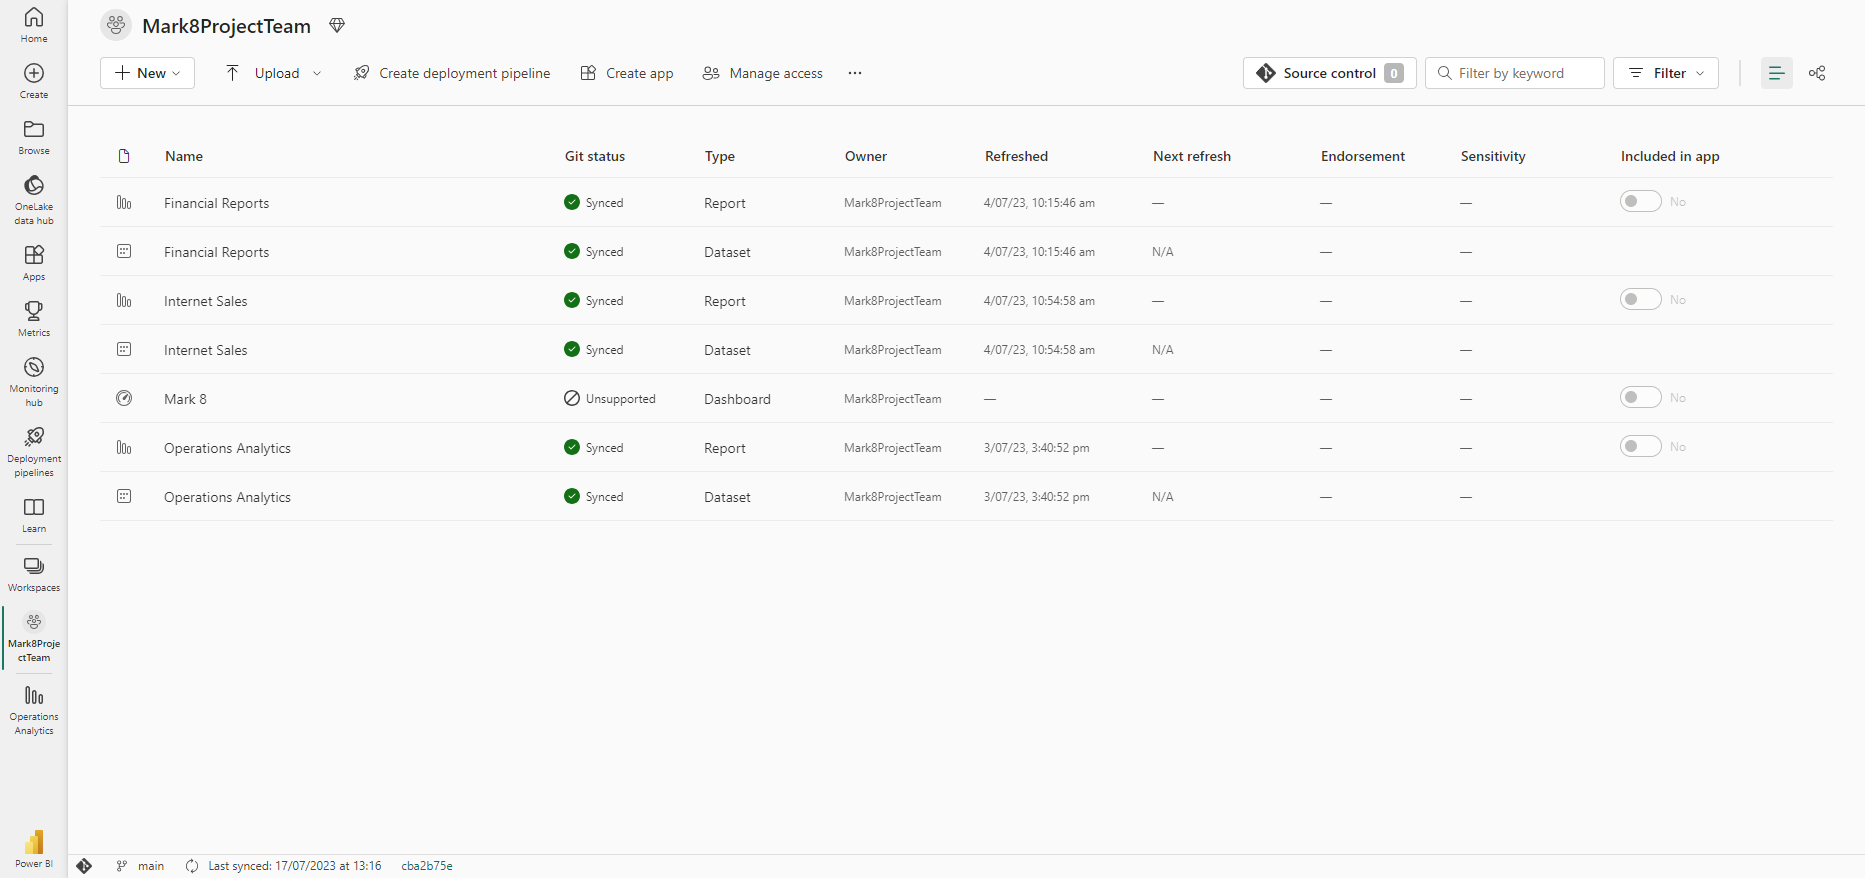
Power BI Premium Workspace after syncing with Git repo on Azure DevOps
As you see, this page has a few changes, such as:
- A new Git status added to the list view in the Workspace
- A new Source control pane added
- Git sync information on the status bar showing the Connected branch (the main branch in our example), the Last synced time, and a link to the last Commit that the Workspace is in sync with.
Resolving the “Unable to connect to Git branch. This workspace is in a different region. Go to the workspace admin settings to enable cross-region connections.” error #
As pointed out in the previous section, you may get the following error message when clicking the Connect and sync button to integrate your Workspace with Azure DevOps:
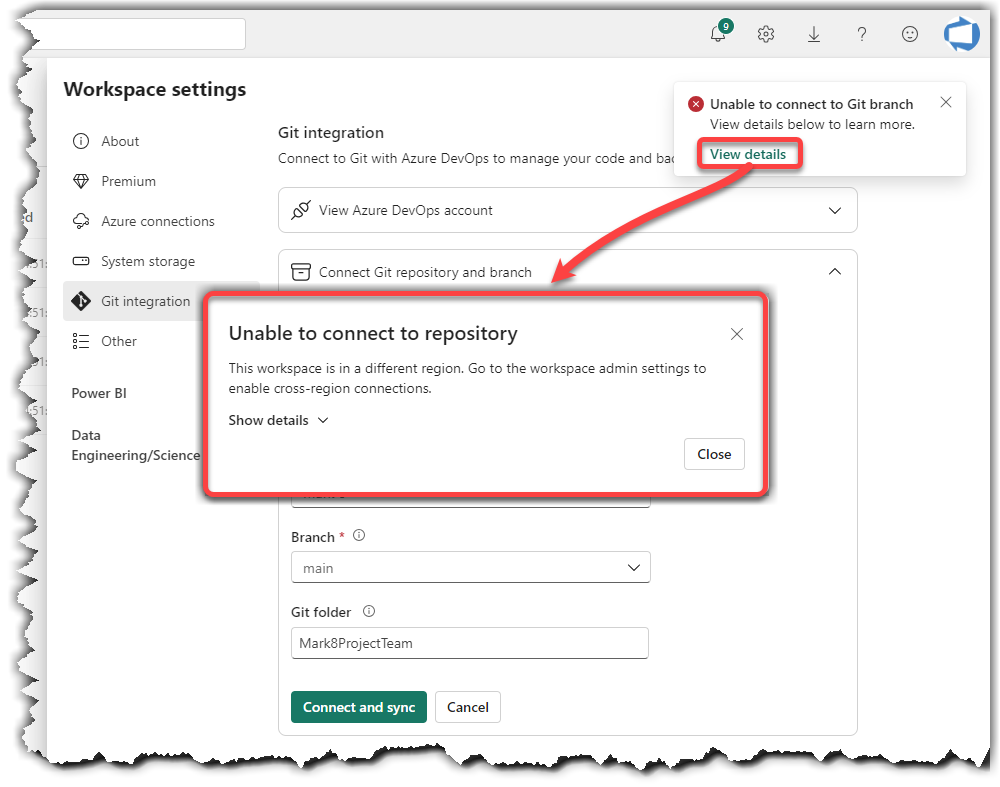
If you face this error, it means that your Power BI tenant is in a different region than your Azure DevOps. That’s why I mentioned earlier that it is best to select the same region as your Power BI tenant when creating the Azure DevOps Organization. To fix this issue, you must be a Fabric Administrator. If you aren’t an admin, contact your administrator(s) to fix the issue. Otherwise, follow these steps:
- Click the Settings gear from the top right of your browser
Note:
Depending on your screen resolution, you may see an ellipsis button on the top right of your browser. Click the ellipsis button, then click Settings.
- Click Admin portal
- Scroll all the way down from the Tenant settings tab to find the Git integration section. Expand the Users can export items to Git repositories in other geographical locations (Preview) setting
- Click to toggle button to Enable it. (In my example, I enabled this feature to The entire organization. You may enable it only for Specific security groups.)
- Click the Apply button
The following image shows these steps: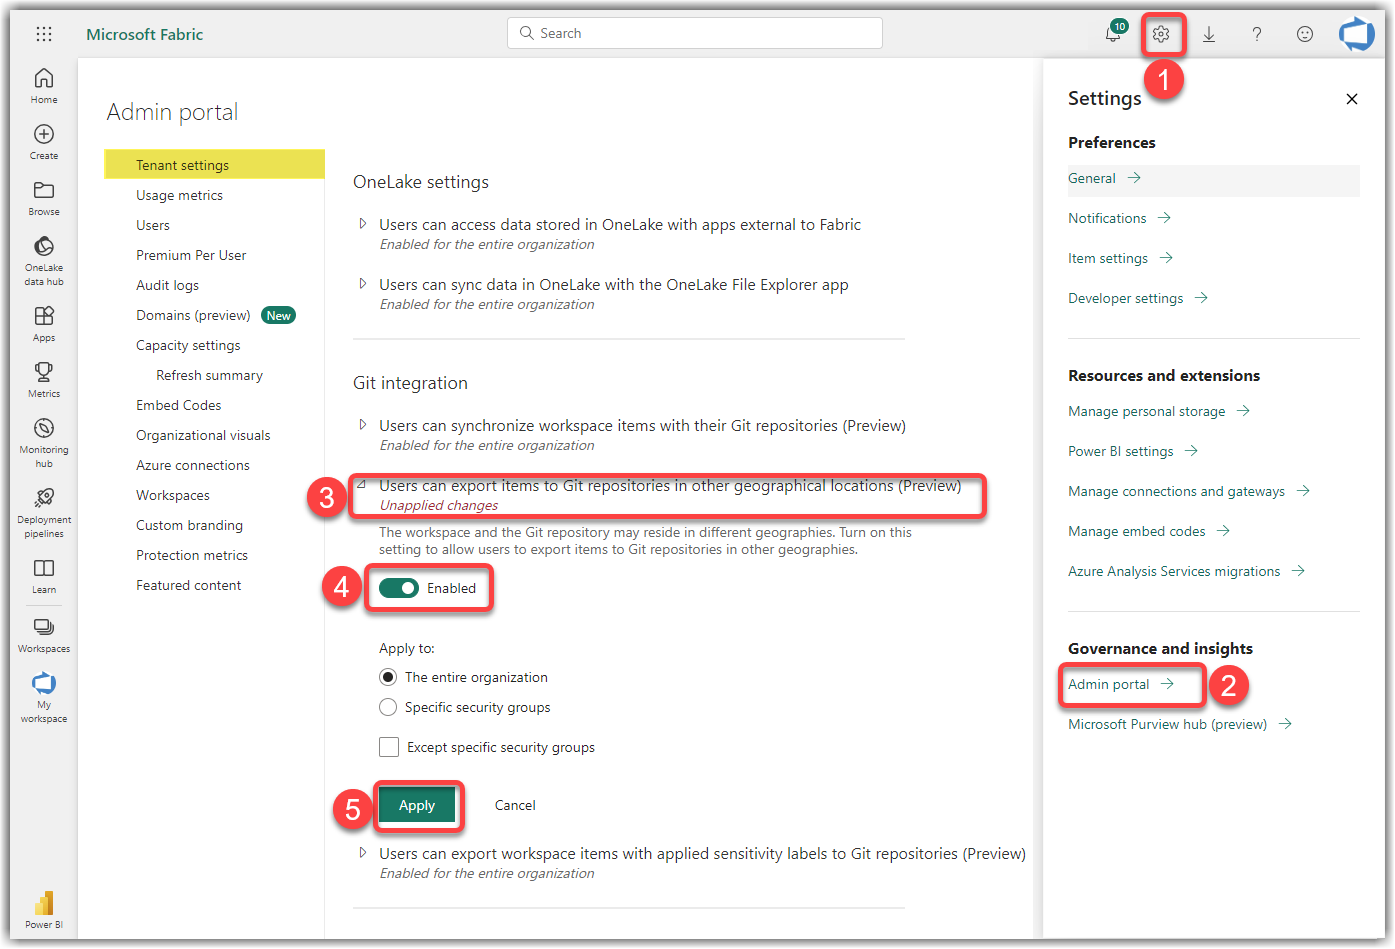
Enabling Users can export items to Git repositories in other geographical locations feature in the Fabric Admin Portal
Now that we have allowed Git repositories to reside in a different geographical location than our Power BI tenant, we can continue the configuration from where we left off.
This post aims to cover all aspects of Integrating Power BI Premium Workspaces with Git repositories on Azure DevOps. I will publish a separate post on using this integration to synchronise our codes between Power BI Service in the cloud and the Power BI Desktop project on our local machine.
Stay tuned!
Discover more from BI Insight
Subscribe to get the latest posts sent to your email.
Hi Soheil, thank you for your post, you make it so easy to follow. Everything went seamlessly on my end.
Hi,
Are you able to synchronise your codes between Power BI Service in the cloud and the Power BI Desktop project on our local machine.
hi Leo,
Yes you can. Please check out my other blog, the second part of this series that explains exactly that.
Cheers
Hi Soheil,
Thanks for getting back me.
I think I was not clear enough. I wanted an example of you making change on a report in Service and pushing that change to online repos then pulling the changes to the local repos so you can open in Power BI Desktop with the changes made in Service.
Hi Leo,
Thanks for clarifying.
While this is possible, it is best practice to always make changes in Power BI Desktop and push them to the Git repos in Azure DevOps, which will affect the items in the service.
There are multiple reasons for that:
– Power BI Desktop provides more advanced development features than the service. For example, what would you do if you need to make some changes in a load disabled query in Power Query?
– The version of Power BI in Microsoft Fabric is not necessarily the same as your current Power BI Desktop. Usually, Power BI Desktop is behind Power BI on Microsoft Fabric. This can make some challenges on your local code.
Hopefully that helps.
Great article!
I’m wondering if you have any best practices for managing multiple environments? In our Power BI service, we always have DV, QA, PR workspaces for each workspace, and have created deployment pipelines.
What’s the best plan for utilizing and deploying using dev/qa/prod branches in devops, to match all the various dev/qa/prod sets of workspaces?
Follow up question! Any thoughts on how to incorporate the physical PBIX files into the repo so that we can always be sure we can download the latest version of the file from the repo?
Hi JC,
To manage multiple environments with Git integration in Power BI, it’s best to align your DevOps branch strategy with your workspace structure (DV, QA, PR) especially if you use deployment pipelines. You could create separate branches in Git for each environment—dev, qa, and prod—so that the code reflects the current state of your workspaces. When developing or testing, you work in the ‘dev’ branch and push updates that align with your DV workspace. Similarly, when a feature or update is ready, you can merge it into the ‘qa’ branch, and deploying to the QA workspace for testing. And the same applies to ‘prod’ deployments to PR workspace. This setup helps automate deployment pipelines and ensures code consistency across environments.
For incorporating PBIX files into the repo, you can include them as part of your version control process. I have explained it on part 2 of this series: http://localhost:8080/integrating-power-bi-with-azure-devops-git-part-2-local-machine-integration/
Hi Soheil, Thanks for the information. I have a similar scenario as JC mentioned above. How do we utilise multiple branches (eg staging and main)
I already connected staging branch to staging workspace and created a deployment pipeline through Power BI servce. Therefore I do not need main branch as testing is completed in staging, the changes will move to production workspace by executing the deployment pipeline.
In this case, no point of having a production branch. But at some point production version is different to what’s in staging. And if there’s an emergency fix to be done, how should I handle the branches?
Looking forward for your feedback.
TIA