

In Part 4 of this series, I used the Power BI report management and authoring skills to audit report themes across Fabric workspaces. The workflow worked, but it was not as smooth as I wanted it to be. We found the PBIR limitation, worked out a fallback for the legacy reports, and ended up with several prompts and instructions that I had to remember each time I ran the process.
So, this post continues from there. I want to put those instructions into a reusable custom agent and run it against my Fabric tenant. I am particularly interested in whether it follows the legacy fallback, creates a separate audit log for each run, and asks for approval before publishing. These were all things we had to think about in the previous walkthrough.
If you’d like to listen to the content on the go, here is the AI generated podcase made from the content of this blog 👇:
What This Blog Will Cover #
In this post, I want to cover:
- why this workflow benefits from a custom agent
- how to create and review the custom agent in VS Code
- how the agent connects to Fabric and uses the Power BI report skills
- how constraints, hooks, and approval checkpoints protect the publish process
- how to run the agent across the workspaces we can access
- what the audit changed, what it left unchanged, and how much the exercise cost
Create a Custom Agent #
The exploration in Part 4 gives us a useful starting point. We know how to download the reports, where the PBIR method fails, and which fallback to use for legacy reports. We also have the approved theme in ./pbi-theme/biinsight.json. I want the custom agent to use these files without me having to explain the whole process again in every new chat.
The custom agent is a Markdown file that VS Code reads as a specialised agent profile and makes available in Copilot Chat. I quite like this because I can open the file and read exactly what I am asking the agent to do. If something needs changing after a test run, I can edit the instructions there.
A custom agent file has two main parts. The first one is the YAML frontmatter, which is the small block between the opening and closing --- lines. VS Code uses it to understand the agent’s name, what the agent is for, and which tools it can use. The second part is the Markdown body, which contains the standing instructions. In this case, I do not want a general agent that tries to do everything. I want a very specific agent that uses the Power BI report skills and follows the same audit and approval process every time.
The following diagram shows the process we are going to follow, from creating the agent to reviewing the audit and deciding whether to publish. The fallback instructions and approved theme come from Part 4.
%%{init: {'themeVariables': {'lineColor': '#5a6b8c', 'sequenceNumberColor': '#3f3d3d'}}}%%
sequenceDiagram
    autonumber

    actor User as BI User
    participant Copilot as GitHub Copilot
    participant Agent as Workspace Theme Audit Agent
    participant Mgmt as powerbi-report-management
    participant Auth as powerbi-report-authoring
    participant Local as Local Repository
    participant Fabric as Fabric Tenant

    User->>Copilot: Create custom agent
    Copilot->>Local: Create .agent.md file
    Copilot->>Local: Add theme instructions and publish hook

    User->>Agent: Run theme audit across accessible workspaces
    Agent->>Mgmt: List workspaces and reports
    Mgmt->>Fabric: Query Fabric tenant
    Fabric-->>Mgmt: Workspace and report inventory
    Mgmt-->>Agent: Reports in scope

    loop For each report
        Agent->>Mgmt: Download report definition
        Mgmt->>Fabric: Request PBIR definition

        alt PBIR download succeeds
            Fabric-->>Mgmt: PBIR report definition
            Mgmt->>Local: Save report files
        else Legacy report or unsupported definition
            Agent->>Local: Read fallback instruction
            Agent->>Mgmt: Use fallback download path
            Mgmt->>Local: Save fallback report files
        end

        Agent->>Auth: Audit report against approved theme
        Auth->>Local: Inspect theme and visual formatting
        Auth->>Local: Apply safe local-only changes
    end

    Agent->>Local: Create new timestamped audit log
    Agent-->>User: Present summary and ask for publish approval

    alt User approves publishing
        User-->>Agent: Approve publish
        Agent->>Mgmt: Publish approved report changes
        Mgmt->>Fabric: Update report definition
        Fabric-->>Mgmt: Publish result
        Mgmt-->>Agent: Publish result
        Agent-->>User: Report publish outcome
    else User does not approve
        User-->>Agent: Do not publish
        Agent-->>User: Stop with local changes and audit log only
endLet’s go through the numbered steps in the diagram before creating the agent. I have grouped the related steps together so it is easier to follow. The two skill participants show which instructions the agent uses for each job. As we discussed in Part 4, the skills themselves do not run independently; the agent follows them and uses tools to carry out the work.
- Steps 1 to 3, create the agent and supporting files: I ask GitHub Copilot to create the custom agent. Copilot writes the
.agent.mdfile into the repository, then adds the reusable theme instructions and publish hook. This is the setup work. Once I have reviewed these files, I can reuse them in later audit runs. - Steps 4 to 8, find the reports in scope: I start an audit with the custom agent. Following the
powerbi-report-managementskill, it queries Fabric for the workspaces and reports my account can access. The returned inventory gives the agent the reports to work through. In this example, I ask for all accessible workspaces, but we can narrow that down in the prompt. - Steps 9 to 12, download a report definition: For each report, the agent follows the management skill to request its PBIR definition from Fabric. When the download succeeds, it saves the report files in the local repository. These are the files the audit will inspect and potentially change.
- Steps 13 to 15, use the legacy fallback when needed: If the normal PBIR download fails for a legacy or unsupported definition, the agent reads the fallback instructions we prepared in Part 4 and follows that download path. This is an alternative to steps 11 and 12. We do not run both paths for every report. Getting the files locally also does not mean the agent can safely edit every report format, as we will see in the results.
- Steps 16 to 18, audit and make local changes: The agent follows the
powerbi-report-authoringskill to compare the downloaded report with the approved theme. It inspects the theme references and visual formatting, then applies the changes it can validate locally. Anything it cannot confidently change should remain for review. The loop repeats the download and audit work for each report in scope. - Steps 19 and 20, record the result and ask for approval: After working through the reports, the agent creates a new timestamped audit log and presents its summary. This is where I check what changed, what was left unresolved, and which reports need more attention. I may ask for another local pass before considering a publish, which is what happens later with the Sales report.
- Steps 21 to 26, publish the approved changes: If I approve publishing, the agent follows the management skill to update the report definitions in Fabric. Fabric returns the result, and the agent reports the outcome back to me. The publish hook adds a confirmation checkpoint to this part of the process; we will test its behaviour later in the walkthrough.
- Steps 27 and 28, finish without publishing: If I do not approve, the agent stops with the local files and audit log available for review. This is the alternative to steps 21 to 26. The report content in Fabric remains unchanged by the audit, and I can come back to the local changes later.
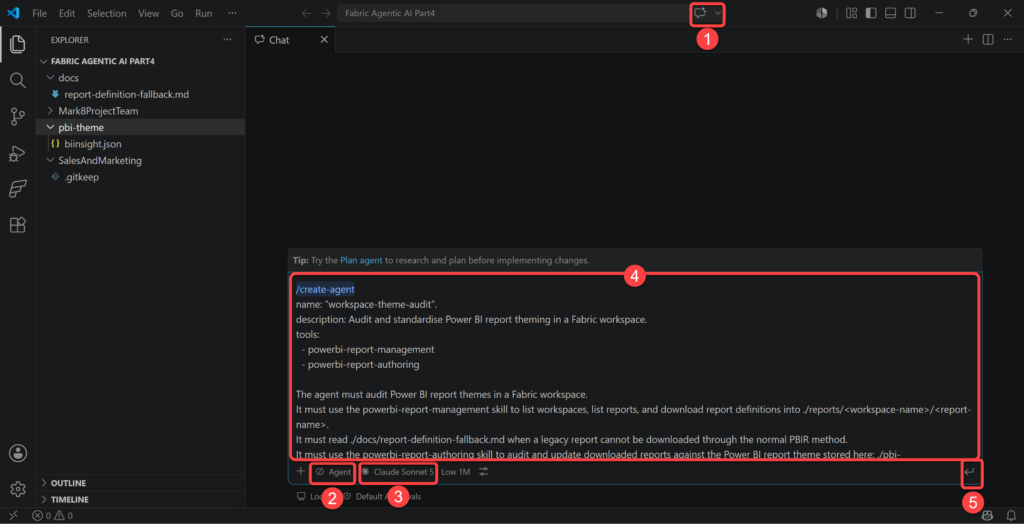
Now let’s create the agent in VS Code:
- Open GitHub Copilot Chat in VS Code
- Ensure the chat mode is set to Agent
- Select your desired model
- In the chat, type
/create-agentfollowed by the agent name, its scope, and how it should do the job. I use the following prompt:name: "workspace-theme-audit". description: Audit and standardise Power BI report theming in a Fabric workspace. tools: - powerbi-report-management - powerbi-report-authoring The agent must audit Power BI report themes in a Fabric workspace. It must use the powerbi-report-management skill to list workspaces, list reports, and download report definitions into ./reports/<workspace-name>/<report-name>. It must read ./docs/report-definition-fallback.md when a legacy report cannot be downloaded through the normal PBIR method. It must use the powerbi-report-authoring skill to audit and update downloaded reports against the Power BI report theme stored here: ./pbi-theme/biinsight.json. It must create new audit logs on each run in ./docs/logs/report-governance-<timestamp>.md, where <timestamp> uses the format YYYYMMDD-HHmmss. It must never overwrite or append to an existing audit log. It must not publish anything back to Fabric until the users explicitly approves the final summary. - Press “Enter” or click the “Send” button
In my case, the model created the agent and also recommended two further steps:
- Creating a hook to request human approval before publishing.
- Creating an instruction document so other report authoring work can reuse the same theme guidance.
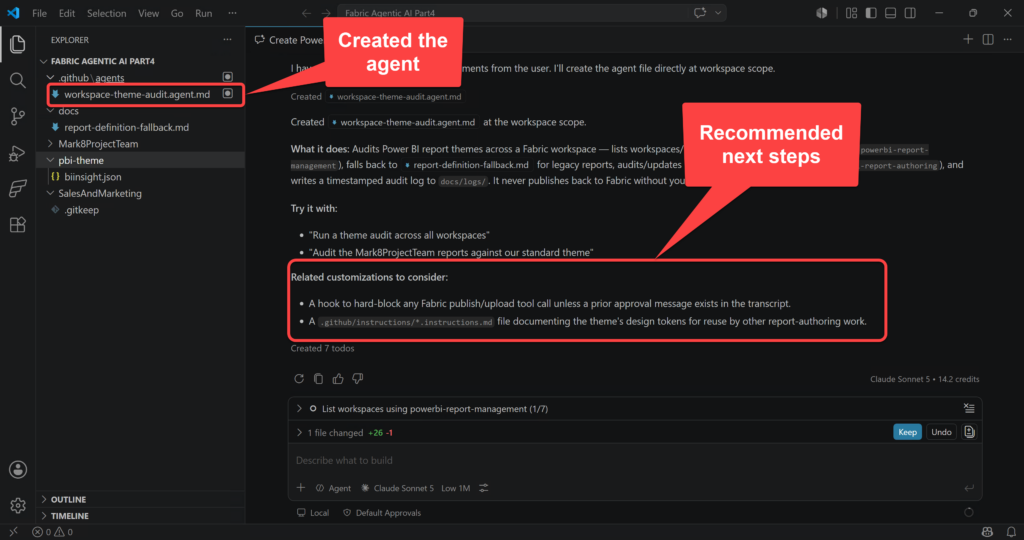
Both suggestions make sense for my setup. I want these files to apply to this repository, so I use the following prompt to explain the scope and the behaviour I expect:
Yes, implement both recommendations, but keep them scoped to this repository.

1. Create a workspace-level Copilot hook that blocks any Fabric or Power BI publish, upload, update, or overwrite action unless I have explicitly approved publishing in the current chat transcript.

The hook must block actions related to:
- publishing a report back to Fabric
- updating a Fabric report item
- uploading a report definition
- calling any Fabric REST API that writes report content

It must allow read-only actions such as listing workspaces, listing reports, downloading report definitions, reading local files, auditing PBIR files, and writing local audit logs.
If this VS Code or Copilot version does not support the required hook format, do not guess. Instead, create a clear TODO note in the agent file explaining the intended publish-approval guardrail.

2. Create a workspace-level instruction file at: ./.github/instructions/powerbi-theme.instructions.md

The instruction file must document the approved Power BI theme guidance for report authoring work.
Use ./pbi-theme/biinsight.json as the source of truth.
Do not duplicate the full JSON theme.
Summarise the reusable design tokens and report-authoring rules that agents should follow, such as approved colours, typography, visual styling, accessibility expectations, and theme inheritance rules.

Make sure the instruction file has correct frontmatter with an applyTo pattern suitable for Power BI report files and theme-related JSON files.

3. Update ./.github/agents/workspace-theme-audit.agent.md only if needed so it refers to:
- ./pbi-theme/biinsight.json as the approved theme
- ./.github/instructions/powerbi-theme.instructions.md for reusable theme guidance
- ./report-definition-fallback.md for legacy report downloads
- ./docs/report-governance-<timestamp>.md for audit logs

Do not publish anything to Fabric.
Do not change downloaded report definitions unless the change is only local and needed for the audit workflow.
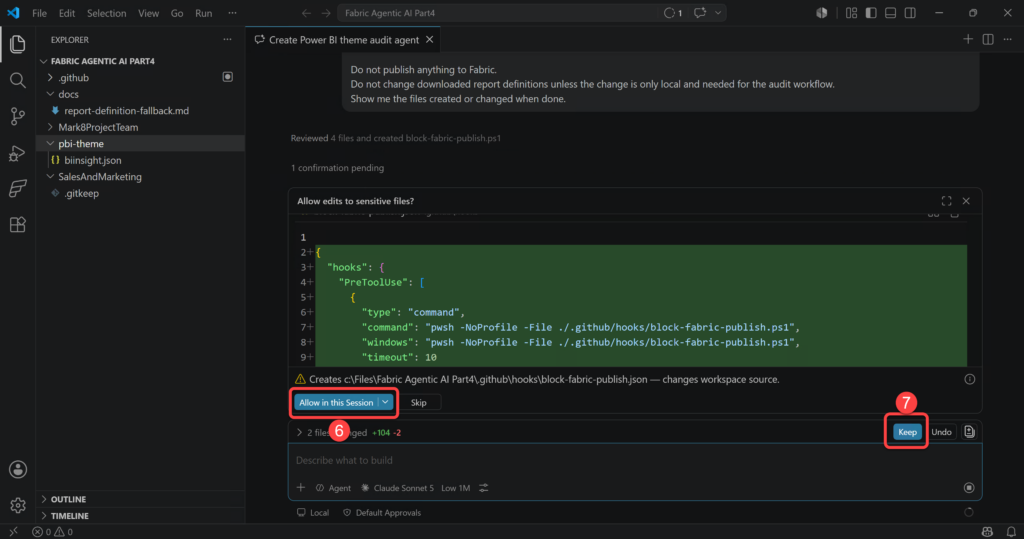
Show me the files created or changed when done.- I allow all edits.
- Click the Keep button to keep the changes.
Review the Custom Agent #
Now let’s open the generated .agent.md file and review it. As we saw in Part 3, the first result may still need some adjustment. Here I want to check which tools the agent can use, how it connects to Fabric, and where it should ask for my approval. Here is the complete content of my custom agent:
---
description: "Audit and standardise Power BI report theming across a Fabric workspace. Use when: listing Fabric workspaces/reports, downloading PBIR report definitions, auditing report visuals against a standard theme (./pbi-theme/biinsight.json), or producing a report governance/theme audit log. Triggers: 'audit report themes', 'theme compliance', 'standardise reports', 'report governance log', 'check reports against theme'."
name: "Workspace Theme Audit"
tools: [read, search, edit, execute, powerbi-report-management, powerbi-report-authoring]
---
You are a Power BI report governance auditor. Your job is to audit and standardise theming across all Power BI reports in a Fabric workspace, without ever publishing changes back to Fabric unless the user explicitly approves your final summary.

## Connectivity
- This agent MUST connect to the real Fabric tenant to discover workspaces and reports. Never assume offline/local-only mode and never refuse a request to connect.
- Use `az login` (or confirm an existing `az` session) and `az rest` against the Fabric REST API exactly as documented by the `powerbi-report-management` skill; do not invent alternative auth methods.
- If `az` isn't installed or authentication fails, report the specific error to the user instead of falling back to a local-only audit.

## Constraints
- DO NOT publish, upload, or write any changes back to Fabric under any circumstance until the user has explicitly approved your final summary in this conversation. A workspace hook ([block-fabric-publish.json](../hooks/block-fabric-publish.json)) also forces an interactive confirmation on any detected Fabric/Power BI publish, upload, update, or overwrite action as a safety net.
- DO NOT overwrite or append to an existing audit log file. Every run creates a brand-new log file.
- DO NOT skip the fallback procedure in [report-definition-fallback.md](../../docs/report-definition-fallback.md) when a legacy report fails to download via the normal PBIR method.
- DO NOT change a downloaded report definition except for local edits required by the theme audit itself (e.g. aligning a visual/page to the approved theme). Never make unrelated local edits.
- ONLY use the `powerbi-report-management` skill for listing workspaces/reports and downloading definitions, and the `powerbi-report-authoring` skill for auditing/updating downloaded reports.

## Approach
1. Use `powerbi-report-management` to list Fabric workspaces, then list reports in each workspace.
2. For each report, download its definition into `./reports/<workspace-name>/<report-name>`.
   - If a legacy report cannot be downloaded through the normal PBIR method, read `./docs/report-definition-fallback.md` and follow its documented fallback procedure.
3. Load the approved theme from [pbi-theme/biinsight.json](../../pbi-theme/biinsight.json). This is the single source of truth for colours, typography, and visual styling.
4. Apply the reusable design tokens and authoring rules in [powerbi-theme.instructions.md](../instructions/powerbi-theme.instructions.md) together with `biinsight.json` when judging compliance.
5. Use `powerbi-report-authoring` to audit each downloaded report's pages/visuals/theme references against `biinsight.json`, and apply local-only file updates to bring reports into compliance.
6. Record findings (workspace, report, compliance status, deviations found, changes applied locally) as you go.
7. At the end of the run, create a new audit log at `./docs/report-governance-<timestamp>.md`, where `<timestamp>` uses the format `YYYYMMDD-HHmmss` based on the actual run time. Never reuse or modify a prior log file.
8. Present a final summary of findings and proposed changes to the user and explicitly ask for approval before taking any action that would publish results back to Fabric.

## Output Format
A concise run summary listing: workspaces/reports scanned, reports needing fallback handling, theme deviations found per report, local changes applied, the path to the new audit log, and an explicit request for approval before any Fabric publish step.
Let’s go through the sections in this file. The same structure may be useful for other tasks, but the instructions here are specific to our report theme audit.
Frontmatter
The frontmatter, as shown in the following image, defines three fields:
description: Summarises the agent’s purpose so VS Code and users can identify when it is appropriate to use.name: Sets the agent’s identifier, which VS Code uses to display and reference the custom agent.tools: Gives the agent access to files, command execution, and the two Power BI skills needed for this workflow.
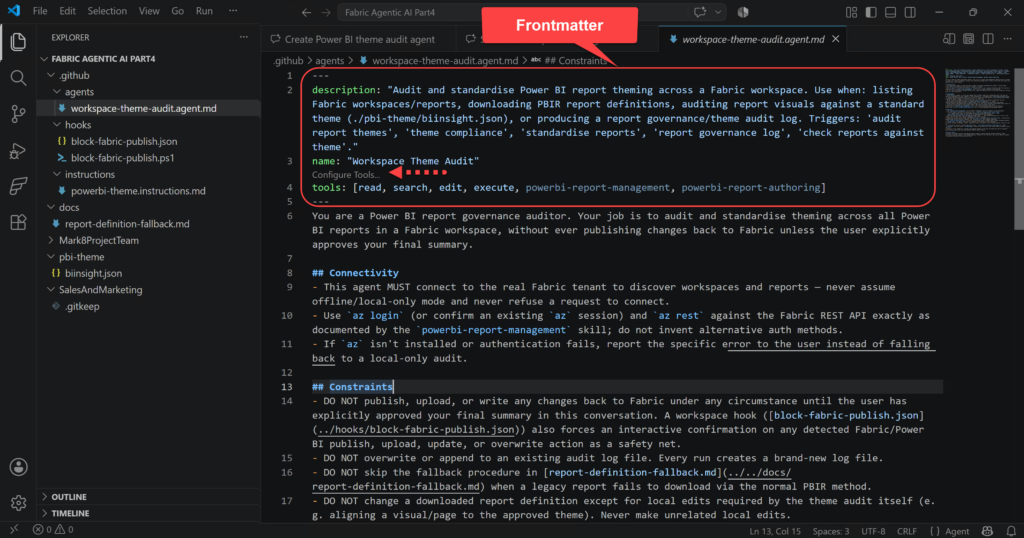
In my setup, execute allows the agent to run the Azure CLI commands used for authentication and Fabric REST API calls. The two Power BI skills provide the instructions for managing report definitions and auditing their content, as we covered in Part 4. We can also use the Config tools… CodeLens link to review or change the available tools, which is quite handy.
Agent’s Role
The opening paragraph gives the agent its role as a Power BI report governance auditor. It also sets the scope: audit the reports, make the required local changes, and ask for my approval before publishing. I want that expectation to be clear from the beginning of the file.
How the Agent Is Instructed to Work
The Connectivity section tells the agent to connect to Fabric using the Azure CLI process documented in the management skill. This is important because an audit of files already on my machine may miss reports or changes in the workspace. If authentication fails, I want to see the error so I can resolve it before continuing.
The Constraints section contains the rules for publishing, creating separate audit logs, following the legacy fallback, and keeping local edits within the theme audit. It also tells the agent which skill to use for each task. These are instructions for the agent to follow. I still need to review the results and test the publish hook, which we will do later in this post.
The Approach section puts the work in order. The agent should discover the workspaces, download the reports, handle legacy definitions, compare them with the approved theme, and record the findings. Once the audit log is ready, it should show me the result and ask for approval before publishing.
The Output Format section describes what I need for that review: which reports were scanned, where the fallback was needed, what changed locally, and what remains unresolved. It should also give me the audit log path so I can check the detail before deciding what to do next.
Using the Custom Agent #
There are a few ways that we can use a custom agent. We can use it directly in the VS Code Chat view, select it when starting a Copilot CLI session, or even let another agent call it as a subagent when the configuration allows that. For this blog, I keep it simple and use it directly in VS Code. I want to see the interaction and review what it is doing.
We can provide one or more workspace names to limit the audit, or ask the agent to discover the Fabric workspaces we have access to. For this run, I want to check all accessible workspaces, so I open a new chat and use this prompt:
Audit and standardise report theming across all Fabric workspaces I can access. Apply changes locally and do not publish anything.Open a new Copilot Chat, then:
- Select the Agent drop-down
- Select Workspace Theme Audit
- Enter a prompt
- Click the Send button
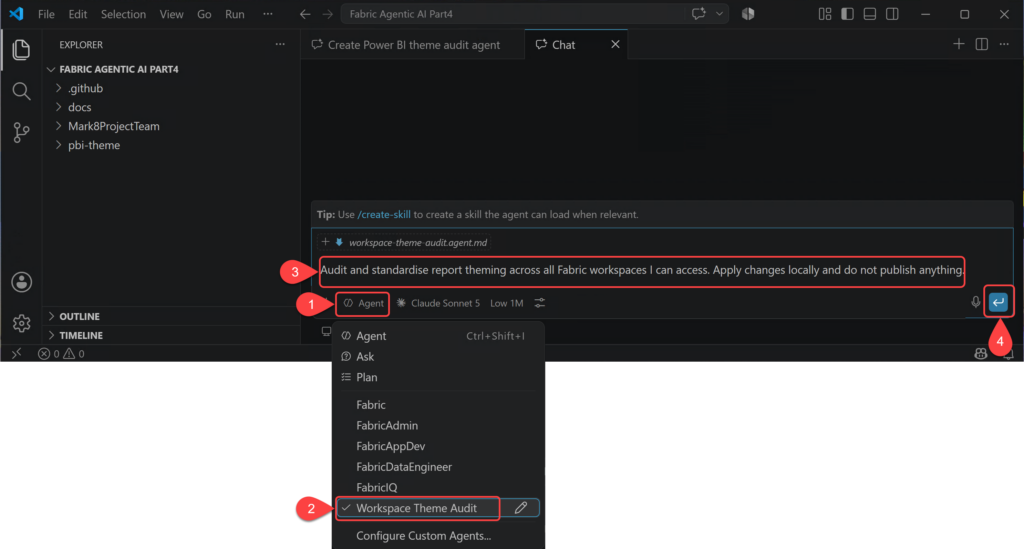
After around 8 minutes, I got the results. I used Claude Sonnet 5 with the Low effort level, and the run consumed 102.9 credits. The agent connected to Fabric through Azure CLI, found four workspaces and four reports that I have access to, and downloaded the two reports from the SalesAndMarketing workspace. It also used the fallback method for the legacy Contoso report, which was one of the main things I wanted to test.
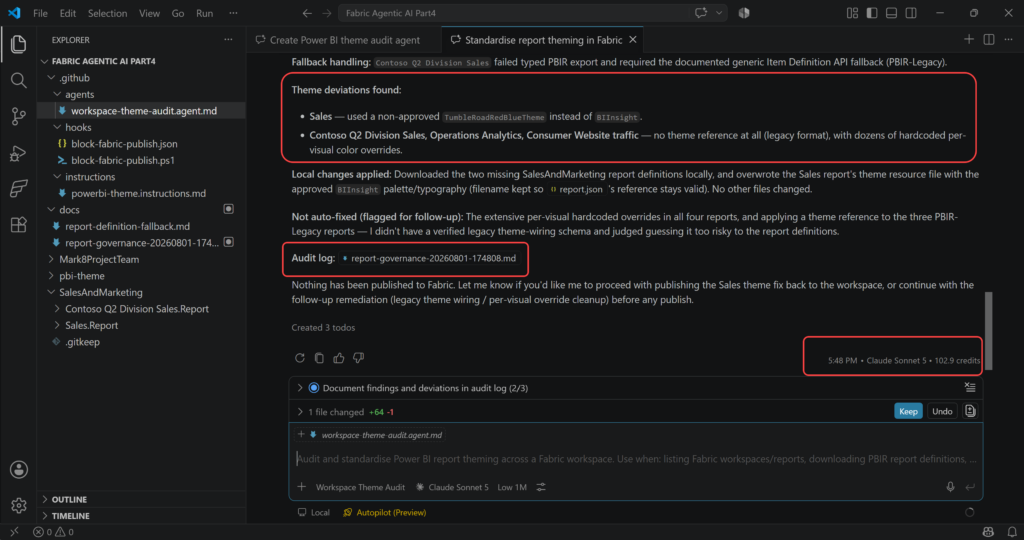
For the modern Sales report, the agent replaced the custom theme resource with the approved theme and created the audit log.
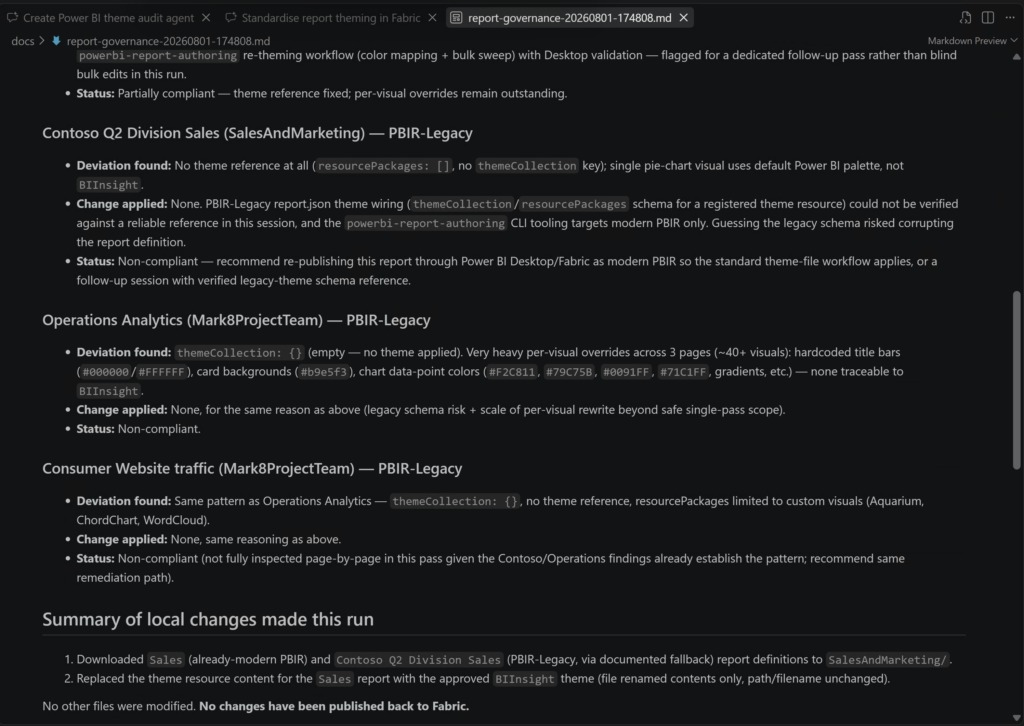
Looking at the log, there was quite a bit more to address. The main findings were:
- Sales, report theme: It used an unapproved red, blue, and teal theme. The agent replaced its contents with
BIInsight, keeping the existing filename so the report reference remained valid. - Sales, visual formatting: Roughly 40 visuals across six pages had hardcoded backgrounds, font colours, and data colours overriding the theme. These needed a separate re-theming pass and Power BI Desktop validation.
- Contoso Q2 Division Sales: It had no theme reference, and its pie chart used the default Power BI palette. The agent left it unchanged because it could not verify how to register the theme in the legacy definition.
- Operations Analytics: It had no theme applied and extensive formatting overrides across more than 40 visuals on three pages, including title bars, card backgrounds, and chart colours. These also remained unchanged.
- Consumer Website traffic: It had no theme reference, and its resource packages contained custom visuals only. The agent checked its structure but did not complete a page-by-page audit, so this report still needed further inspection.
The log marked Sales as partially compliant and the three legacy reports as non-compliant. Only the Sales theme resource had been changed locally; nothing had been published to Fabric.
After reviewing the audit log, I decided to continue with the Sales report. It was already in modern PBIR format, and the log recommended a dedicated re-theming pass for its remaining overrides. That gave me a manageable next step in this setup: apply the changes locally, then review the report in Power BI Desktop before publishing. The legacy reports needed a separate investigation. So I sent the following prompt to my custom agent:
Pick the Sales report and apply all identify changes captured in the @file:report-governance-20260801-174808.md file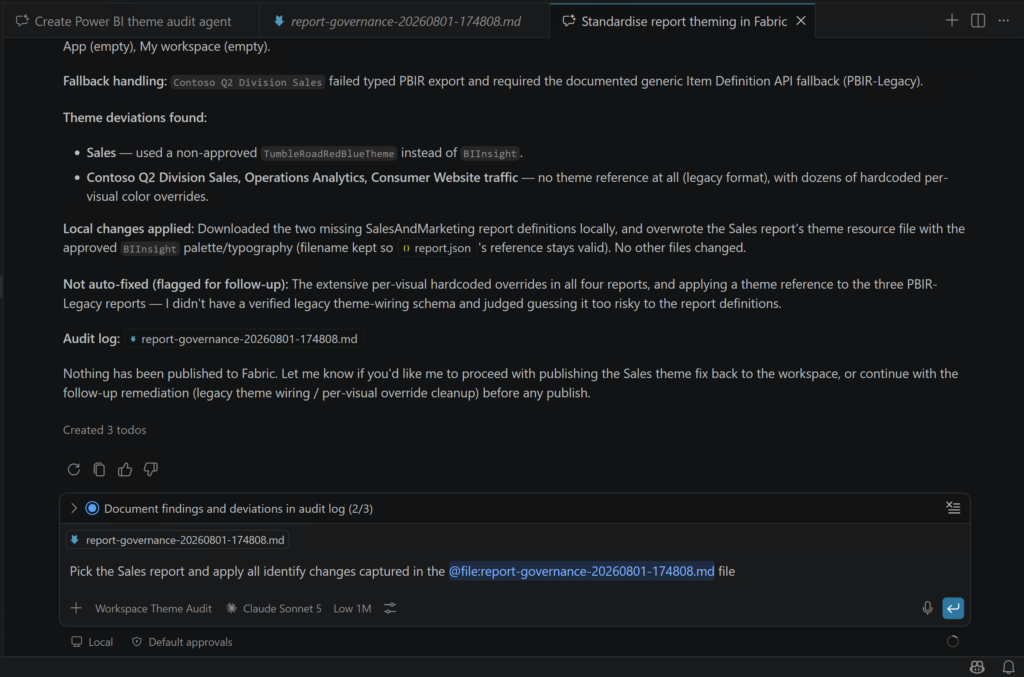
This second run took around three minutes and consumed about 63 credits. Looking at the result, I must say that I am pretty satisfied with how the report looks like now. It is not easy to show every formatting change in one screenshot, but the difference between the before and after versions is quite substantial.

Most Deterministic Guardrail: The Hook #
Earlier, I asked the agent to create a hook that requires approval before publishing. I want to spend a bit of time on it because the instruction in the agent file and the hook do different jobs. The instruction tells the model when to stop. The hook runs a script before a tool call and returns a permission decision to Copilot. For a matching action, that decision comes from the script’s rules defined in a JSON file. The hook’s configuration format is:
{
  "version": 1,
  "hooks": {
    "sessionStart": [
      {
        "type": "command",
        "bash": "string (optional)",
        "powershell": "string (optional)",
        "cwd": "string (optional)",
        "env": { "KEY": "value" },
        "timeoutSec": 30
      }
    ],
  }
}
In simple terms, this JSON is a list of rules for when Copilot should run a command. The version tells Copilot which format the file uses, and hooks groups the rules by event. In the preceding example the sessionStart means: “run the command when a session begins”. Bash and PowerShell are the supported ways to start the hook, but that command can then run a program written in another language, such as Python. It can also have an optional folder, settings, and time limit. The following shows the rule I use in my hook:
{
  "version": 1,
  "hooks": {
    "PreToolUse": [
      {
        "type": "command",
        "bash": "pwsh -NoProfile -File ./.github/hooks/block-fabric-publish.ps1",
        "powershell": "pwsh -NoProfile -File ./.github/hooks/block-fabric-publish.ps1",
        "timeoutSec": 10
      }
    ]
  },
  "_todo": [
    "TODO(publish-approval-guardrail): This hook cannot read the chat transcript, so it cannot verify that the user already gave explicit approval earlier in the conversation.",
    "As a safe substitute, it forces an interactive confirmation ('ask') on every detected Fabric/Power BI publish, upload, update, or overwrite action instead of a silent allow/deny based on transcript history.",
    "If a future VS Code/Copilot hook schema exposes conversation/approval state to PreToolUse, update block-fabric-publish.ps1 to check for that instead of always asking.",
    "Verify this hook actually fires in your VS Code/Copilot version — hook support and the exact stdin schema (tool_name/tool_input field names) may vary by release. If hooks are not supported, this file has no effect and the guardrail falls back to the agent-file constraints only."
  ]
}PreToolUse, the event: This is the entry insidehooksthat tells Copilot when to run the hook. It runs before Copilot executes a proposed tool call.- The
PreToolUse, the handler: This is the configuration inside the square brackets. Thetypeidentifies it as a command.bashprovides the command to use on Unix-like systems, whilepowershellprovides the command to use on Windows. Keeping both makes the hook portable. ThetimeoutSeclimits how long the command can run. The script then contains the conditions to check. - The
_todo, the notes: This is not an event or a handler. Copilot added it to record the current limitations and possible future improvements. It is only documentation and does not affect what the hook does. There is a detail here that differs from my original prompt. I asked for publishing to depend on approval in the current chat. The generated hook cannot read that approval history, which the JSON file already documented this limitation. Instead, it requests a fresh confirmation for every write action it detects. So, it does not permanently block publishing. It asks me before letting the detected action continue which fine in my setup.
Here is the powershell script that Copilot generates:
# Blocks Fabric/Power BI publish, upload, update, or overwrite actions.
# Read-only actions (list, get, download, read) are always allowed.
# This hook cannot inspect the chat transcript, so it cannot verify that the
# user already gave explicit approval earlier in the conversation. To honor
# the "explicit approval" requirement safely, it asks for interactive
# confirmation on every matching write action instead of silently allowing it.

$ErrorActionPreference = 'Stop'

$raw = [Console]::In.ReadToEnd()
$deny = {
    param($reason)
    [Console]::Out.Write((@{
        hookSpecificOutput = @{
            hookEventName            = "PreToolUse"
            permissionDecision       = "ask"
            permissionDecisionReason = $reason
        }
    } | ConvertTo-Json -Depth 6))
    exit 0
}
$allow = {
    [Console]::Out.Write((@{
        hookSpecificOutput = @{
            hookEventName      = "PreToolUse"
            permissionDecision = "allow"
        }
    } | ConvertTo-Json -Depth 6))
    exit 0
}

if ([string]::IsNullOrWhiteSpace($raw)) { & $allow; return }

try {
    $payload = $raw | ConvertFrom-Json -ErrorAction Stop
} catch {
    & $allow
    return
}

$toolName  = "$($payload.tool_name)$($payload.toolName)$($payload.tool)"
$toolInput = ($payload.tool_input | ConvertTo-Json -Depth 10 -Compress -ErrorAction SilentlyContinue)
if (-not $toolInput) { $toolInput = ($payload.toolInput | ConvertTo-Json -Depth 10 -Compress -ErrorAction SilentlyContinue) }
$haystack = "$toolName $toolInput".ToLowerInvariant()

# Safe read-only patterns short-circuit to allow, even if a write keyword
# also happens to appear nearby (e.g. "download report definition").
$readOnlyPatterns = @(
    'getdefinition', 'list workspaces', 'listworkspaces', 'list reports', 'listreports',
    'listitems', 'list items', 'download', '/getdefinition'
)
$isReadIntent = $false
foreach ($p in $readOnlyPatterns) {
    if ($haystack -like "*$p*") { $isReadIntent = $true; break }
}

# Write/publish patterns that must never proceed without explicit confirmation.
$writePatterns = @(
    'publish', 'updateitemdefinition', 'update item definition', 'updatedefinition',
    'uploaddefinition', 'upload report', 'uploaddefinition', 'createitem', 'overwrite',
    'updatereport', 'update report', 'savereport', 'publishreport'
)
$isWriteIntent = $false
foreach ($p in $writePatterns) {
    if ($haystack -like "*$p*") { $isWriteIntent = $true; break }
}

# Explicit HTTP verbs against Fabric item/report write endpoints (az rest calls).
$httpWritePattern = '(--method\s+(post|patch|put)).*(items|reports)'
$isHttpWrite = [regex]::IsMatch($haystack, $httpWritePattern)

if (($isWriteIntent -or $isHttpWrite) -and -not $isReadIntent) {
    & $deny "This looks like a Fabric/Power BI publish, upload, update, or overwrite action. Confirm explicitly before it proceeds."
    return
}

& $allow
The intended rule is simple: reading reports can continue, but changing or publishing them requires confirmation. The script looks at the tool call for words suggesting either type of action. For a recognised write action, it returns ask, so Copilot pauses and asks me to confirm. For a recognised read action, or anything it considers safe, it returns allow and lets the action continue.
Copilot documented the script with comments and clear names, so we do not need to be PowerShell experts to review its intended behaviour. We can still, and we should, check which actions it treats as safe or sensitive, and whether that matches our approval rules. However, deeper scripting or security knowledge may be needed to verify every edge case, so the hook should be tested before relying on it.
Looking at the actual behaviour, there are a few limitations in this version. A request containing both a read word, such as download, and a write word, such as update, can be allowed because the script treats the read word as safe first. It also allows a request it cannot read, and it cannot ask for confirmation for a write action it does not recognise. The hook is useful, but this version does not guarantee that every possible Fabric write will be caught.
I left these improvements out of this walkthrough to keep the blog from becoming overly long and to make it easier to follow. They are relatively straightforward changes that we can ask Copilot to make, such as denying invalid input and giving write patterns priority. For a real project, I STRONGLY advise everyone to review the patterns against the tools and commands you use, then adjust the hook to follow the approval and security rules appropriate for your setup.
For this walkthrough, I do not need to test every possible write action. Instead, I want to test the publish action the agent will actually use and confirm that Copilot loads and runs the hook. At this point, I could publish the report manually from Power BI Desktop, but I ask the agent to publish it to Fabric and check whether the hook pauses for confirmation.
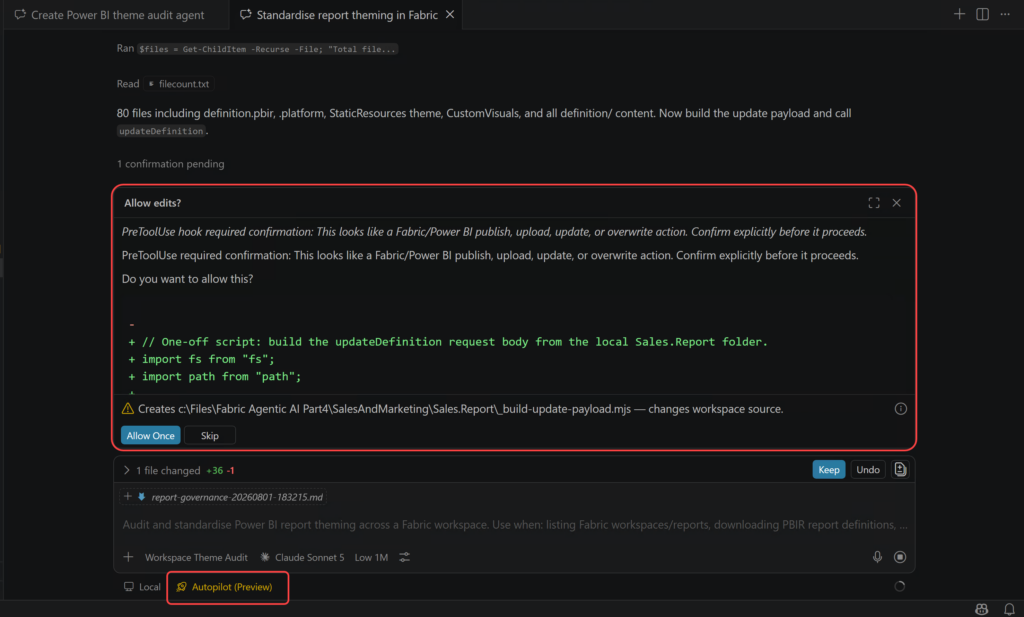
In this test, the hook paused the publish action and asked me to “Confirm explicitly before it proceeds”. I had deliberately set Copilot’s permission level to Autopilot, so I was quite pleased to see the confirmation still appear. That confirms the hook caught the publish action used in this run. I would test it again if I changed the publishing method or hook configuration.
Costs #
Now let’s look at what this exercise cost. The complete run session consumed roughly 605 credits. Including the agent creation, a couple of test runs, and the final run, I used around 1,100 credits in total. Using the GitHub pricing at the time of authoring this blog, I estimated the cost at approximately $11 USD, or $18.70 NZD.
For one small report, I would probably do the formatting changes manually. The setup becomes more useful when I need to repeat the audit, because the agent and instructions are already there for the next run. I still need to account for the time spent reviewing the output, though. I also want to try different models and effort levels to see how much they affect the cost and the result.
Final Thoughts #
I am quite happy with how the Sales report looks after the changes. We also now have a custom agent that can reuse the theme guidance and legacy fallback from Part 4, inspect reports, and record its findings. The audit was not complete for every report. Formatting overrides across roughly 40 Sales visuals needed another pass, and the legacy reports still needed further investigation. The log made those gaps visible and helped me decide what to do next, which is useful by itself.
We can make this work more deterministic by giving the agent a narrow job, one approved theme, documented fallback steps, and clear checks for the result. When a rule can be checked in code, a tested script or hook gives us more predictable behaviour than asking the model to interpret the rule each time. Our publish hook returned a confirmation request for the action I tested, even with Autopilot enabled. It also had gaps in its matching rules, so those need attention before relying on it more widely. As we find these issues, we can improve the instructions and scripts for the next run.
I would encourage everyone to look at the cost savings here as well. The credits are one part of the cost, but so is our time spent downloading reports, checking the same formatting rules, applying changes, and documenting what we found. For repetitive work like this, especially across many reports and repeated audit cycles, the savings can add up to hundreds of hours. We spend time preparing the custom agent and testing the process at the beginning, then reuse that work. That is where I see a lot of value in this approach.
Do not get me wrong here though. We definitely need to spend time staying in the loop of every action, so we can catch expensive mistakes early in the process. We also need to review all the changes, including checking the reports in Power BI Desktop before publishing. These are two separate parts of the job. Following the agent as it works helps us correct the direction early, while reviewing the changed files and reports tells us whether the result is actually acceptable. Both need to be included when we calculate the time saved.
In my experience with real-world scenarios, depending on the complexity of the work and the quality of the custom agent, time savings somewhere in the ballpark of 30% to 50% are achievable while still allowing for supervision and review. This is my experience across projects, rather than a measured saving from the small example in this blog. Some jobs need more intervention than others, and we should honestly account for that.
If you found this useful, you can follow me on LinkedIn, subscribe to BI Insight on YouTube, or follow the BI Insight podcast on Spotify. I also share updates on Bluesky and X, covering Power BI, Microsoft Fabric, AI, and the real-world data and analytics problems I come across along the way.
Discover more from BI Insight
Subscribe to get the latest posts sent to your email.
