

In Part 1, I went through the concepts and terminology behind agentic AI, things like agents, tools, skills, MCP, guardrails, and Human in the Loop. In Part 2, I moved into the practical setup, VS Code, GitHub Copilot, and a safe way to install and test MCP servers. In Part 3, I used that setup for a real, narrow modelling task, moving 54 measures into a dedicated table with display folders, using the Power BI Modeling MCP server and the Ask, Plan, Agent workflow.
At the end of Part 3, I said the next post would move into more complex scenarios using a paid GitHub Copilot licensing tier and a more advanced model. This is that post. The scenario itself is also a step up. Instead of one semantic model, we are looking at a whole Fabric workspace full of Power BI reports, and we are composing several Agent Skills together. The skills use Azure CLI for Fabric authentication and API calls. This workflow does not use a Fabric MCP server.
Before the hands-on part, I also want to spend a bit of time on something that has been bothering me a little while writing this series. The definitions of skills, agents, and MCP servers keep shifting under our feet as the tools mature. So let’s start there.
If you’d like to listen to the content on the go, here is the AI generated podcase made from the content of this blog 👇:
What This Blog Will Cover #
In this post, I want to cover:
- A quick refresher on the differences between skills, agents, and MCP servers, and an honest note on how these definitions keep evolving
- Explaining why this workflow uses Azure CLI through the skills, rather than a Fabric MCP server
- Introducing Skills for Fabric, Microsoft’s open-source collection of Agent Skills for Fabric and Power BI, with a closer look at the powerbi-report-* skills
- The folder structure GitHub Copilot expects in a repository, and a brief note on how Claude Code and Codex differ
- The difference between configuring skills, agents, and MCP servers at the user scope versus the project scope
- What Agent Plugins are, since they are new since Part 2, and how to install them and MCP servers from inside VS Code
- A hands-on walkthrough auditing and standardising report theming across a Fabric workspace using these skills together
Skills, Agents, and MCP Servers, a Quick Refresher #
I covered this in more depth in Part 1, but it is worth a short refresher here because the tooling has moved on since then, and honestly, the lines between these three concepts are blurrier than they were a few months ago.
- An agent is the thing that does the planning and the acting. It reads context, decides what to do next, calls tools, and reacts to the results. In GitHub Copilot, this shows up as the Ask, Plan, and Agent modes I used in Part 3, plus any custom agents we define ourselves.
- A skill is a packaged set of instructions, usually a
SKILL.mdfile plus reference material, that teaches an agent how to do a specific job well. A skill does not run code on its own. It is loaded into the agent’s context when relevant, and it shapes how the agent behaves for that task. - An MCP server is a live connection to a real system. It exposes tools the agent can call, such as creating a Fabric item, listing files in OneLake, or running a pipeline. Unlike a skill, an MCP server actually does something against a real environment when called.
In my view, the simplest way to keep these apart is this: skills tell the agent how to do something well, MCP servers give the agent something it can actually do, and the agent is the one deciding when to use which.
That said, I want to be honest about something. These definitions are not as stable as I would like. A few months ago, a “skill” in this space barely existed as a named concept. Now Microsoft ships dozens of them. Plugins, which I will get to shortly, can bundle skills, agents, and MCP servers all together, which makes the boundary between “a skill” and “a small agent with built-in tools” a bit fuzzier than the textbook definition suggests. In my view, it is not worth getting too attached to the precise definitions. Focus on what a given package actually does for us, and treat the terminology as a moving target that the industry is still negotiating.
So with that refresher out of the way, let us look at the actual approach used in this post.
Why This Workflow Does Not Need a Fabric MCP Server #
The report skills used here already use Azure CLI to authenticate against Fabric and call the Fabric REST APIs. powerbi-report-management handles the retrieval and publishing of report definitions, while powerbi-report-authoring and powerbi-report-design handle the report-specific work. Adding a Fabric MCP server would be another way to reach Fabric, but it is not needed for this workflow.
This keeps the setup smaller. Azure CLI is still a required dependency, because the skills rely on it. The powerbi-modeling-mcp server may be installed as part of the powerbi-authoring plugin, but this report-theming scenario does not call it either.
Introducing Skills for Fabric and the powerbi-report-* Skills #
At FabCon-adjacent announcements this year, Microsoft published microsoft/skills-for-fabric on GitHub, an open-source, MIT-licensed collection of Agent Skills that teach AI assistants how to work correctly with Microsoft Fabric and Power BI. It targets GitHub Copilot, Claude Code, Cursor, Windsurf, Codex, and Gemini CLI, which tells us something about where this industry is heading, these skill packages are increasingly written once and consumed by several different agentic tools.
Each skill lives in its own folder under skills/<skill-name>/, with a SKILL.md file (a YAML frontmatter block describing the skill’s name, description, and version, followed by the actual instructions) and usually a references/ folder with deeper topic-specific Markdown files. Some skills also ship an assets/ folder, for example a base theme JSON file.
For this post, the four skills I care about are the powerbi-report-* family, all introduced together as of release 0.3.3 of the repository:
- powerbi-report-planning: an end-to-end, requirements-to-implementation workflow. It gathers audience, scope, and page plan information, produces a locked report specification document, and then orchestrates the build sequence across the other skills. Use it when we want a guided “plan, then build” experience.
- powerbi-report-design: produces visual design guidance before any PBIR files are touched. It covers tone, page archetypes, chart selection, colour and typography, theme direction, and accessibility, including a WCAG-oriented accessibility checklist. It explicitly does not write PBIR files itself, it produces a design brief for the authoring skill to implement.
- powerbi-report-authoring: the file-mechanics layer. It creates and edits PBIR/PBIP files using the
powerbi-report-authorandpowerbi-desktopCLIs, covering pages, visuals, filters, slicers, bookmarks, theme registration and re-theming, formatting objects, PBIR validation, and a Power BI Desktop reload-and-screenshot verification loop. - powerbi-report-management: the Fabric-side transport layer. It manages report workspace items in Fabric via the
az restCLI against the Fabric REST API, covering listing, creating, downloading, updating, and deleting report items, including the long-running operation polling that publishing involves.
I find the way Microsoft split these four skills genuinely sensible. Each one owns a clearly bounded responsibility, and each skill’s own description tells the agent when to hand off to one of the others. Planning hands off to design and authoring. Design hands off to authoring. Authoring hands off to management for anything that needs to leave the local file system and reach the actual Fabric workspace. That separation of concerns is exactly the kind of design that makes a multi-skill workflow predictable instead of chaotic, and it is the backbone of the hands-on scenario later in this post.
One more practical note, each of these skills carries an instruction telling the agent to check for an updated version once per session. Skills for Fabric is a young, fast-moving repository, it went through six releases in about two months as of writing, so I would not be surprised if some of the detail here shifts by the time we read this. Treat the capabilities I describe as accurate as of writing rather than permanently fixed.
The Folder Structure GitHub Copilot Expects #
So the question is, once we have all of this, skills, agents, MCP servers, how does it actually sit inside our repository? Here is the folder structure I now keep in a Power BI or Fabric project repository for GitHub Copilot:
fabric-report-governance/
|-- .github/
|   |-- copilot-instructions.md
|   |-- instructions/
|   |   `-- powerbi.instructions.md
|   |-- prompts/
|   |   `-- workspace-theme-audit.prompt.md
|   |-- agents/
|   |   `-- workspace-theme-audit.agent.md
|   `-- skills/
|       `-- powerbi-report-review/
|           `-- SKILL.md
|-- .vscode/
|   `-- mcp.json
|-- pbi-theme/
|   `-- biinsight.json
|-- reports/
|-- docs/
`-- AGENTS.md
The .github folder holds Copilot customisations. pbi-theme, reports, and docs are project folders for this workflow. The following files and folders are the important agentic parts:
.github/copilot-instructions.md, repository-wide custom instructions that Copilot reads automatically and adds to every request.github/instructions/*.instructions.md, narrower instructions that only apply to files matching a glob pattern we set in theapplyTofrontmatter property, handy when one repository mixes Power BI, Fabric notebooks, and other file types that each need their own conventions.github/prompts/*.prompt.md, reusable prompt files we can save once and invoke again from the chat input with a slash command, instead of retyping the same long prompt every time.github/agents/, custom agent definitions, each one a Markdown file with the.agent.mdextension and a YAML frontmatter block describing its tools, model, and behaviour.github/skills/, project-level Agent Skills, each in its own folder with aSKILL.mdfileAGENTS.mdat the repository root, a more tool-agnostic instructions file that several agentic tools, including Codex, read by convention.vscode/mcp.json, the MCP server configuration for this specific workspace
Avoiding Instruction Duplication #
There is an overlap here that is easy to miss. AGENTS.md, .github/copilot-instructions.md, and .github/instructions/*.instructions.md can all contain instructions. If we copy the same rules into all three places, the agent receives the same context repeatedly. That uses context for no benefit, makes maintenance harder, and can produce conflicting instructions when one copy is later updated but the others are not. This is not good for agentic work, where clear and consistent instructions matter a lot.
I find it helps to give each file one job:
AGENTS.mdis the tool-agnostic baseline. Put repository rules here that should apply across Codex, Claude Code, GitHub Copilot, and similar tools. Examples are coding conventions, validation requirements, safety rules, and rules about preserving user changes..github/copilot-instructions.mdis for GitHub Copilot-specific behaviour that does not belong in the portable baseline. Examples are Copilot chat conventions, references to Copilot features, or repository-wide guidance that only Copilot can use..github/instructions/*.instructions.mdis for narrow, file-type-specific rules. UseapplyToso Power BI rules apply to PBIR files, while notebook or infrastructure rules apply only where they are relevant..github/agents/*.agent.mddefines a role and workflow. It can point to shared rules, but should not copy all of them again..github/skills/*/SKILL.mdcontains task-specific instructions and references. It should teach a repeatable capability, not become another copy of the repository policy.
The practical rule is: give every rule one source of truth. Put shared rules in AGENTS.md, keep Copilot-only rules in copilot-instructions.md, and use scoped instruction files only when a rule needs to apply to certain files. Where one file needs a reminder about another rule, use a short reference instead of copying the full text.
I want to flag something important here. These folder structures are no longer as isolated from each other as they used to be. GitHub Copilot, Claude Code, and Codex still have their preferred locations, such as .github, .claude, and AGENTS.md, but the tools have become much better at recognising instructions created for other agents. For example, I have seen Claude reading and following instructions that were originally created for GitHub Copilot.
This is useful when we want to use the same repository with different AI tools, but we need to be a bit careful. If we copy the same instructions into .github, .claude, and AGENTS.md, more than one version may be loaded into the context. That creates duplication, consumes part of the context window, and may increase token usage and running costs. It also creates another problem: the duplicated instructions can slowly become different and even conflict with each other. So, instead of copying the same rules into every supported folder, I prefer having one source of truth and keeping the tool-specific files as small as possible.
Scopes, User Versus Project #
At this point, a natural question comes up, where should all of this actually live, in the repository or on my own machine? The answer is, it depends on whether we want the configuration to be personal or shared with our team, and both GitHub Copilot’s skills, agents, and MCP servers all support this same split.
- Project scope: files live inside the repository, under paths like
.vscode/mcp.json,.github/agents/, and.github/skills/. Because these live in the repo, they are committed to source control and shared with everyone who clones the project. This is the right place for anything we want our whole team to use consistently, a shared MCP server configuration, a shared report-authoring skill, a shared review agent. - User scope: files live in our own VS Code user profile or in home-directory folders, things like
~/.copilot/agents/or~/.copilot/skills/. These are user scoped, they follow us across every project we open with that profile, but nobody else on our team sees them unless we explicitly share the files ourselves.
A practical way I think about it, if I would be annoyed that a teammate does not have a particular skill or MCP server configured the same way I do, it belongs at project scope. If it is just a personal convenience, a pet skill I like having around, or an MCP server I use for my own exploration that has nothing to do with this specific project, it belongs at user scope.
I need to raise a caveat here. VS Code supports both project-level and personal copies of skills, custom agents, and MCP servers. The official documentation explains where each scope is stored, but I could not find a documented precedence rule that clearly says what happens when items with the same name exist in more than one scope.
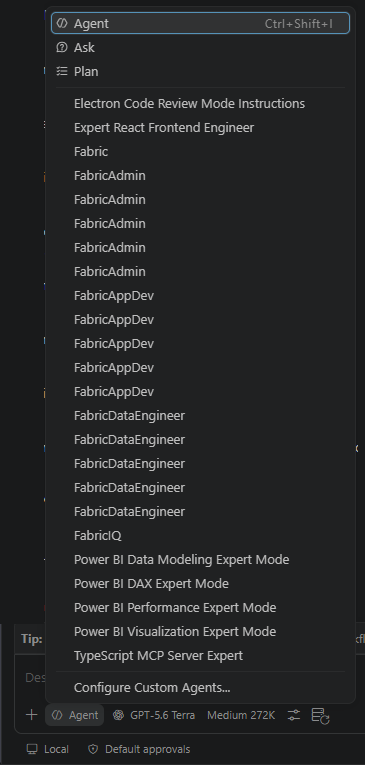
In my own experience with VS Code, duplicated MCP servers and skills do not behave like one clean project-level override. I have seen multiple copies remaining visible and accessible at the same time, and it can be very difficult to tell which copy we are actually using. Custom agents have a similar problem. VS Code shows the agent description when we hover over it, but if the duplicated agents use the same name and description, there is almost no practical way to know which one to select without opening their .agent.md files and comparing the contents. The following screenshot shows an extreme example from my Dev machine:
So my advice is simple: avoid naming collisions between project-level and personal skills, agents, and MCP servers. Use clear and unique names, remove or disable copies that are no longer needed, and do not rely on undocumented precedence behaviour to sort it out for us.
What Are Agent Plugins, and How Do We Install Them #
This is genuinely new since Part 2, and worth explaining properly because the word “plugin” gets used loosely everywhere. In VS Code, an Agent Plugin is a prepackaged bundle of agent customisations that we discover and install from a plugin marketplace. A single plugin can combine any mix of slash commands, Agent Skills, custom agents, hooks, and MCP servers into one installable unit.
I think the clearest way to describe a plugin is, it is a bundled package, and the package can contain skills, agents, and MCP servers together, pre-wired to work as a set. That is different from a regular VS Code extension, which is a separate artefact built on the VS Code Extension API, and it is different from installing a single MCP server on its own through the MCP Servers view. A plugin is a higher-level packaging concept that sits above both.
As of writing, Agent Plugins is still labelled Preview in the official VS Code documentation. A few practical things worth knowing:
- The plugins are automatically installed at the user scope. Depending on the install can find the entire package here:
%USERPROFILE%\.vscode\agent-plugins. The relevant plugin folder, in our case theskills-for-fabricfolder contains allagents,skills, and many more. - MCP servers bundled inside a plugin will be automatically registered, so if we already have the same MCP server installed, we will get another one registered by the plugin.
- The installation happens from a few different places, the Extensions view by searching
@agentPlugins, the Command Palette (Ctrl+Shift+P) command Chat: Install Plugin From Source for installing directly from a Git repository URL, the gear icon in the Github Copilot Chat view or from GitHub Copilot CLI.
The agent plugin in the marketplace is currently named fabric-skills that ships exactly this kind of bundle package. After installation, we get 28 skills, 4 agents, and only 1 MCP Server. Interestingly, the “powerbi-report-*” skills are NOT included in this plugin, while looking at its GitHub repo, the skills directory contains four “powerbi-report” related skills. It gets even more interesting to find out that the fabric-skills plugin actually includes semantic-model-authoring and semantic-model-consumption skills. I don’t know why they must be in separate plugins. Please let everyone know if you know why. As mentioned, this plugin currently includes only 1 MCP server. No, it is not the fabric-core-mcp, or the fabric-rti-mcp or the fabric MCP server; it is the FabricIQ MCP server! Very interesting right? There are still more…
OK, so, to get the “powerbi-report-*” skills, we need to install the powerbi-authoring plugin. This plugin comes with 4 skills, and 1 MCP Server. The MCP Server is, the powerbi-modeling-mcp server. No surprises on that.
Both plugins include one useful check-updates skill to keep the plugins up-to-date, that currently only runs in GitHub Copilot CLI.
Install fabric-skills and powerbi-authoring Plugins in VS Code #
As mentioned, there are several ways to install the agent plugins in VS Code. I explain two methods.
Installation from GitHub Copilot Customisation #
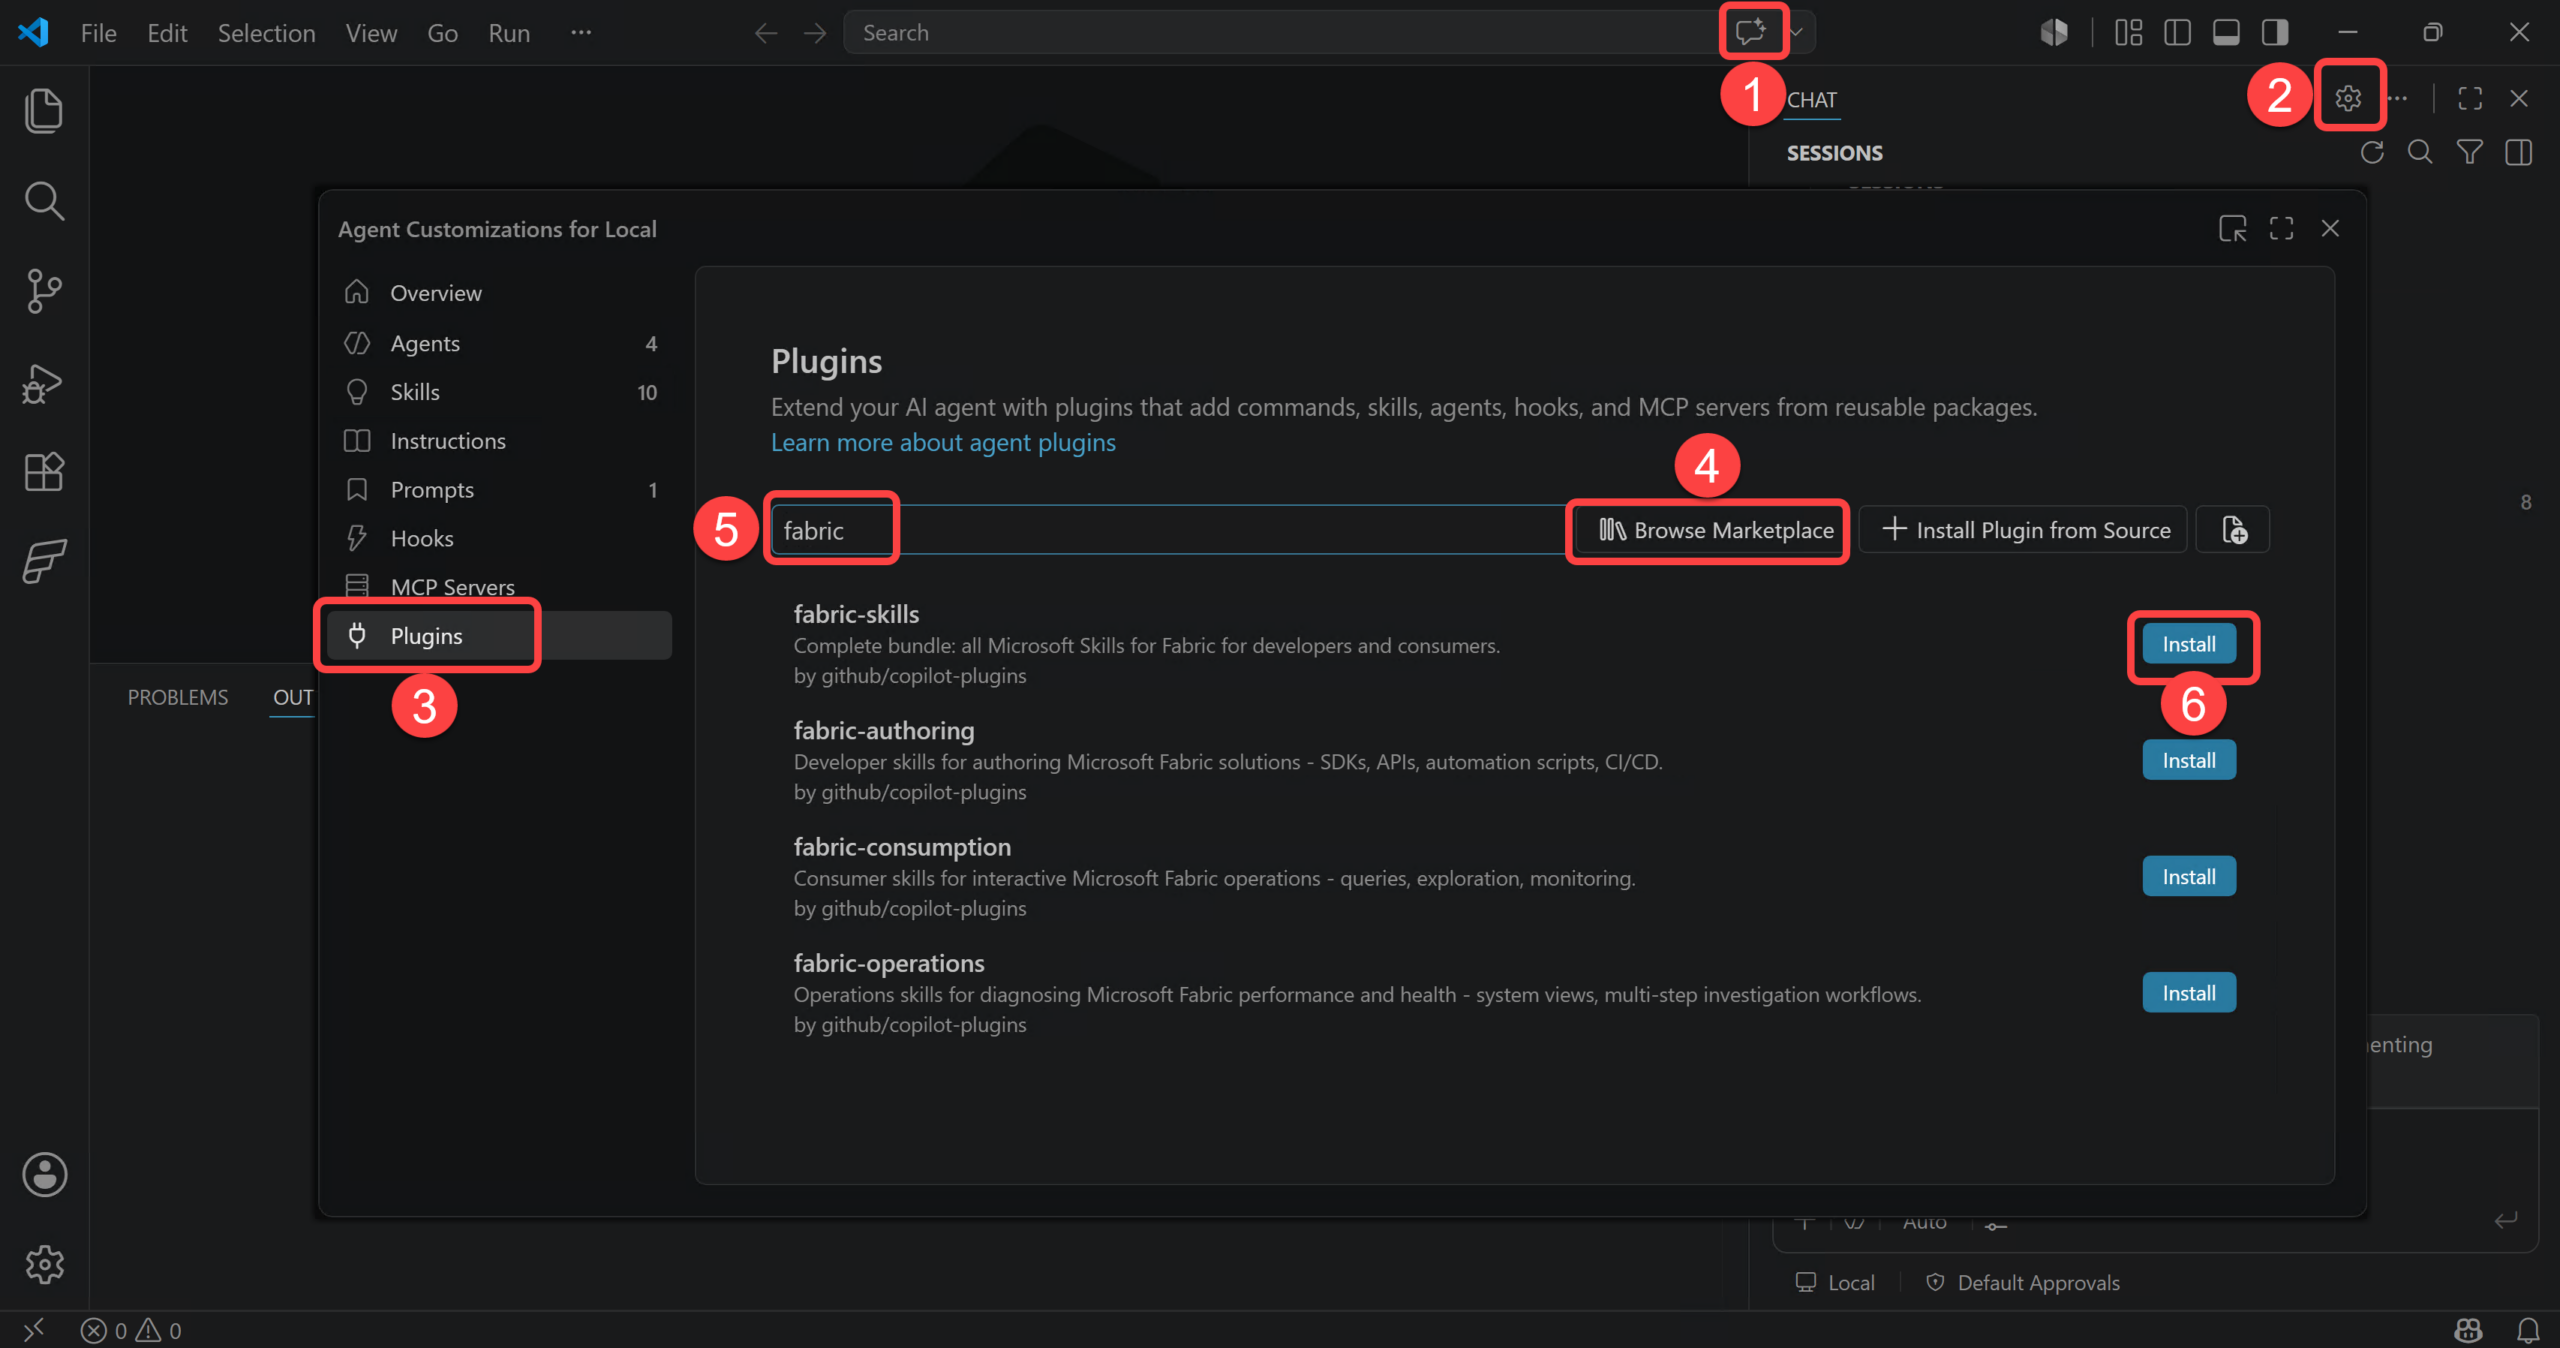
- Open the GitHub Copilot chat
- Click the gear icon on the top right of the chat panel
- Go to the Plugins tab
- Click the Browse Marketplace button
- Type to search for
fabric - There are currently four options available, click the Install button from the
fabric-skillsoption (the other three are bundled into this one)
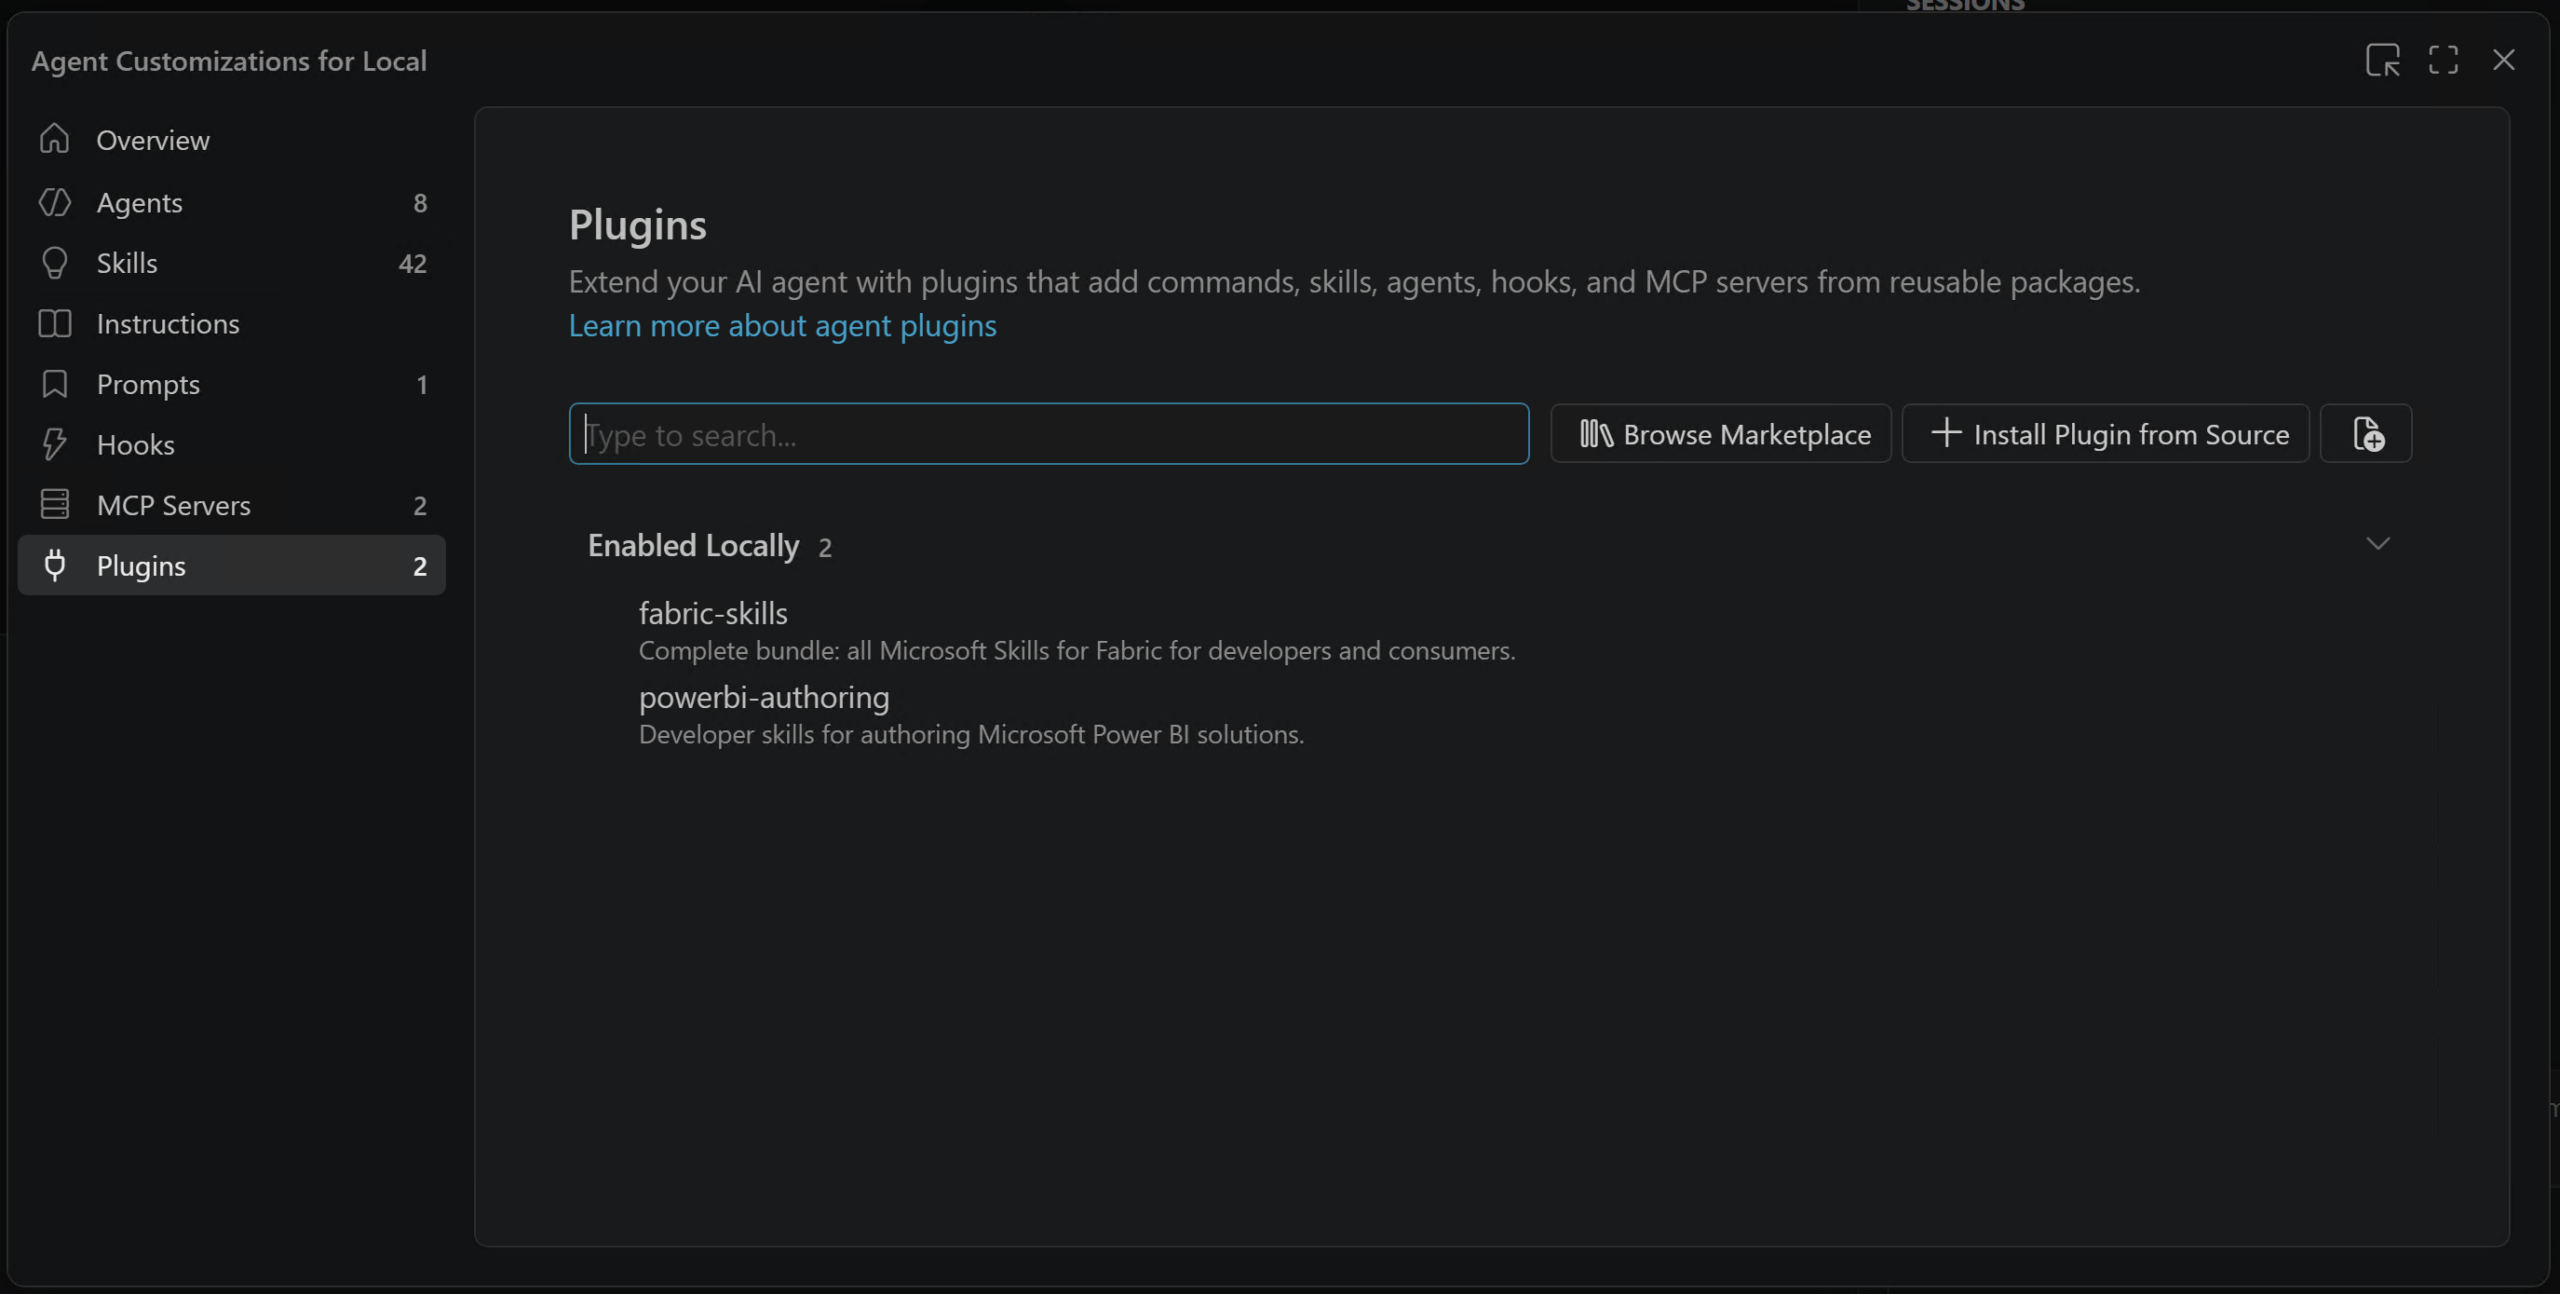
Do the same for powerbi-authoring to get the full package.
Installation from Copilot CLI #
If you have not installed Copilot CLI, go to https://github.com/github/copilot-cli/releases/latest, download the latest version and install it. In VS Code on PC, press Ctrl + Shift + ` to open integrated terminal then type copilot command to run Copilot in terminal, then select yes to trust the folder you run Copilot in.
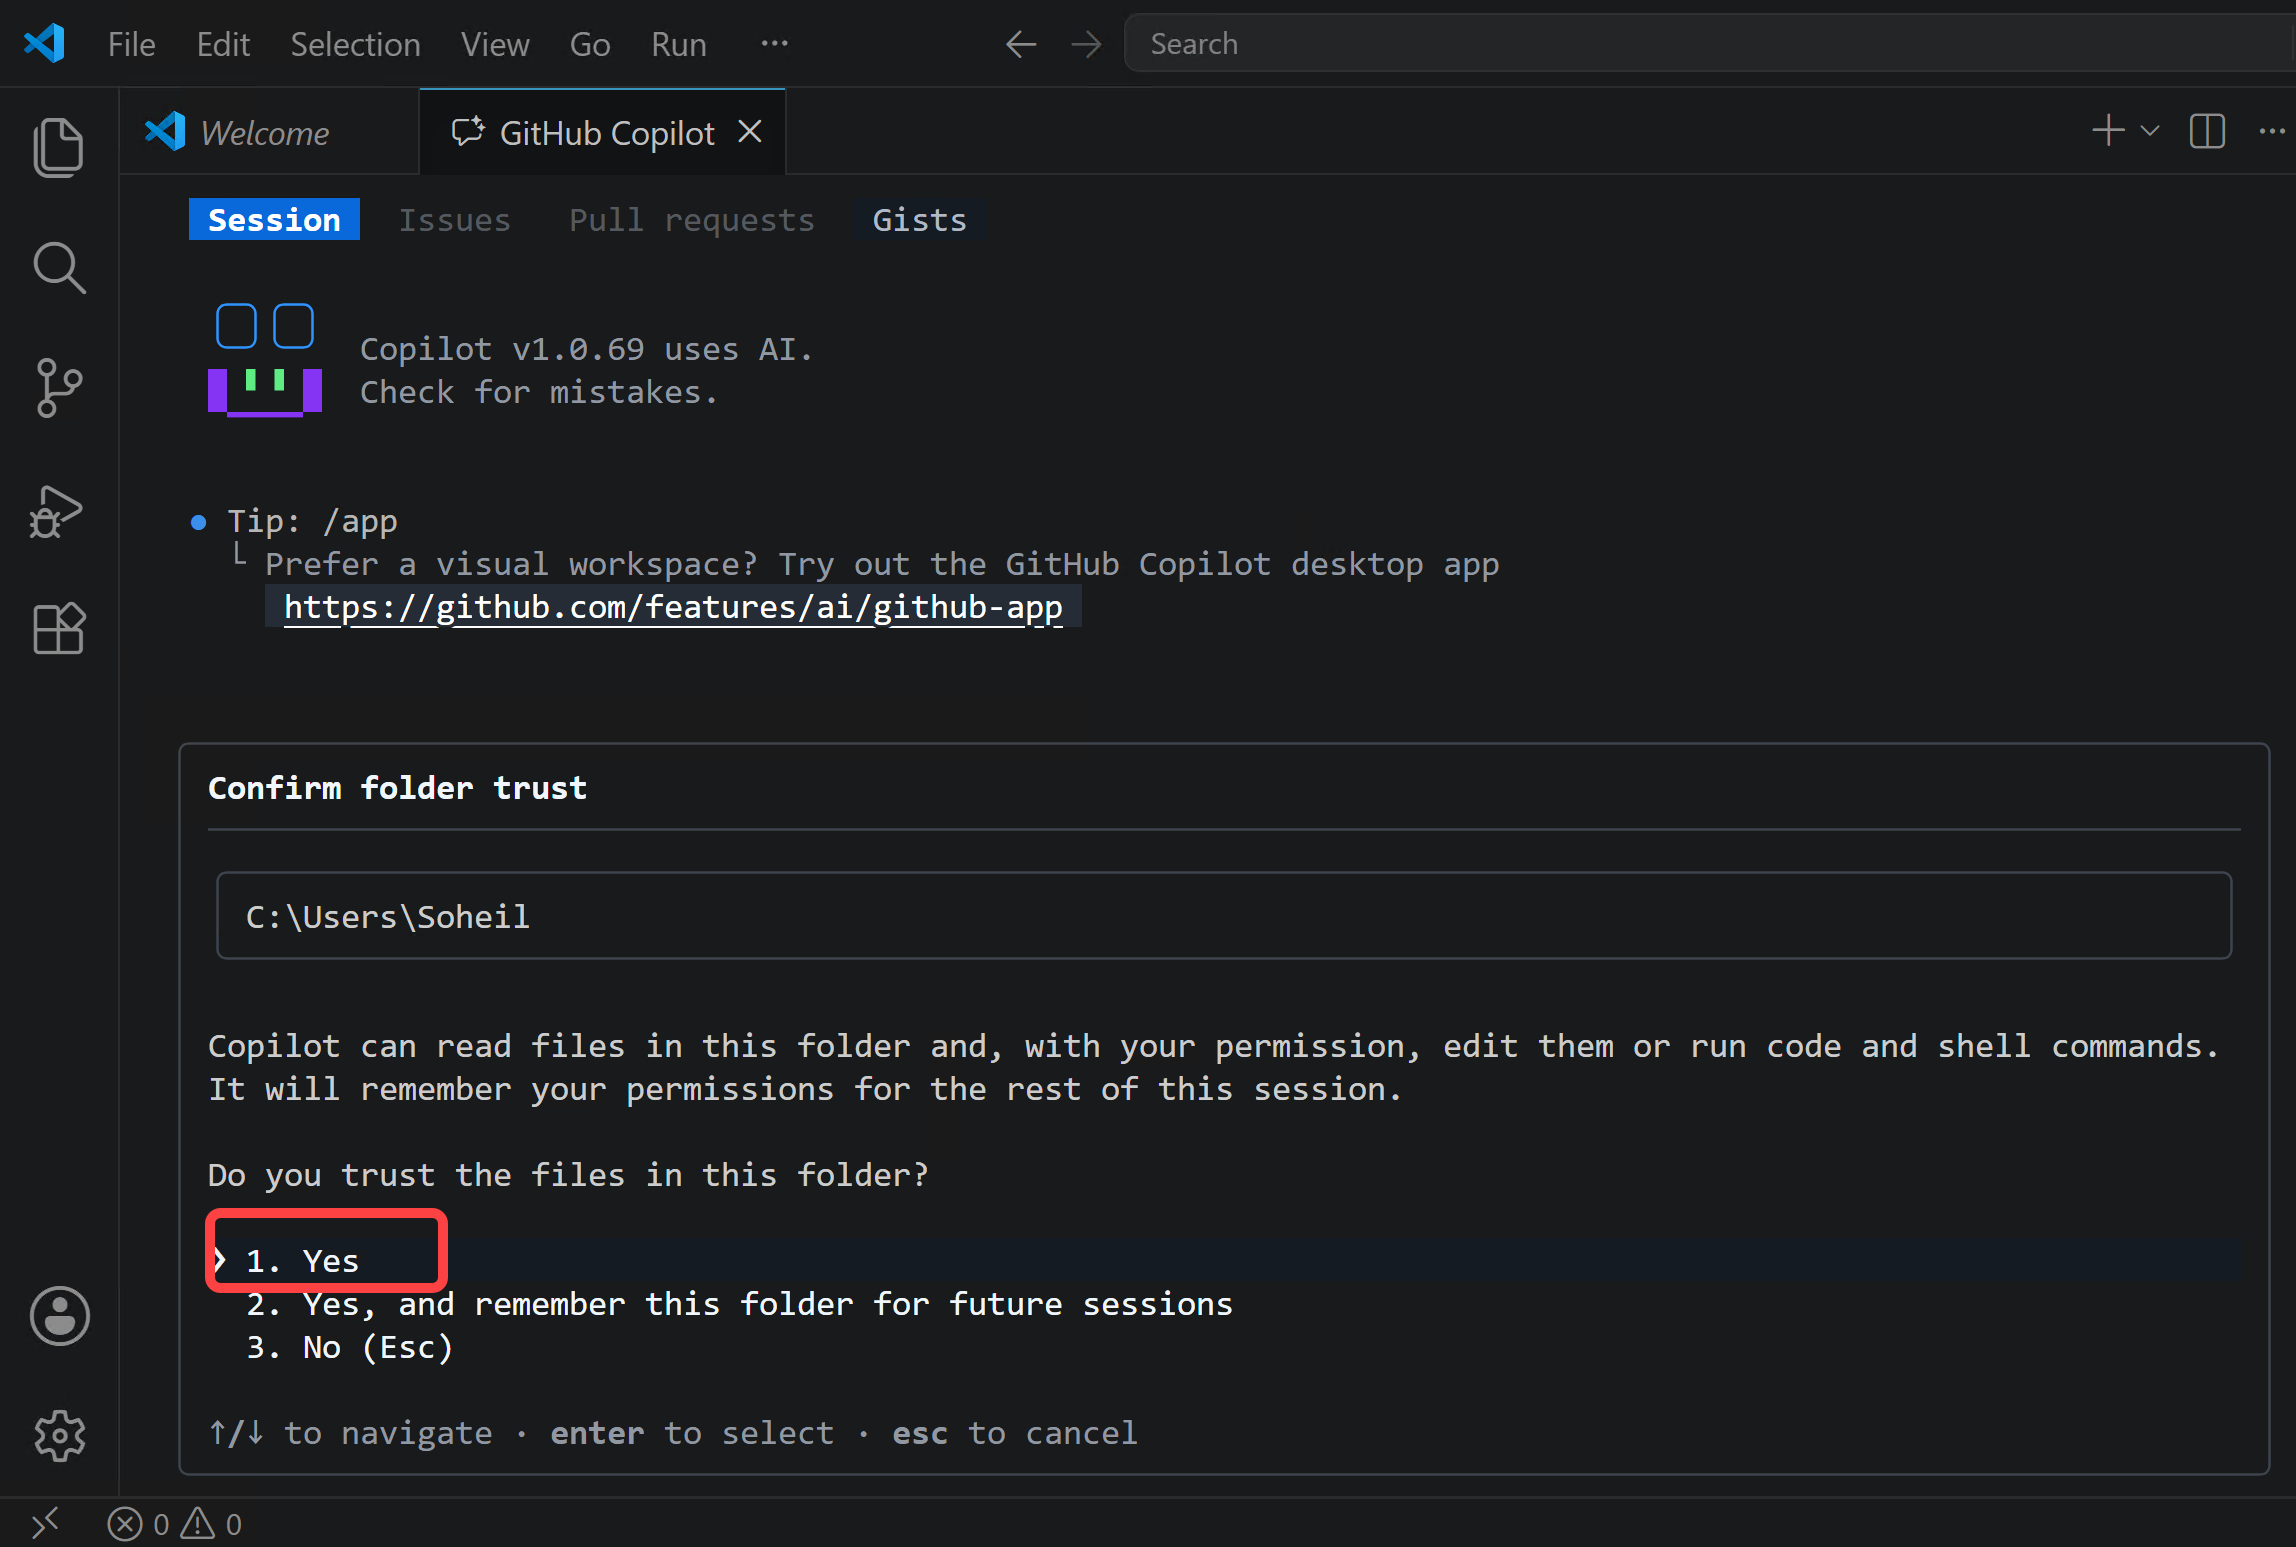
Now run the following command in Copilot to add the public marketplace:
/plugin marketplace add microsoft/skills-for-fabric
Then run the following command to install the fabric-skills bundle:
/plugin install fabric-skills@fabric-collection
and run this one to install the Power BI authoring bundle:
/plugin install powerbi-authoring@fabric-collection
Both methods work the same, it is just your preference. To exit copilot and go back to terminal run the /exit command.
Other Requirements #
There are two other technology dependencies that need to be in place before everything works end-to-end: Azure CLI, which the fabric-skills bundle relies on to authenticate against Microsoft Fabric, and Node.js, which provides the runtime needed to run the powerbi-modeling-mcp server. The following sections explain both.
Azure CLI
Looking at the fabric-skills GitHub repo, the readme clearly mentions it needs to run az login to authenticate. This is required to get the access token for your Microsoft Fabric environment, which means, we have to install Azure CLI on our machine.
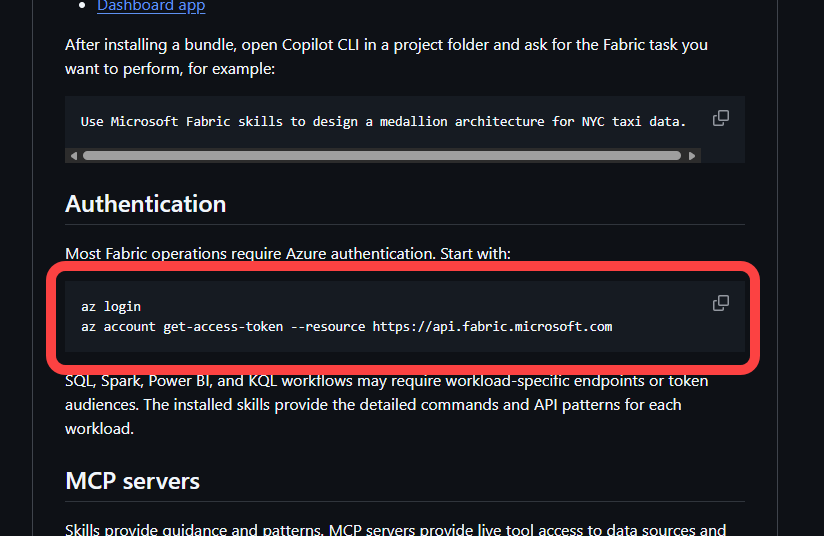
We can run the following command in terminal to install it:
winget install --id Microsoft.AzureCLI
Note
You must exit copilot to run the above command. It needs to run in terminal not in Copilot.
Node.js
Looking at Microsoft’s own repository for the powerbi-modeling-mcp server, it states that Node.js is required to run it.
We can use the following command to run Node.js’s installer to install it on our PC:
winget install OpenJS.NodeJS
To be clear, our scenario in this blog does not require using the powerbi-modeling-mcp server. However, since the MCP is included in the powerbi-authoring plugin and the plugin itself does not install its requirements, I thought I would explain it here so you are not caught out later.
Now that we have all the logistics sorted, let us see how all these things work in action.
The Scenario #
Imagine a Fabric workspace that has grown organically over one or two years. Different people have created reports at different times, using different colours, formatting choices and branding.
Some reports use the approved corporate theme correctly. Others use older themes, default Power BI colours or hard-coded formatting overrides. Nobody has consistently checked whether the reports meet the organisation’s branding and accessibility standards.
The organisation already has an approved Power BI theme that includes the correct brand colours and has been designed with accessibility and contrast in mind.
The goal is to create a reusable custom agent that can audit and remediate every report in the workspace with one simple request.
The setup should remain easy for Power BI users to understand. It uses:
- one custom agent file containing the workflow, rules and approval checkpoint
- one approved Power BI theme JSON file
powerbi-report-managementfor listing, downloading and publishing reportspowerbi-report-authoringfor auditing and editing PBIR files
The agent should handle the complete process automatically, then pause only once for human approval before publishing changes back to Fabric.
The Workflow #
- The user asks the custom agent to run the workspace theme audit.
- The agent reads its built-in instructions, including:
- the target Fabric workspace
- the path to the approved theme
- the audit scope
- the validation rules
- the publishing approval requirement
- the location of the final markdown audit report
- The agent uses
powerbi-report-managementto:- resolve the Fabric workspace
- list all reports
- download each supported report definition in PBIR format
- save the report definitions locally
- The agent uses
powerbi-report-authoringto audit each report for:- the currently registered theme
- colours that do not match the approved theme
- hard-coded formatting overrides
- page, visual, slicer, shape and text formatting
- formatting that prevents theme inheritance
- detectable contrast issues
- The agent applies the approved theme and remediates relevant formatting issues locally.
- The agent validates every changed PBIR definition and records:
- successful changes
- validation failures
- unsupported reports
- blocked reports
- issues that require manual review
- The agent presents one summary to the user showing:
- reports audited
- reports changed
- reports that passed validation
- reports that need manual review
- reports ready to publish
- The workflow pauses for a human-in-the-loop approval checkpoint.
- After approval, the agent uses
powerbi-report-managementto publish only the approved and successfully validated reports back to Fabric. - The agent generates a markdown audit report containing:
- the reports reviewed
- the theme drift found
- the formatting overrides changed
- validation results
- unresolved issues and exceptions
- publishing results
sequenceDiagram
    autonumber

    actor User as BI User
    participant Agent as Theme Governance Agent
    participant Mgmt as powerbi-report-management
    participant Auth as powerbi-report-authoring
    participant Local as Local PBIR Reports
    participant Fabric as Fabric Workspace

    User->>Agent: Run workspace theme audit

    Agent->>Mgmt: Resolve workspace and list reports
    Mgmt->>Fabric: List report items
    Fabric-->>Mgmt: Report inventory
    Mgmt-->>Agent: Reports in scope

    loop For each supported report
        Agent->>Mgmt: Download report definition
        Mgmt->>Fabric: Get report definition in PBIR format
        Fabric-->>Mgmt: PBIR definition
        Mgmt->>Local: Save report locally
    end

    Agent->>Auth: Audit reports against approved theme
    Auth->>Local: Inspect theme registration and formatting overrides
    Auth->>Local: Apply theme and remediation
    Auth->>Local: Validate changed PBIR files
    Auth-->>Agent: Audit and validation results

    Agent-->>User: Present one remediation summary and approval request
    User-->>Agent: Approve selected reports

    loop For each approved report
        Agent->>Mgmt: Publish validated report
        Mgmt->>Fabric: Update complete PBIR definition
        Fabric-->>Mgmt: Publishing result
    end

    Mgmt-->>Agent: Publishing results
    Agent-->>User: Generate final markdown audit report
Going Through the Workflow in VS Code #
We use a local folder as the working copy. Do not publish changes until the audit findings and the updated reports have both been reviewed.
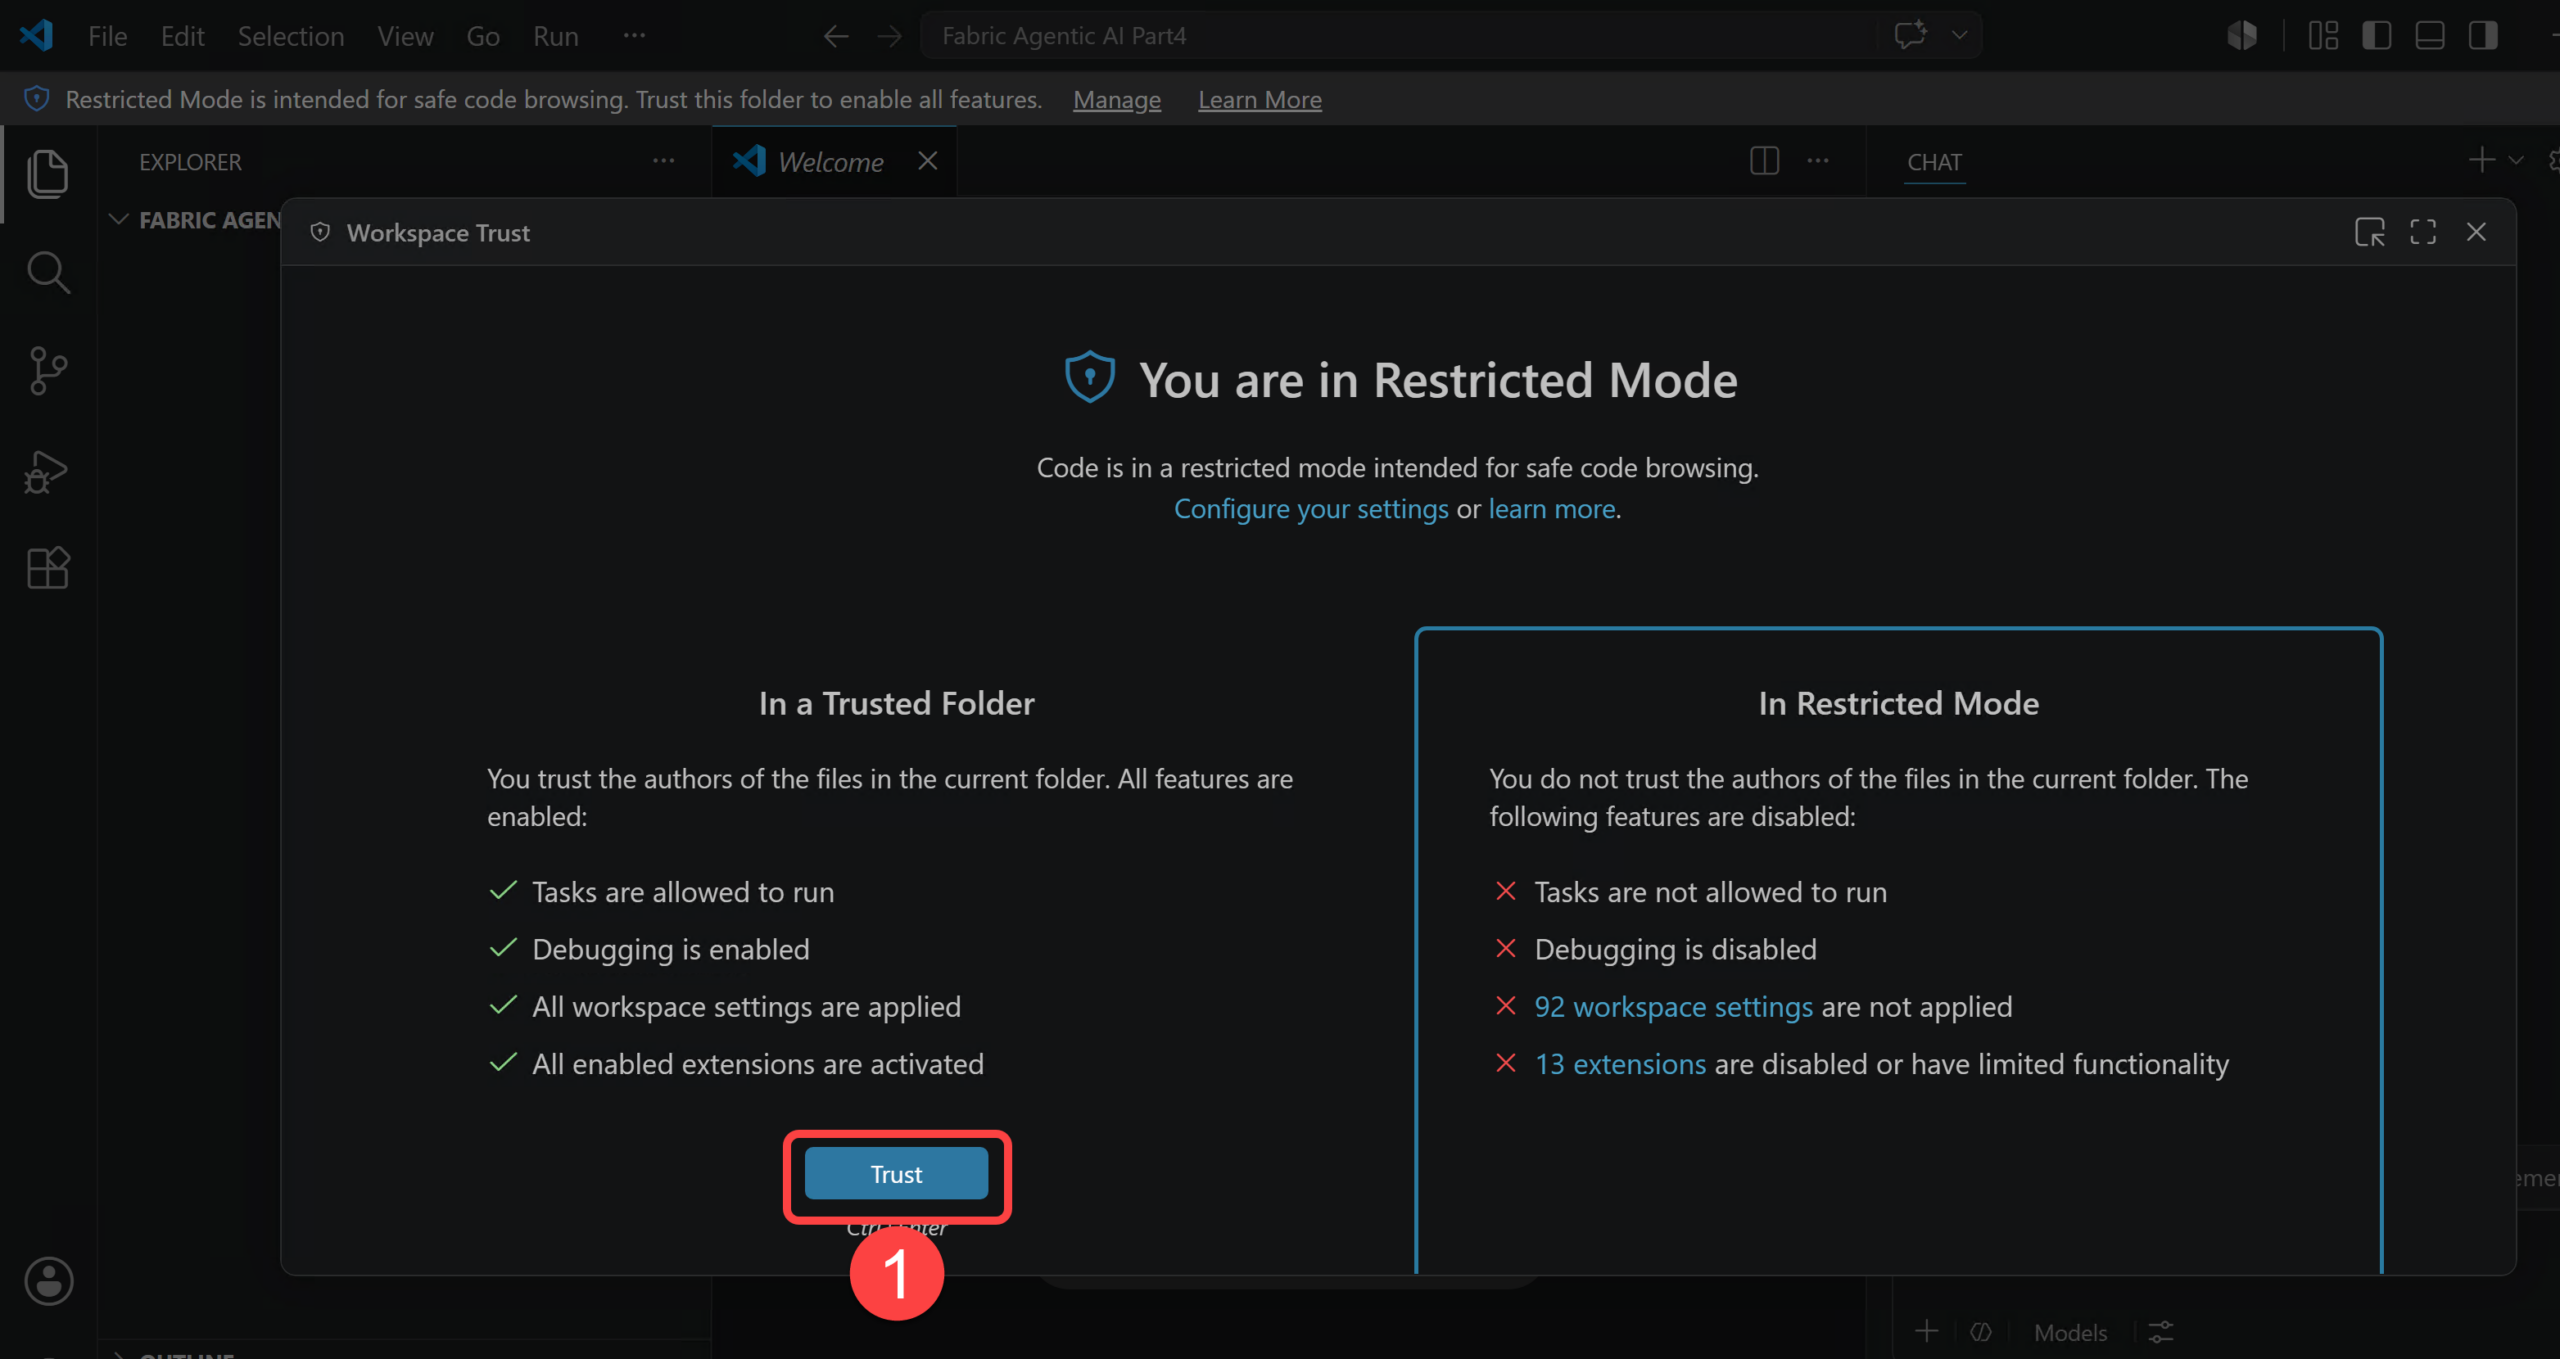
- Open the local Fabric project folder in VS Code and trust its content.
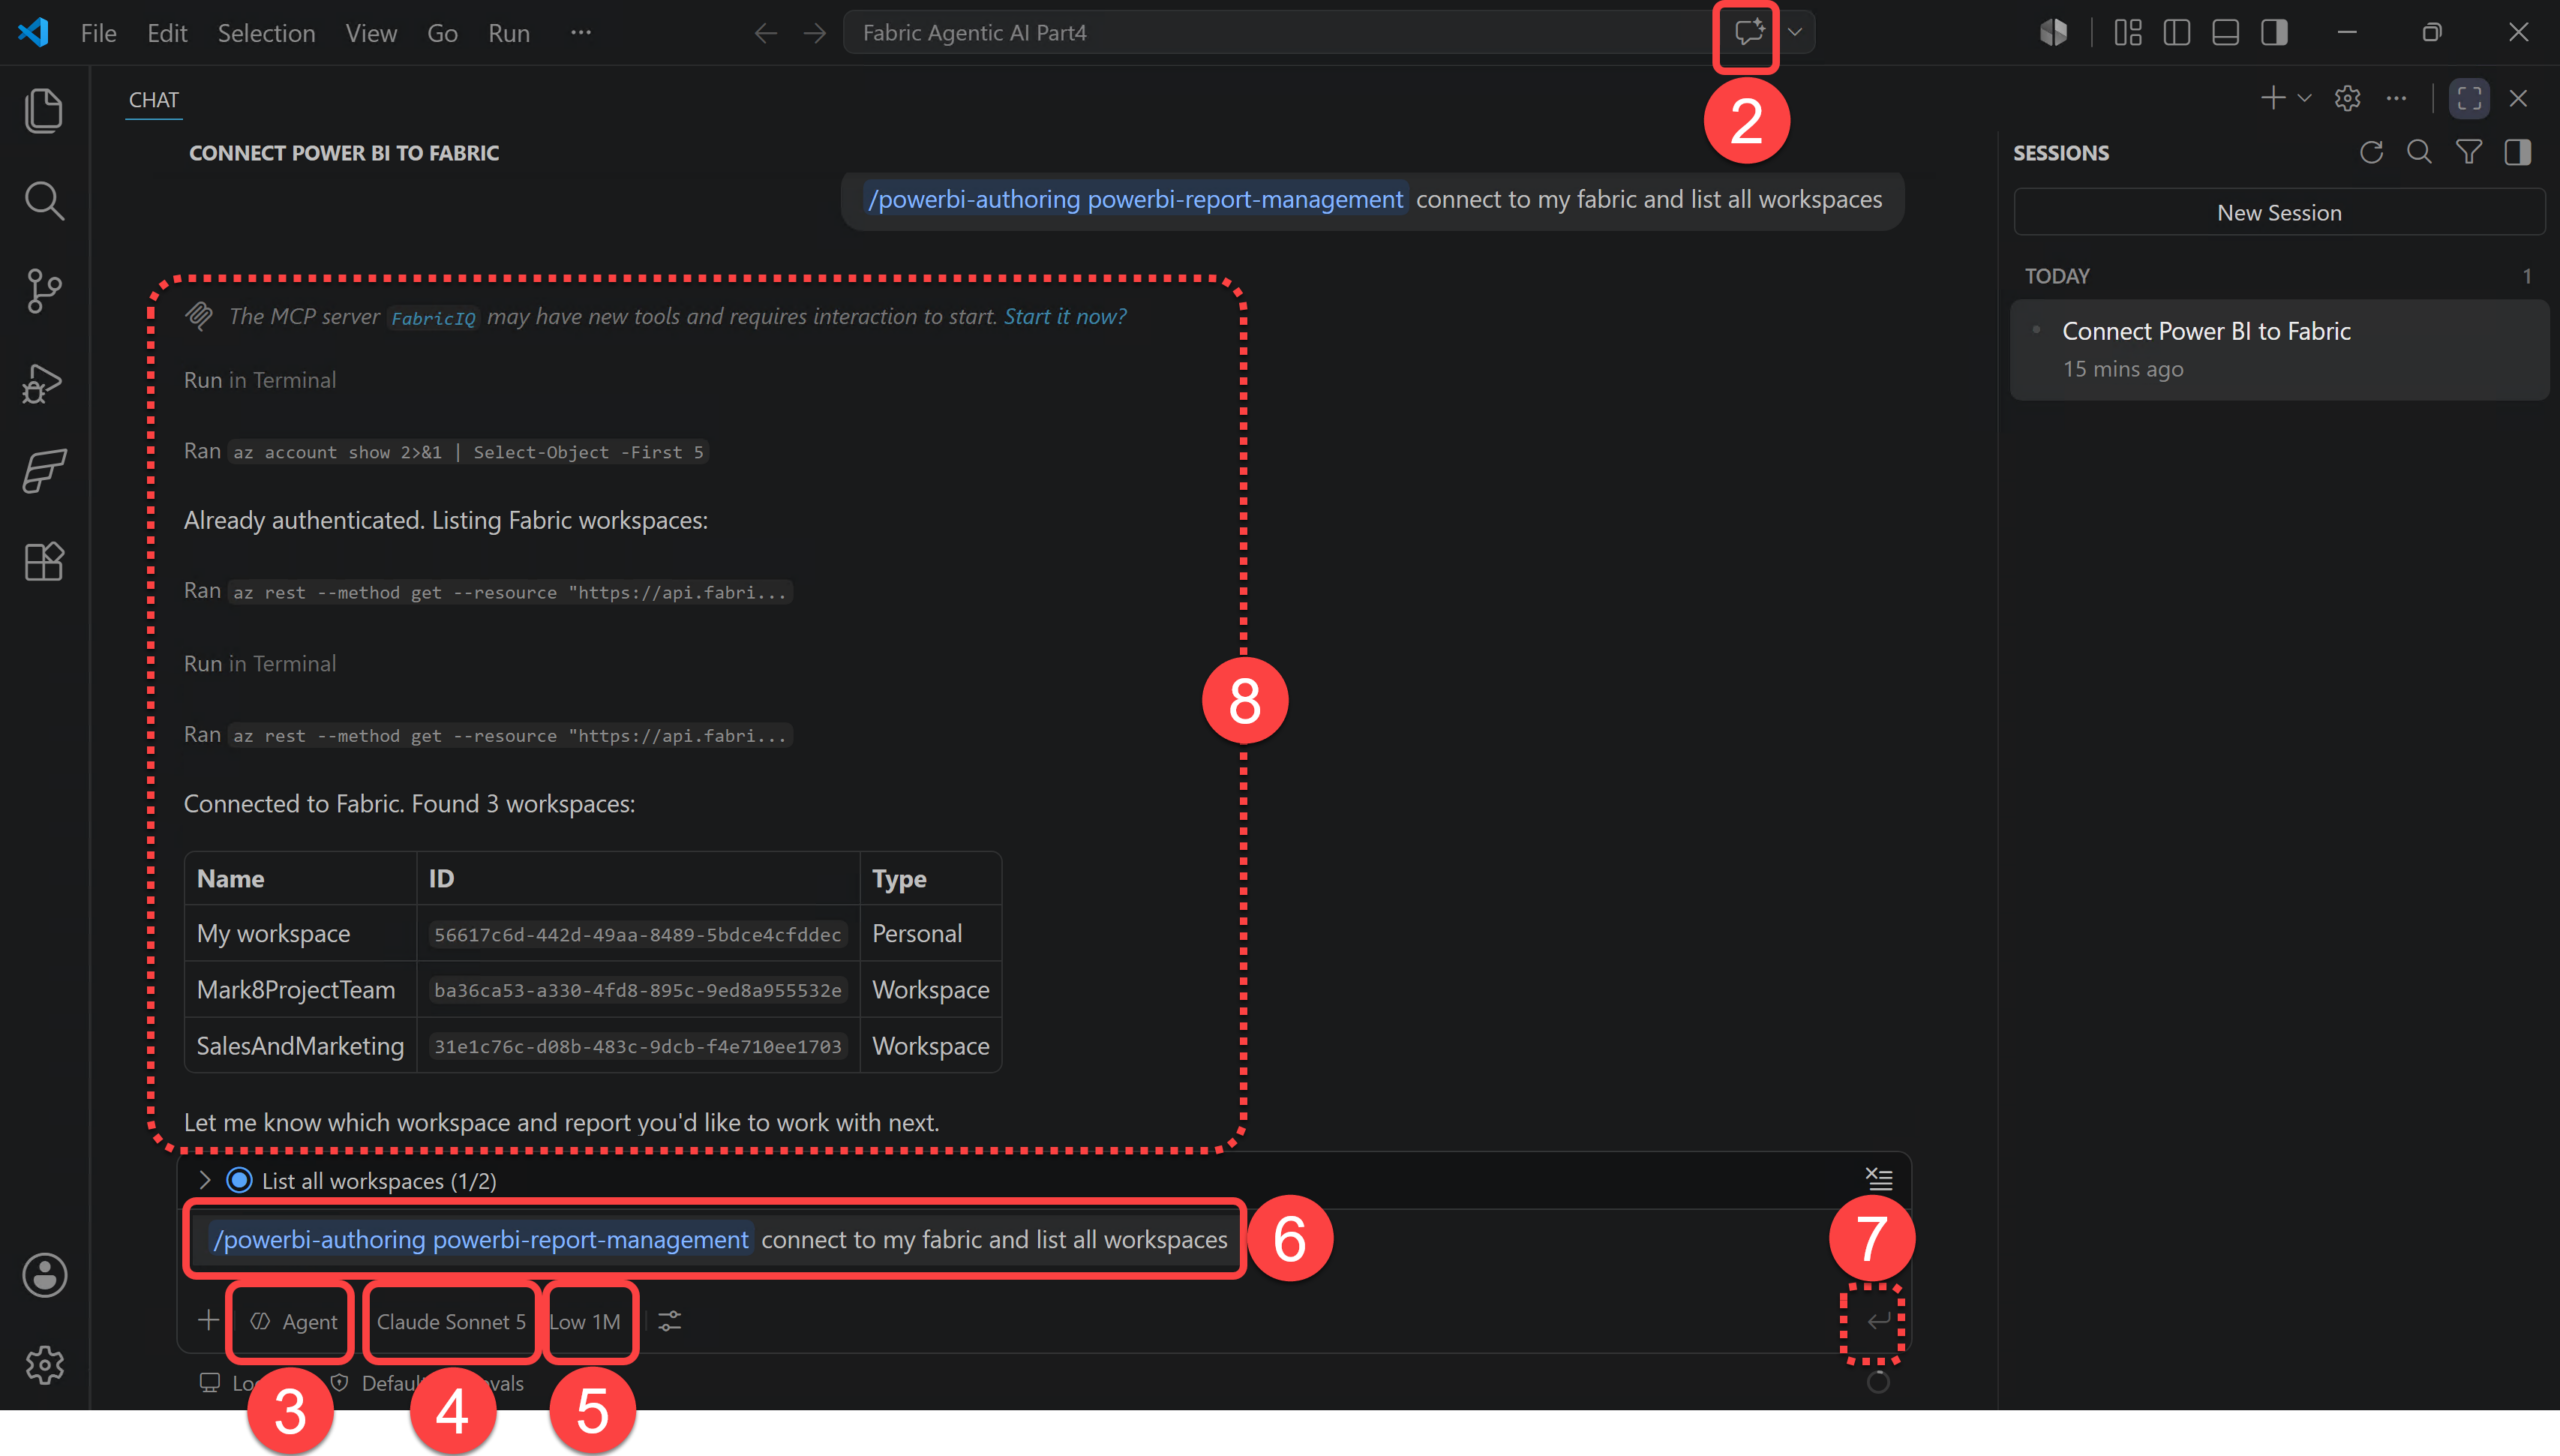
- Open the GitHub Copilot chat.
- Ensure the agent picker is set to “Agent”.
- Select “Claude Sonnet 5” as the model.
- Select “Low” effort.
- Type in the following prompt in the chat:
/powerbi-authoring powerbi-report-management connect to my fabric and list all workspaces
- Press enter.
- The following image shows what I get on my side, you should see something similar.
- Run the following prompt and observe the results:
exclude personal workspaces and create a folder per workspaces in the #codebase
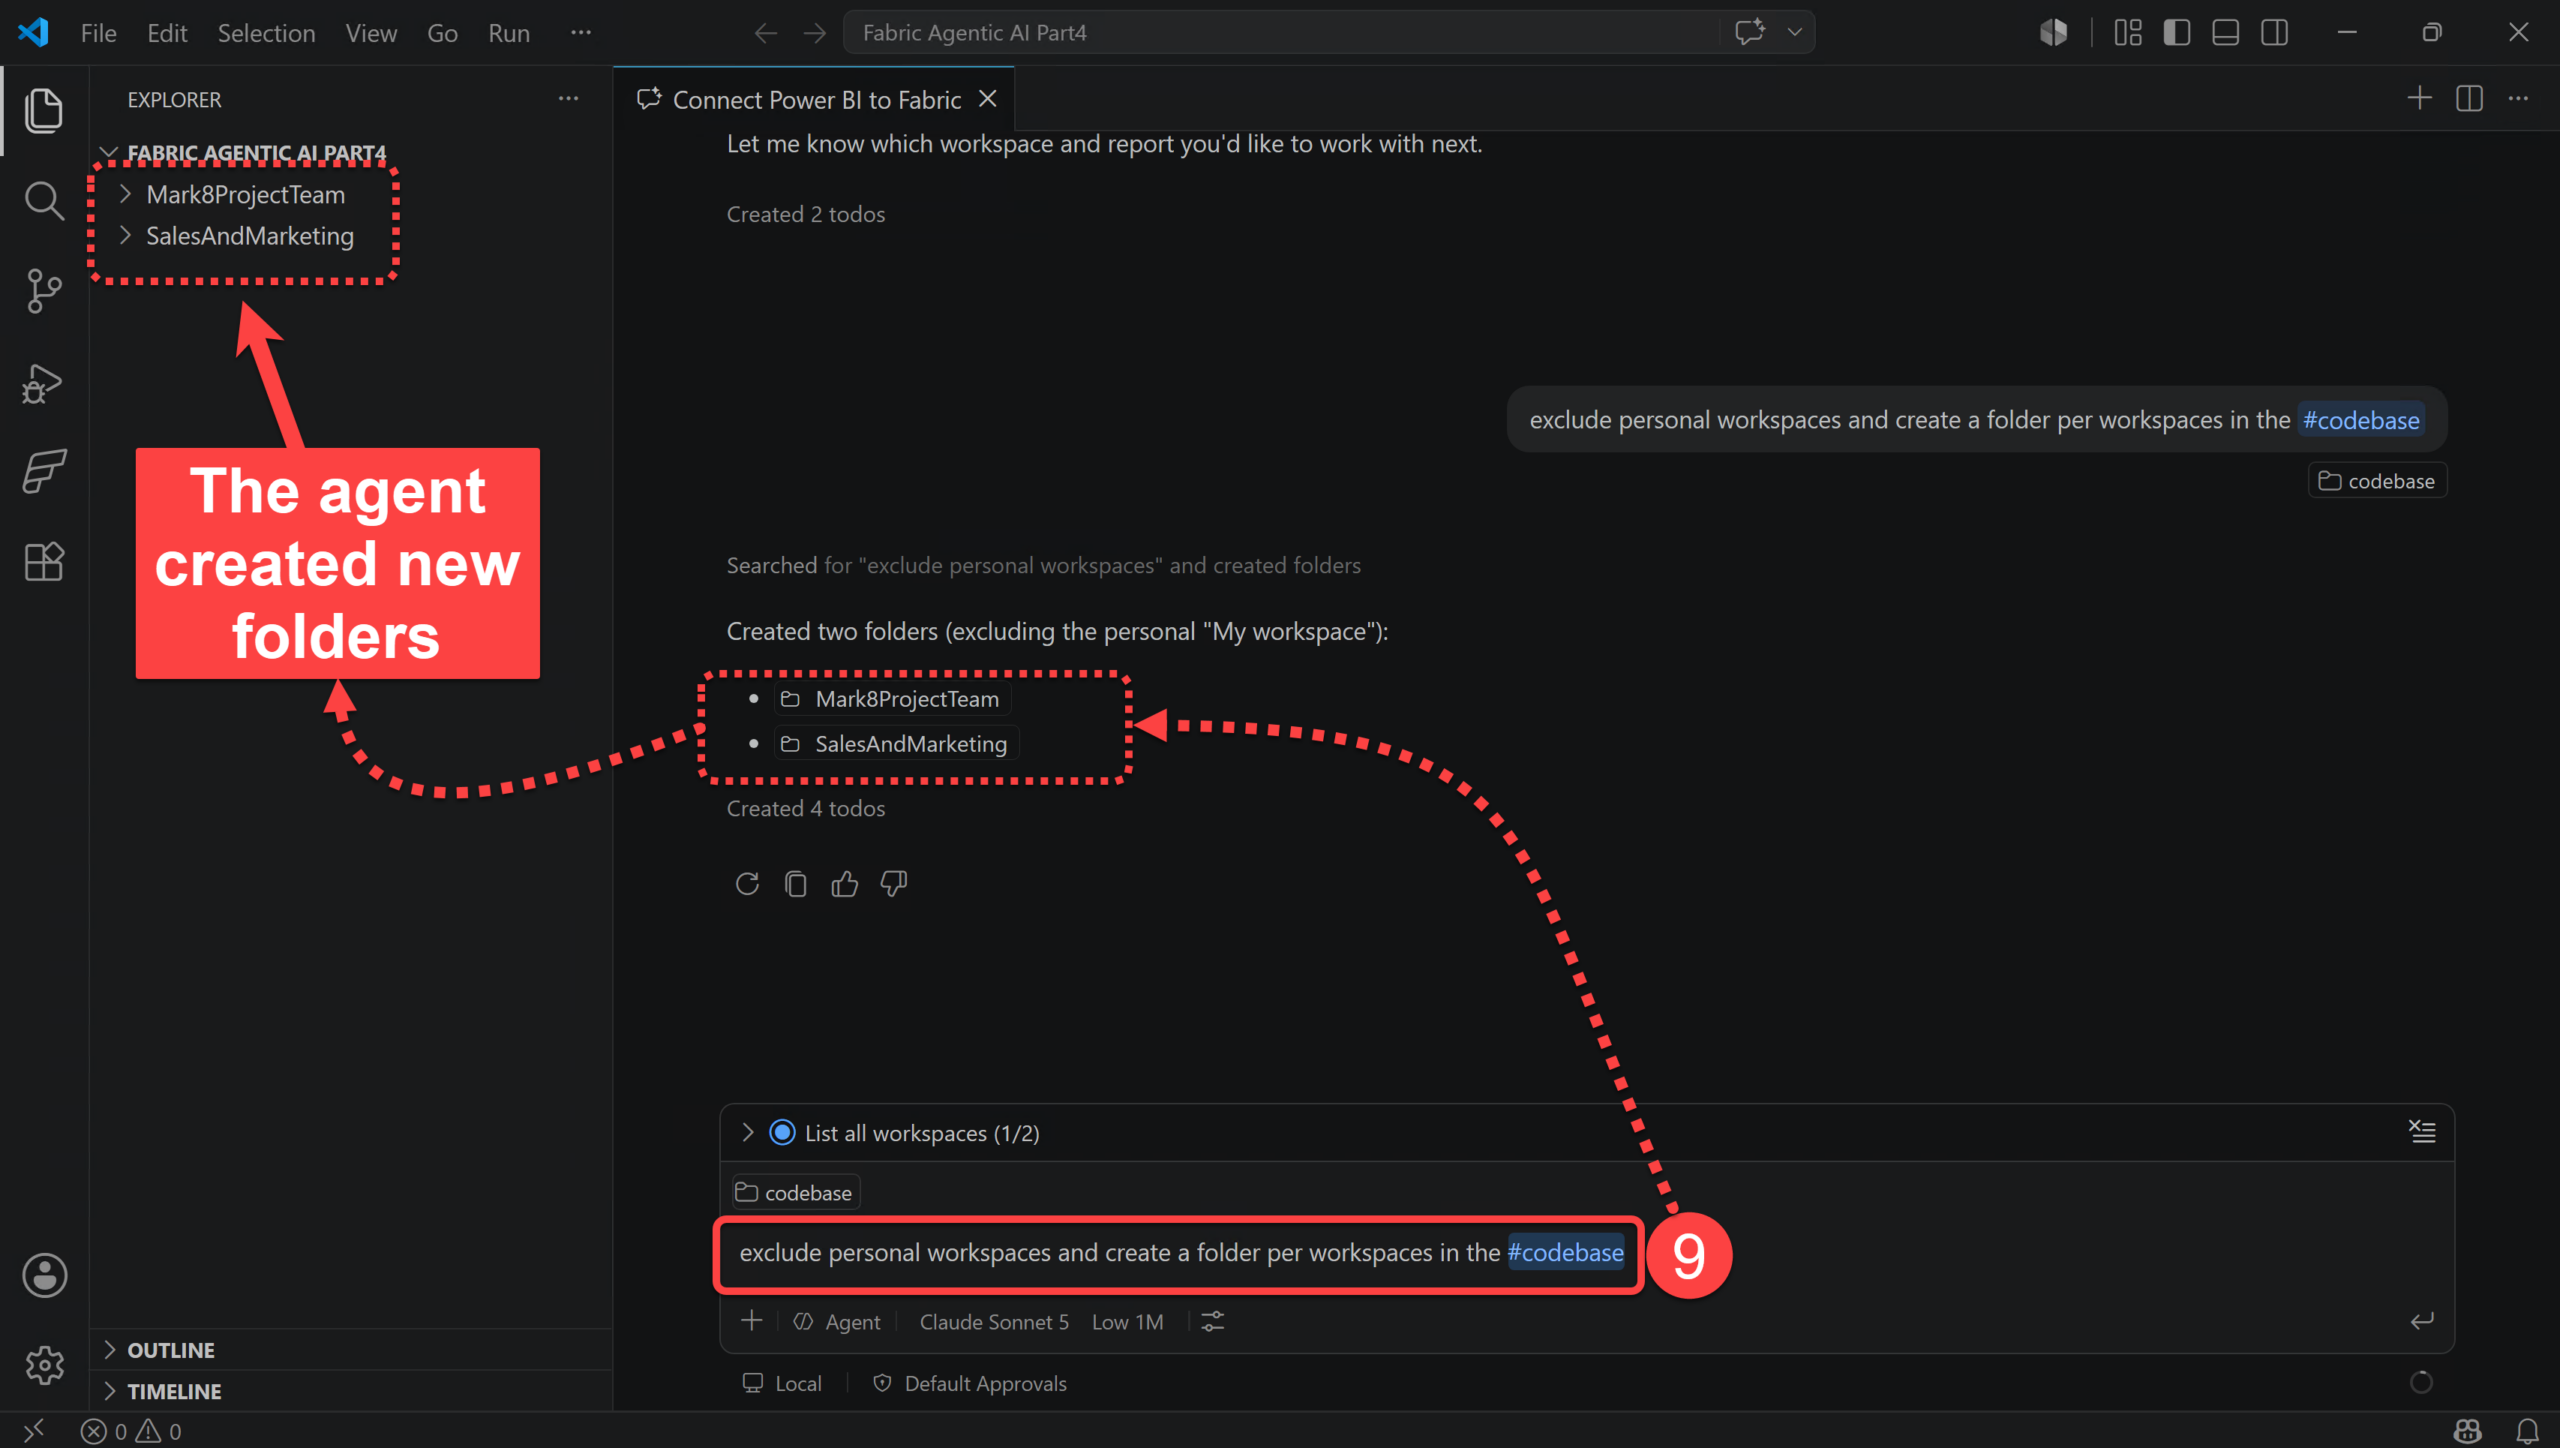
- Run the following prompt and observe the outcomes:
/powerbi-authoring powerbi-report-management download the reports from the "Mark8ProjectTeam" workspace into the relevant folder in the #codebase
- Click the Allow button (or change the Default Approvals to Autopilot to skip the future questions)
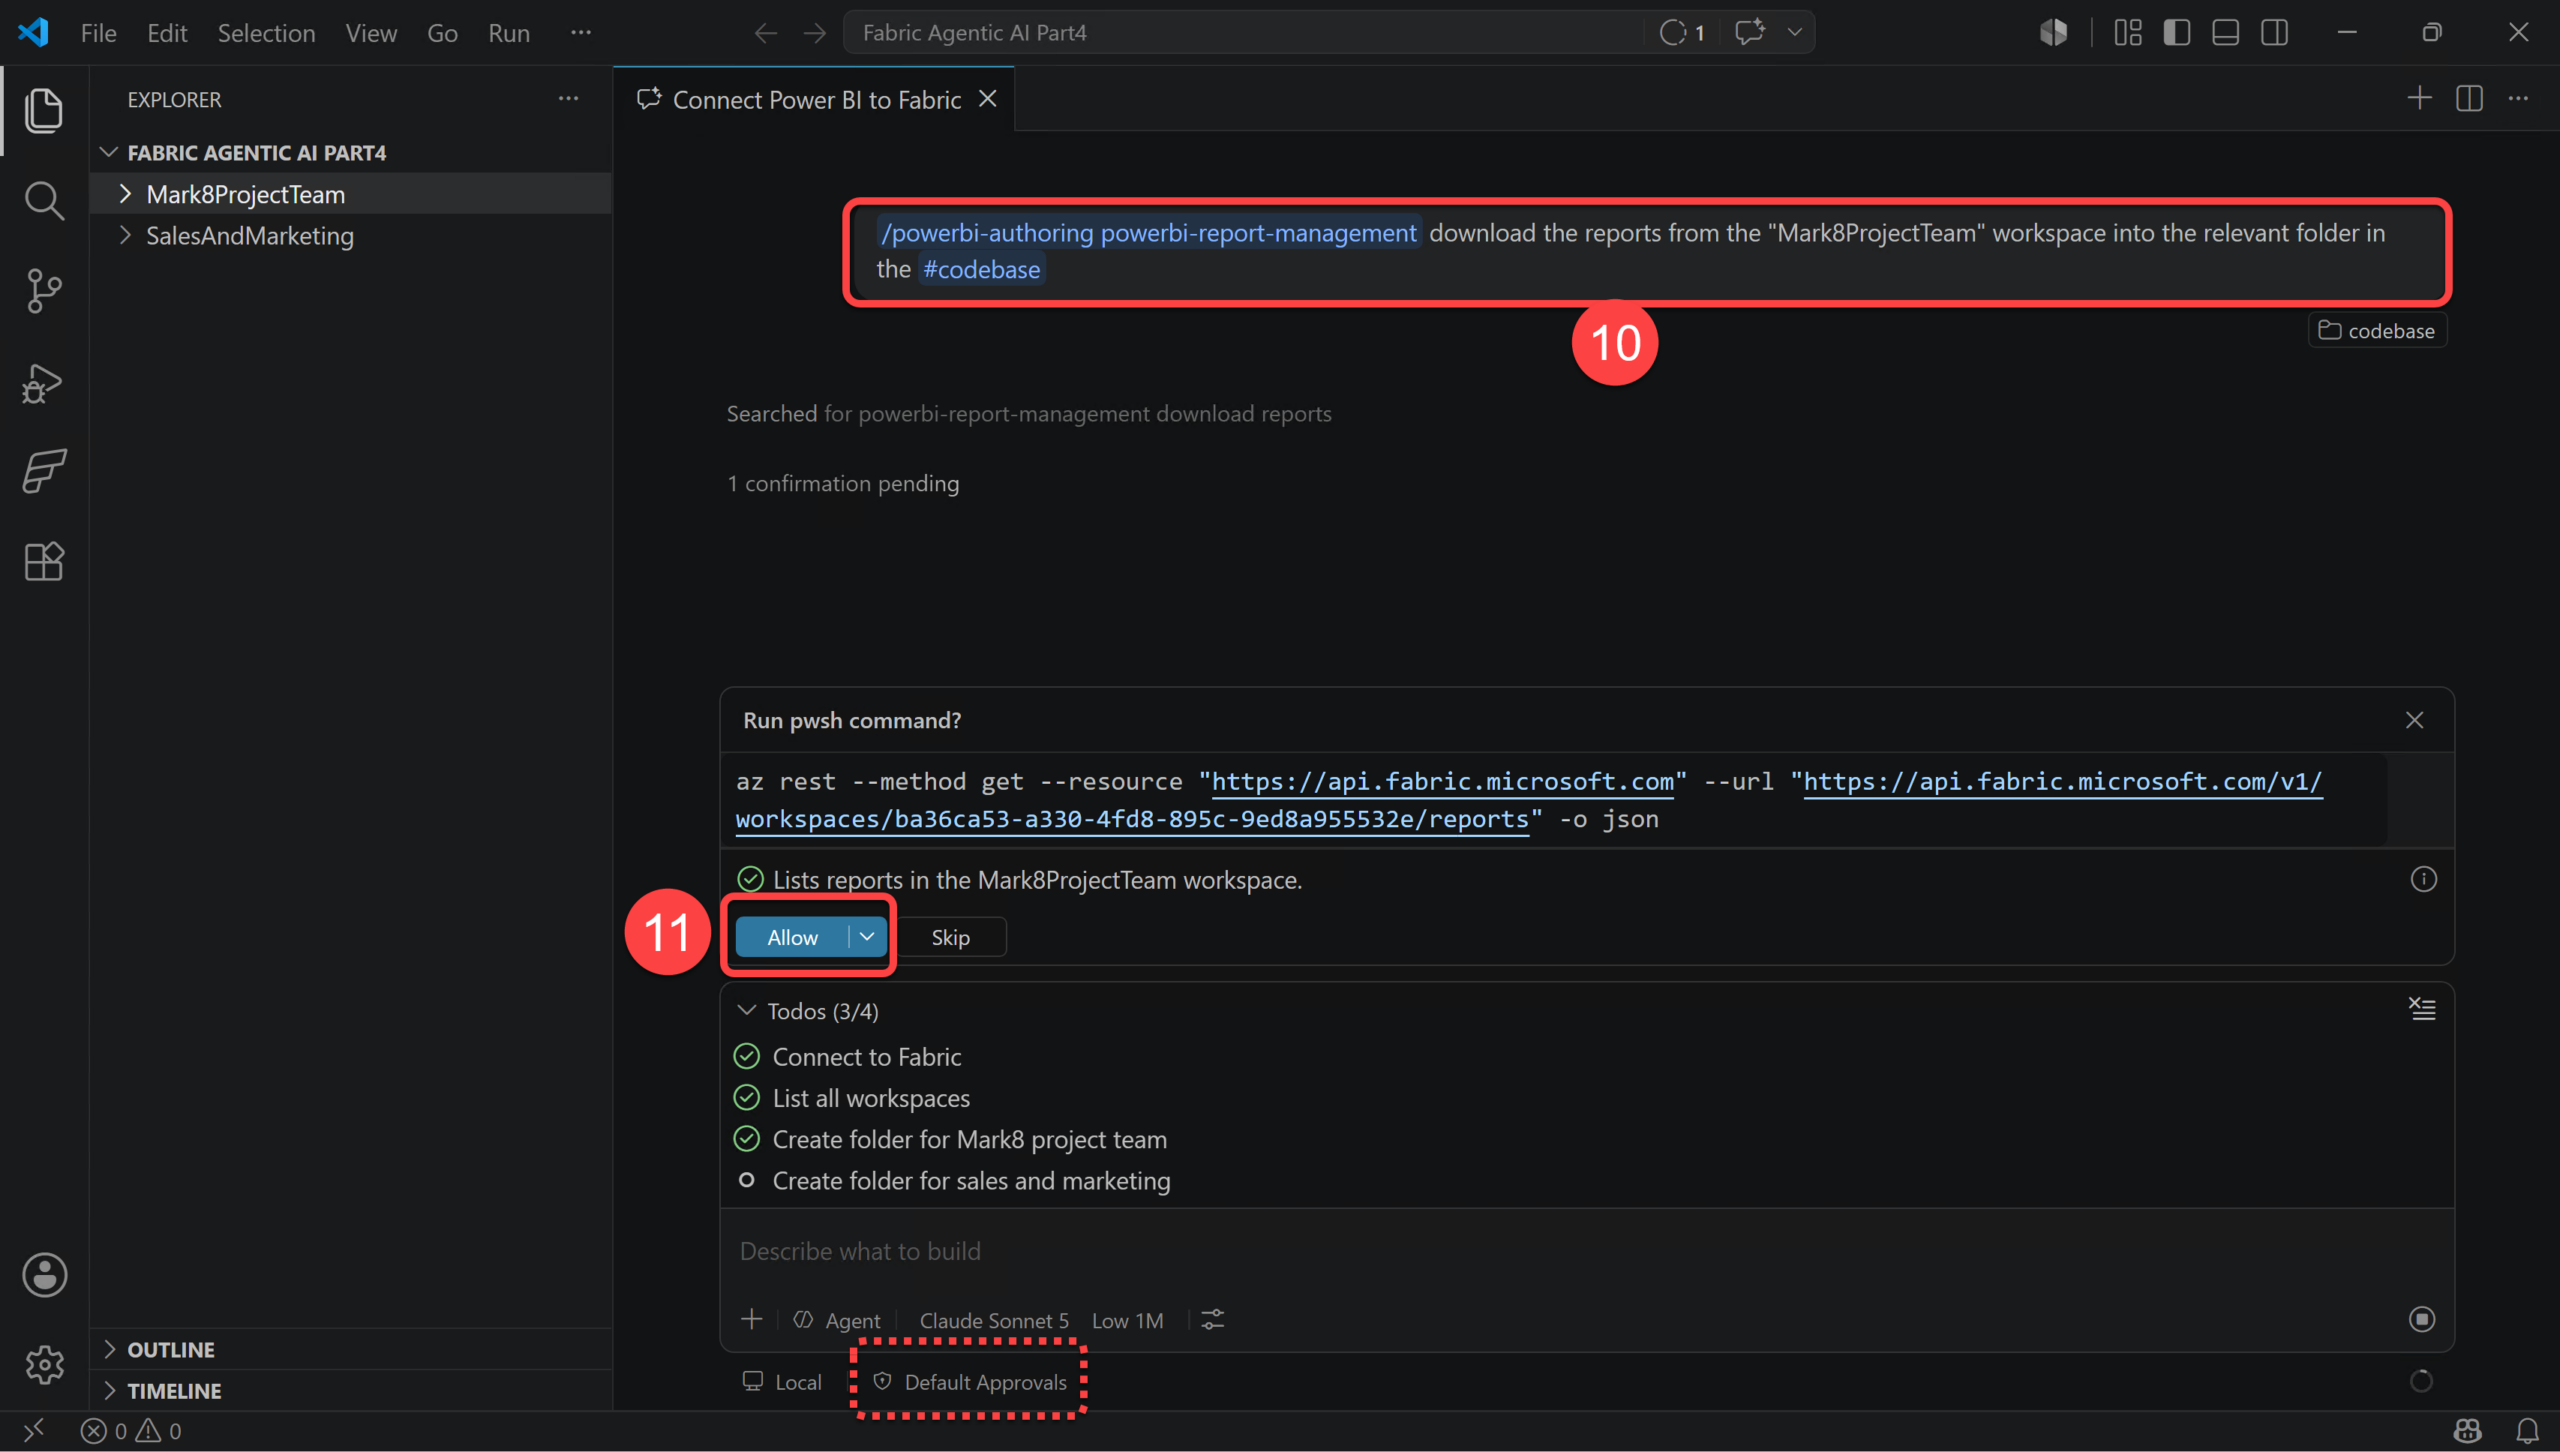
Here is where, in my case, things got a bit ugly. As you see in the following image, the agent came back with a sad news that the reports are indeed in legacy format and could not be downloaded as PBIR files.
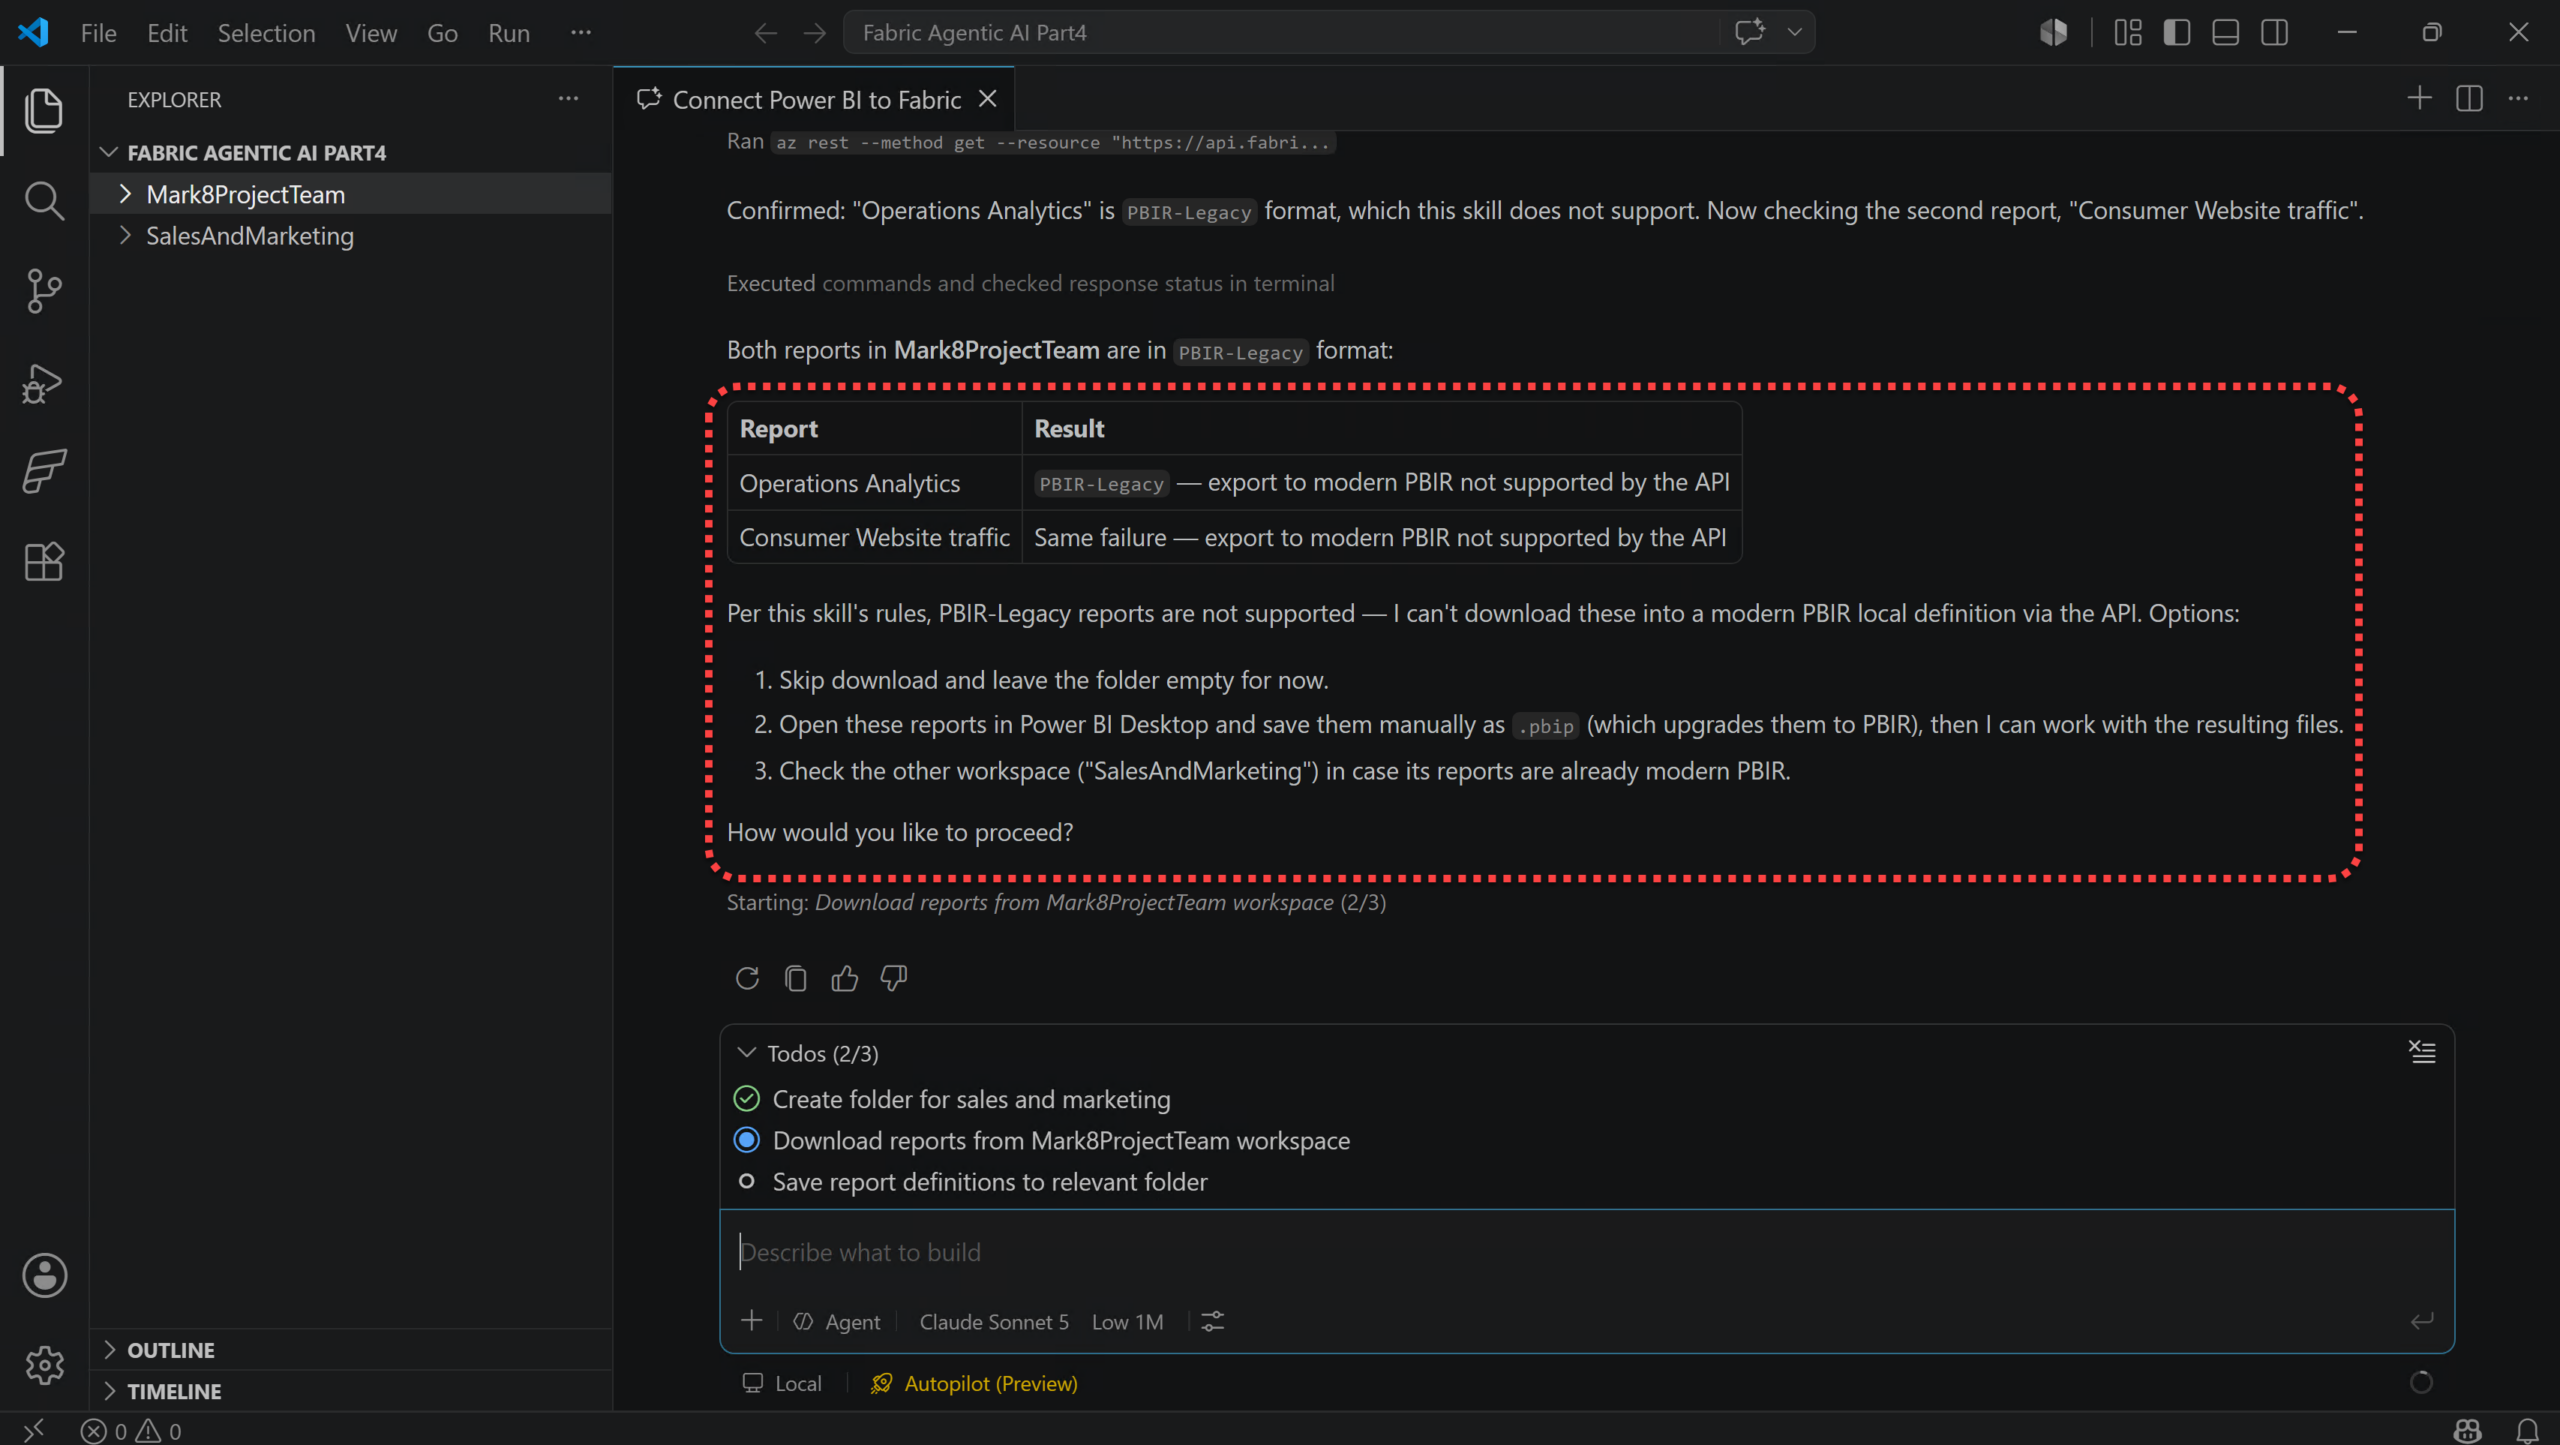
Well, I am not gonna give up, right? Sure!
So I tried the Microsoft Fabric extension for VS Code to clone one of the reports from Fabric to my local folder, and guess what? It simply downloaded the report in PBIR format. 👀
So I have elevated the model effort from Low to High and ran the same prompt, but no success with that either. Then I tried a different prompt, this time, I removed the /powerbi-authoring powerbi-report-management part which explicitly calls the skill from the prompt. No success again, which does not surprise me as I ran the prompt in the very same session meaning the model context is now aware of what I am requesting and it summons the skill automatically. You might think, it would do the same on a fresh new session. But I am not so sure about that, here is why: I have changed the model the latest and greatest GPT model, the GPT-5.6 Terra, and passes the download the reports from the "Mark8ProjectTeam" workspace into the relevant folder in the #codebase prompt, without the /powerbi-report-management skill. It went through some loops and got the same results of “PBIR incompatibility”, but it did not stop there. The model automatically tried a different method, and this time it worked and successfully downloaded my two reports, both of them, into separate folders on my local drive.
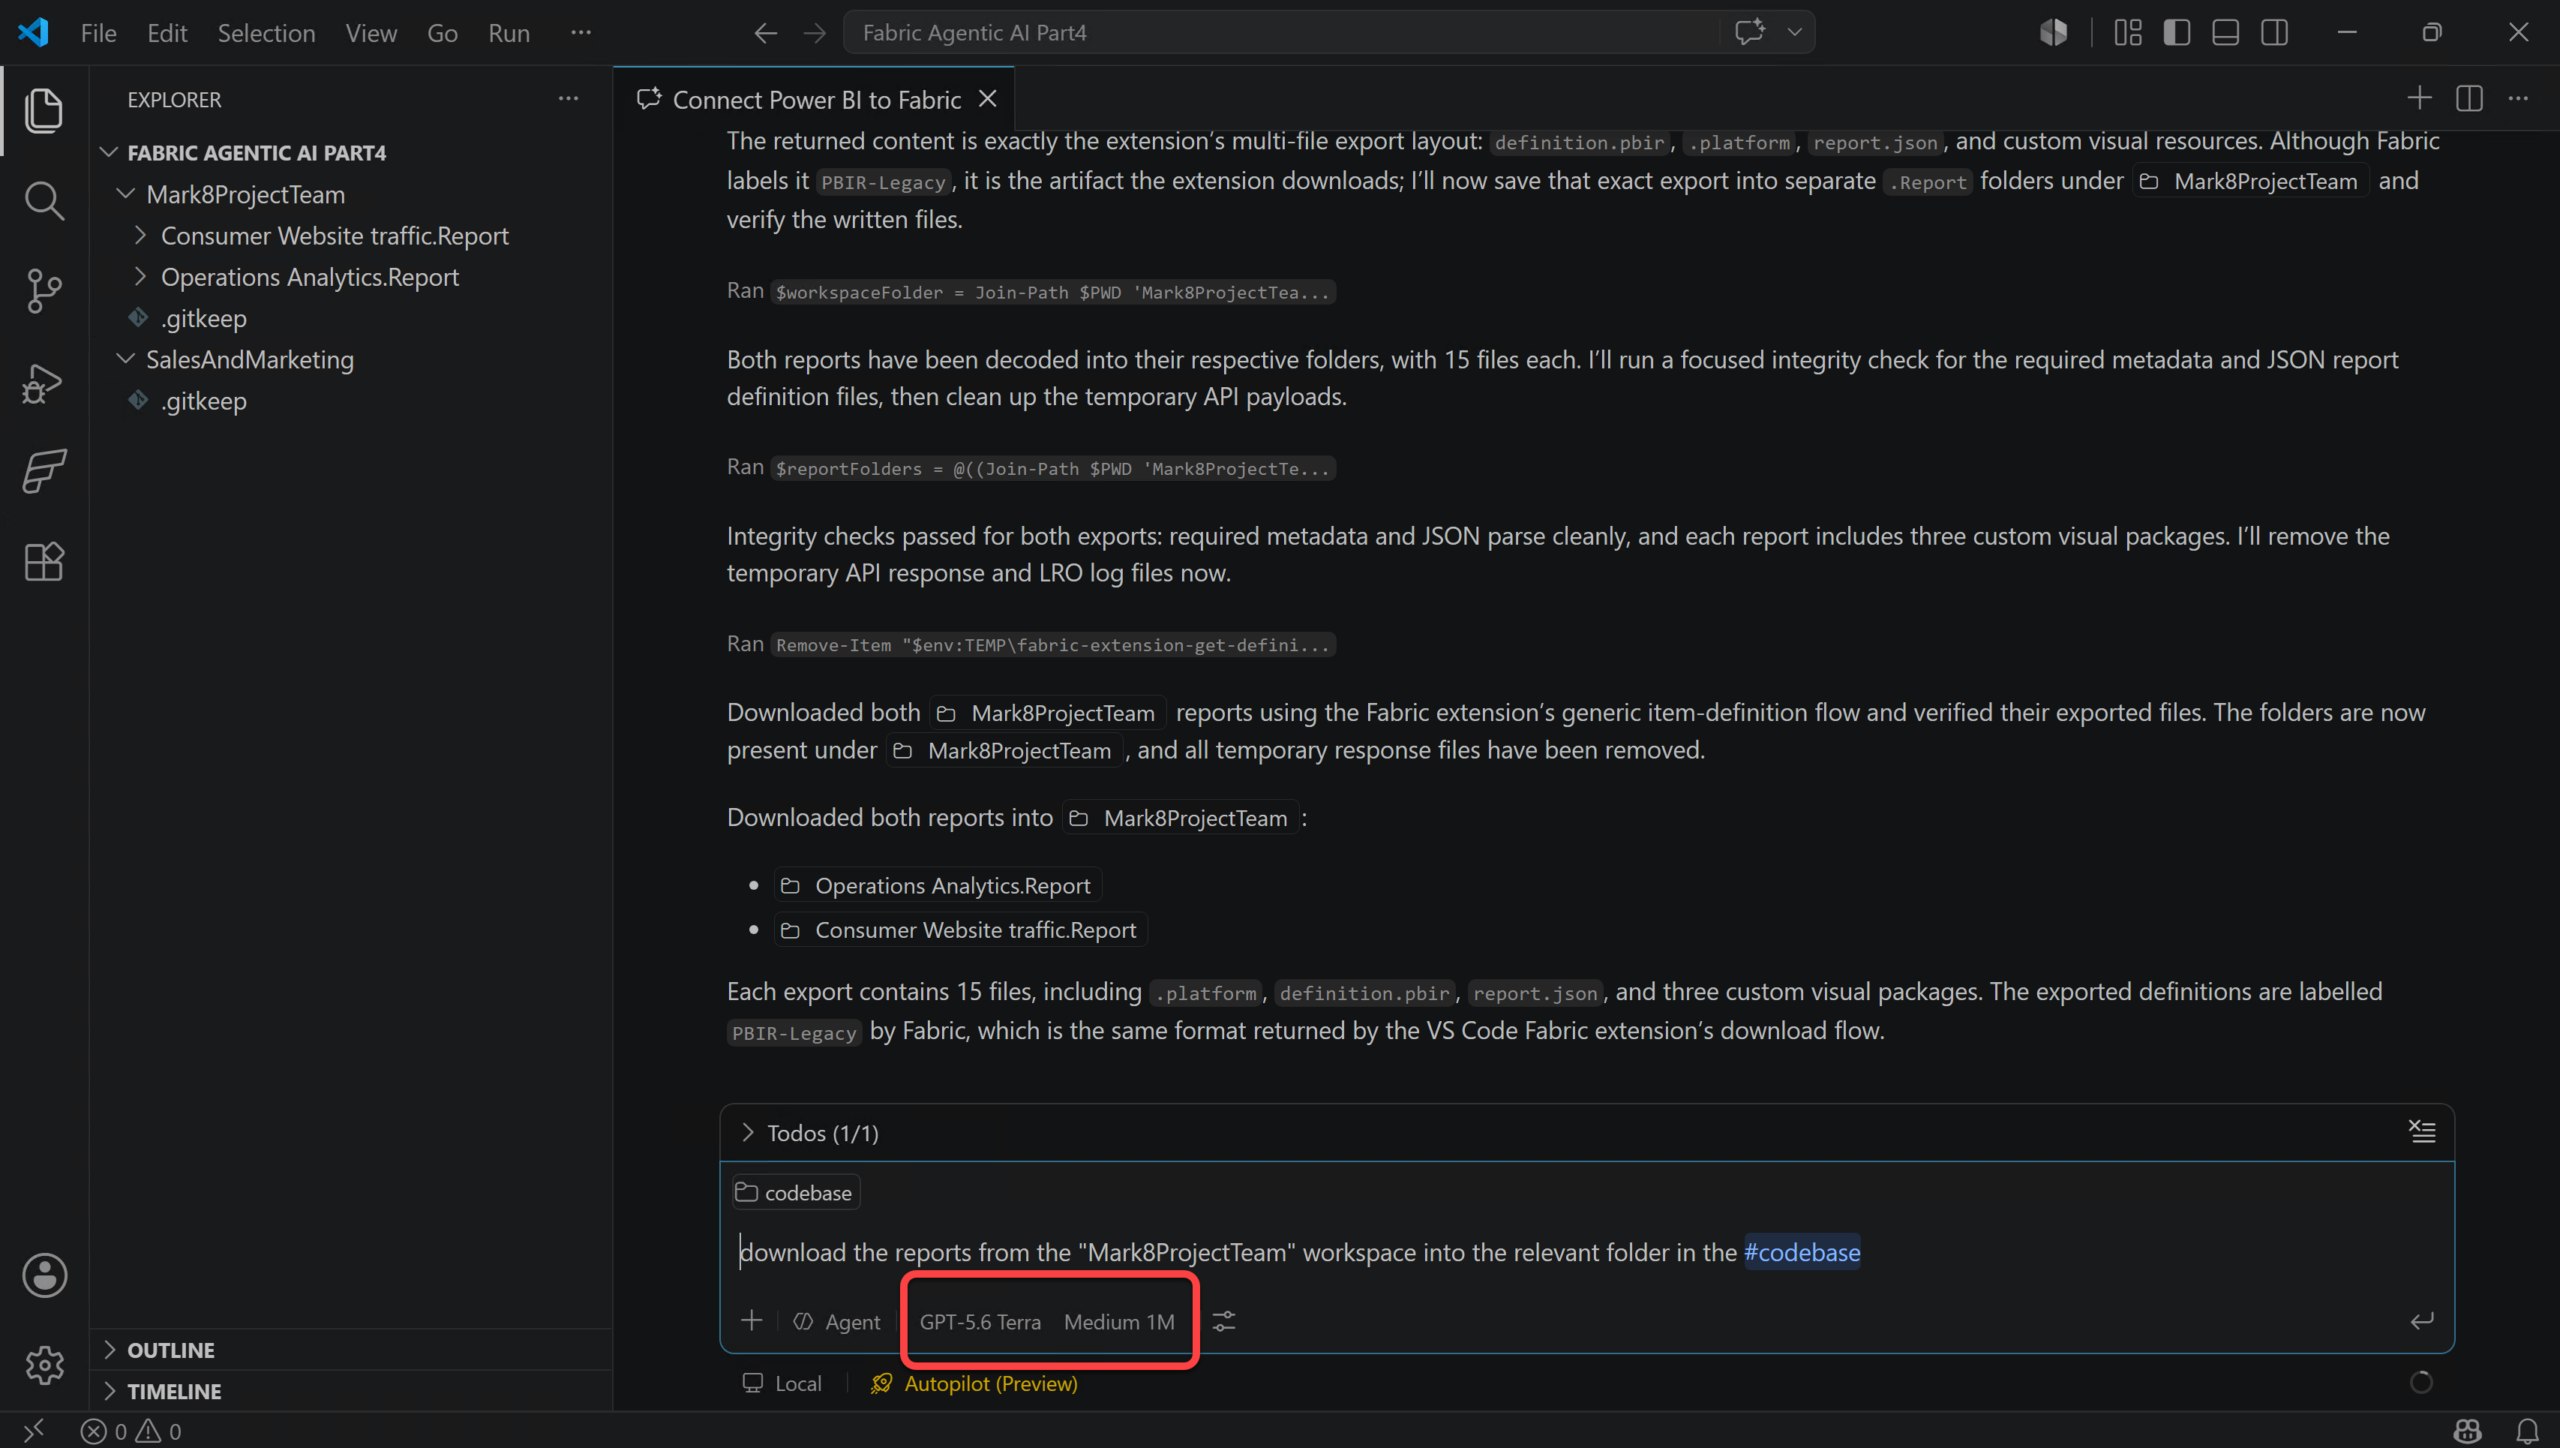
So, how did GPT 5.6 Terra do that? I did a little bit of digging and I found out that the difference is that the /powerbi-report-management skill explicitly enforces the getDefinition?format=PBIR on the API call POST /v1/workspaces/{workspaceId}/reports/{reportId}/getDefinition?format=PBIR while the in second attempt, GPT5.6 Terra did not. It called the POST /v1/workspaces/{workspaceId}/items/{reportId}/getDefinition.This alignes with how and Microsoft Fabric extension in VS code also worked. So, I have asked GPT5.6 Terra to document this as a fallback method for our agentic workflow to support the legacy reports instead of simply skipping them. In real-world scenarios, there will be situations that the report is not downloadable, such as when the report is labeled as highly sensitive and encrypted using Purview Sensitivity Labels which our agentic workflow must record them as well.
Note
The
#codebasereference is a Copilot Chat variable that grounds the prompt in our currently open workspace, letting the agent scan and reason over our local project files and folder structure rather than working blind. Here, I used it to point the agent at the relevant local folder to save the downloaded reports into.
We can now copy the organisation’s approved Power BI theme JSON file into a folder in our codebase. In my case, I created a pbi-theme folder and copied my biinsight.json theme into it. We can then use the /powerbi-report-authoring skill to apply #codebase/pbi-theme/biinsight.json to a downloaded report. The skill reads the PBIR files, registers the theme, checks for formatting that prevents the theme from being inherited, validates the changed definition, and lets us open the report in Power BI Desktop for a visual check.
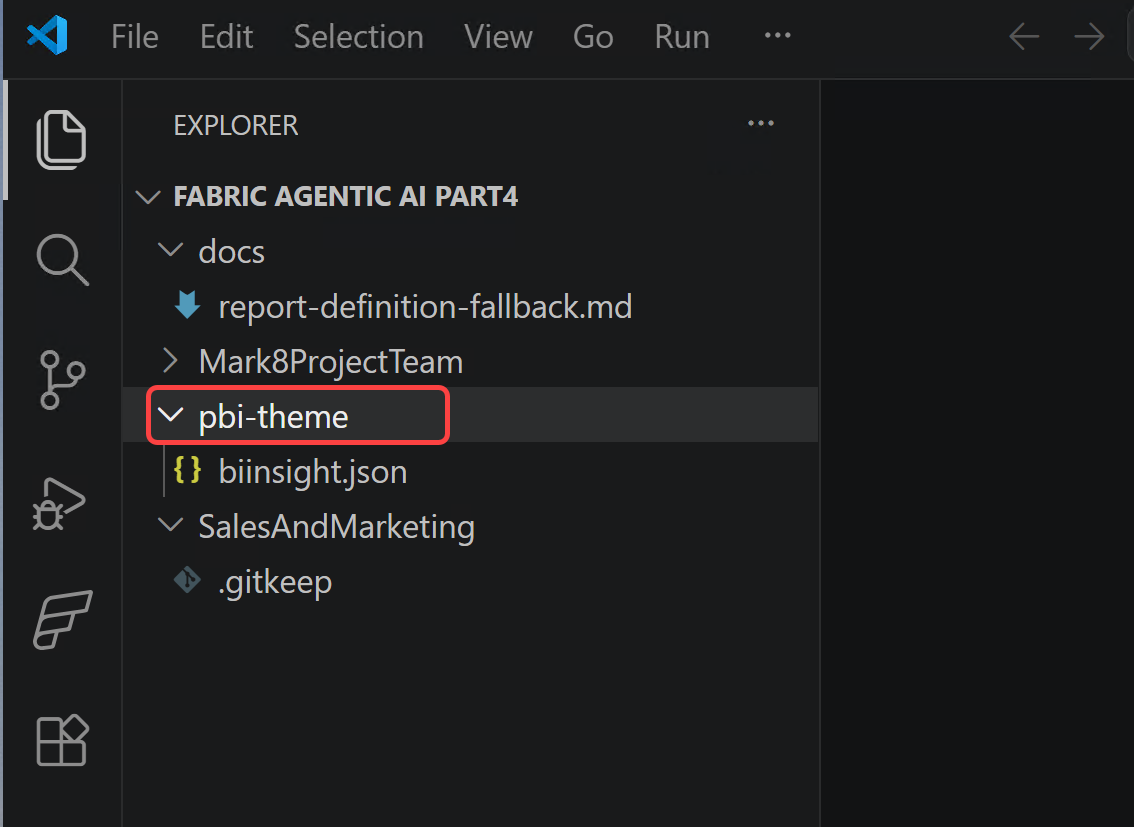
We could do this manually with a prompt like this:
/powerbi-report-authoring apply #codebase/pbi-theme/biinsight.json to the reports in #codebase/reports.
Do not publish anything. Validate every changed PBIR definition and give me a summary of the theme and formatting changes.
This works, but it is not truly the agentic workflow I described earlier. We would still need to go through each stage, type repeated prompts, decide how to handle legacy reports, ask for an audit log, and make sure nothing is published before review. It is very easy for one of these steps to be missed when we do it this way. So the next meaningful step is to create a custom agent.
Conclusion #
Well, this was quite a journey. We started by looking at the individual Power BI report skills, then connected to a real Fabric tenant, listed the workspaces and reports, downloaded the report definitions, and applied the approved theme locally. Things became a bit more interesting when the legacy reports did not support the normal PBIR download method, but at least we found a fallback that actually worked.
So the skills are doing their job, and I am quite happy with that. But there is still a problem. I had to use several prompts, remember which skill to call, handle the fallback, ask for a new audit log, validate the local changes, and make sure that nothing gets published by mistake. Doing this once is fine. Doing it again and again across more workspaces? Well, that is where we can easily miss a step.
This is exactly what I want to fix in Part 5. I will take the same workflow and put the repeated instructions, the approved theme, the fallback method, the audit requirements, and the publish guardrail into a reusable custom agent. The idea is not to make the human disappear from the process. The idea is to make the process easier to repeat without relying on my memory every single time.
If you found this useful, you can follow me on LinkedIn, subscribe to BI Insight on YouTube, or follow the BI Insight podcast on Spotify. I also share updates on Bluesky and X, covering Power BI, Microsoft Fabric, AI, and the real-world data and analytics problems I come across along the way.
Discover more from BI Insight
Subscribe to get the latest posts sent to your email.
